
I’m sure you’ve seen DIY sunburst mirrors all around the blogosphere recently, but because this is a hot trend (pun intended), I don’t think you’ll mind if I share another one. Last fall, I hot glued bamboo kitchen skewers to the back of a bevel edged mirror. After spray painting it white and living with it in our master bedroom for the winter, I decided it wasn’t the right fit. You see, most of the accessories and furniture in our room are black, and the white didn’t stand out against the wall like I had hoped. And the skewers we a little too thin for my liking, at least in this case. I may hang it in the basement bedroom for some drama.
So, I started brainstorming a cheap or free way to make an awesome, chunkier sunburst mirror. Then, while planning a paint chip project, it figuratively hit me. Paint sticks! They’re free and chunky. I snagged 27 from Wal-Mart thinking I would have plenty. Then, I chose a 12 inch diameter beveled mirror from Hobby Lobby (in the candle section). Candles were 50% off, so my mirror cost $3.00.
I went home ready to get my sun bursting on. I started by marking the mirror in quarters, using a Sharpie. Then, I placed a stick on each mark and filling in. Then, I realized I wouldn’t have enough for two tiers. Our weather took a turn for the worse, so I waited to get more sticks. While waiting for the weather, Kate at Centsational Girl posted about her DIY paint stick mirror. Apparently, great minds think alike. Though our plans of attack were slightly different, I knew the results would be stunning, too.
Finally, our weather cleared up and I packed the kids to go to Home Depot. I avoid Wal-Mart like the plague. Immediately, I knew the Wal-Mart sticks were thinner and had rounded corners, so I had to make a few changes.

Turns out 80 grit sand paper rounds corners of paint sticks really quickly.
Now that I had all of my supplies, I got started.

I applied a coat of black paint to the front and sides of each stick. For my first tier, I knew I had to cut the sticks so the curved edge didn’t show, so I didn’t bother painting that far.

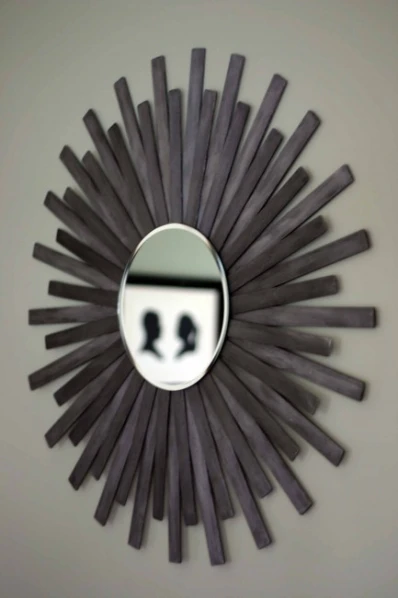
After the black paint dried, I applied a coat of metallic silver paint. The silver is semi transparent, so the black still showed through making a really great metallic charcoal grey. See the difference?

So, after a few hours of painting, letting it dry, painting again, and letting it dry, I warmed up my glue gun. Before I could start gluing, I had to cut the sticks. With a baby and toddler in tow, it wasn’t an option to use a saw. I opted for a wire cutter.

I just squeezed hard twice on each side and then snapped it off. Worked great, but not a super clean edge. I measured 8 inches long on a sample stick and marked the back of each stick for a reference to keep the same length.

I tried to place each stick as evenly as possible. A few lines of hot glue held each stick firmly in place. After finishing the first tier, I flipped it for a quick look. I’m a likin’.

On to the next round. I was able to keep half of the sticks the full length by alternating non cut and cut. This round is 10 inches long with the curved edges hidden behind the first round. Yay for not needing to trim everything down.

With the sticks in place, I glued a picture hook to the back of the mirror with Liquid Nails. 48 hours of dry time later, I hung the mirror on our wall.
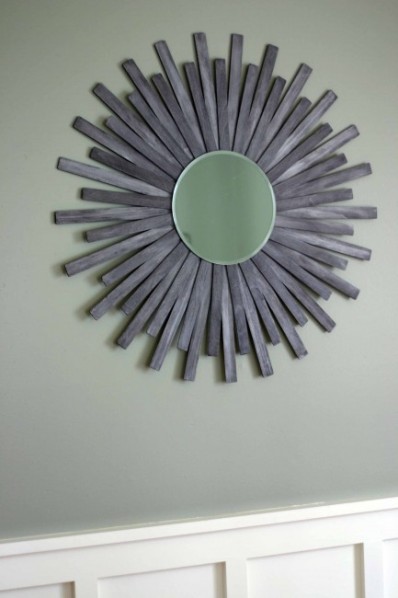
The grey contrasts beautifully against the grey/green walls.
The metallic sheen also changes with the lighting. The wall against the bench is now nicely filled with the sun burst mirror.
How about a little budget breakdown?
50 paint sticks: Free
Paint: Already owned
Glue gun and sticks: Already owned
Picture hook: Already owned (are you noticing a trend?)
Mirror: Originally $5.99, but 50% off to $3.00
Total: $3.00
Have you jumped on the sun burst band wagon? Did you go the store-bought or DIY route? Which store version do you have your eye on? Maybe you have a favorite tutorial? If you’ve made a mirror, we’d love to see yours on our Facebook page.
We’re still looking for questions for our blog anniversary. If there’s something you want to know, just ask.
P.S. We’ve had another request to size down our photos. What do you think of this change? Too large, too small? We need your opinions so we can make the best changes.

LOVE this! so doing this one! thanks!
You know, I actually like your better than Centsational Girl’s… hers is pretty awesome too, but I really like the black!
I’m a new reader, so I’m not sure how big your pictures got before, but I think these are a good size! I’m a pretty big fan of large pictures on blogs though…
Great work on the sunburst!
I would definitely prefer the photos a little smaller. Maybe its because I use RSS or because I’m on a laptop but I almost always have to scroll side to side to see the whole picture. Even when I visit the blog directly, any portrait oriented pictures are too long for my screen.
Thanks, everyone! The project is pretty easy, just a bit of a pain to paint everything. If you give it a try, we’d love to see what you do.
Abby, So the landscape oriented pics are okay? Are the portrait oriented still too big? Thanks for your help!
your pictures still don’t load for me. I would love to see, it just takes forever and I end up closing out/not reading
Hi NancyO,
Really? That’s a bummer. Even the pics toward the bottom don’t load? The landscape are still the same size as before, but I resized the portraits to fit the screen with out scrolling. Are you reading directly on the blog or Google Reader? I really appreciate your help and I’ll try to find a solution.
Thanks!
Amanda
I use RSS too, and the pics do come across really large. The smaller pics in this post are just about right.
Thanks, Hillary for your feedback. So the 3 and 4 pics from the bottom are okay, but still a little large?
I like yours better than CG’s too!
And I am a fan of large photos….I like detail 🙂
Great job on the mirror!
I do like the large photos but it sometimes takes a while to load. I have the same issue with Katie Bower’s blog, too.
Thanks for the info, Jane and Megan. Jane, what size are your blog photos?
I usually read in Google Reader and I can’t see the pics without scrolling side to side. Even when I click through to look directly on your blog the photos fill the whole screen so I can’t always read the caption and see the photo at the same time. I’d prefer photos to be smaller. Just my opinion.
Cool project on making the mirror!
Looks great!
I’m also a fan of smaller pics since I have to scroll to view your pics in RSS feeder.
So funny you posted this because I just gathered all my supplies to do a sunburst mirror of my own. I love how yours turned out and the paint sticks are such a great (free!) solution.
PS I’ve never had any trouble viewing your photos. Yes they are large but never too big to load on my computer at least.
Thanks for your input, Heather and Hilary. I’m doing some testing to see if we can make everyone happy by having the pics load in the blog to show up on the screen, but keep the option to zoom to get a larger, detailed shot when clicked. Hopefully it works!! 🙂
Totally gorgeous!!! I love how you chose the charcoal gray finish, just lovely!!!! Bravo my friend, it looks so fab in your home, and your cutie’s bed head is also a similar sight around here, love it!
xo
Kate
Thanks, Kate! I love your mirror, too. Isn’t it awesome how cheap, but show stealing it is?! Oh yeah, bed head pretty much every day. Haha.
Thanks!
Amanda
Just found your blog and I love it! Your mirror looks amazing, and so creative! Who knew paint sticks could be so chic?
That`s a cute DIY mirror, love em;)
http://pudel-design.blogspot.com/
It’s beautiful! I’ve had this on my list of projects to do since seeing Kate’s, but haven’t gotten around to it yet.I’ll spare you the details of how long the list is.
I really like the finish that you chose.
Cute bed head!
LOVE LOVE LOVE! Turned out incredible and I can’t wait to make my own… just trying to figure out where to put another sunburst mirror in this place… can a gal have too many?
xoxo,
Jen
Thanks, Nikki! The hardest part was dealing with the awkward looks when stealing 25 paint sticks. Yeah, people think you’re crazy. Haha.
Jen, you can never have too many sunburst mirrors! Maybe your basement will need one? I’m sure you’ll find a place. 🙂
I keep telling myself that I’m going to make this project, and now I’m kicking myself for not doing it yet! It turned out so great looking! As for the pictures…I use Google reader, and your pictures don’t load or take a long time to load. Today, they were much better. I guess it just depends if they load correctly…otherwise, it’s just a preference.
this is SUCH a good idea. I hope you don’t mind it if i steal it. I think it would be great for our new place. I love love love love the idea of using paint stirring sticks, so cheap & yet it turns out beautiful!!
Hi Chris, Yeah, I love how this turned out, especially for the price. Thanks for the info about the photos in Google Reader. I’ve made some changes so future posts should be better.
Hi Whitkae,
I absolutely don’t mind if you steal the idea. If you blog about it, I’d appreciate if you’ link back this post, though. Definitely a cheap, but beautiful mirror. 🙂
Thanks!
Amanda
This looks so fantastic and so easy wow! So what is the color of your wall, I love it?
Megan
Hi Megan,
Thanks so much! It was so easy, too. Our master bed and bath are Bay Laurel by Restoration Hardware, but color matched to Wal Mart’s brand in satin. Hope it helps!
Meggan S., Thank you, too. Totally simple and I only paid for the mirror. 🙂
Thanks!
A
Holy Cow! I love this! I’ve seen a lot of these mirrors around blog land and I honestly think this one is my favorite! Especially as far as cost and simplicity…paint sticks…genius!
I love the mirror especially with the color of your walls! It makes everything pop that much more!
LOVE this mirror! I’m totally going to make one, but I’ve got to figure out where I might hang it first. :). What were your finished dimensions?
Thanks, Aimee! The overall is about 27 inches, but you could use a smaller mirror and make your sticks shorter to make a smaller version.
That looks wonderful! I haven’t really cared for the sunburst mirrors that much until now, maybe I’ll add one to our back room reno…we’ll have to see. Oh, and I think the pics this size are great, no problems loading them or anything.
I was also going to say I liked yours better than Centsational Girls. The finish really makes it look high-end. I can’t believe you made this with paint sticks. I have to say, I think this is my favorite DIY sunburst mirror I’ve seen (and I’ve seen a lot of them!). I might even make one of my own!
Thanks, Bethany! I agree that the metallic finish makes the mirror look more expensive than it actually was. Definitely give it a try. It was super easy and cheap!! Just start collecting paint sticks. 🙂
I enjoy your pictures just the size they are! For readers with a Mac if you position your two pointer fingers across from one another horizontally on the trac pad and then slide them together the screen will narrow in. I used this trick a lot before you resized the first time. Now I think everything’s perfect!
It looks wonderful!
Your sunburst mirror is fabulous!
WOW- That looks like it is worth so much more than $3. Such a great piece for your home.
LOVE IT!! What a great idea to use paint sticks!
Whaaaat?? That looks great! Can’t believe it. So simple. Nicely done!
Loved Kate’s mirror, and I LOVE yours, too!!
Thanks, Kim! I really like Kate’s, too. But what I really love is how cheap it is. 🙂
Love, love, love this!! Would you want to share it on my blog? Email me if you are interested!
Amanda,
After seeing this project, I’m so anxious to run down to my nearest home depot and grab me some paint sticks. LOVE this idea. I featured it on my blog today. The link is here: http://keephomesimple.blogspot.com/2011/05/budget-friendly-inspiration.html
Thanks for all the inspiration. You blog is amazing.
Hope you have a great week!
~Robin
Very cool! I’m a new follower; I found this post via Keep Home Simple. I can’t wait to try this out! You have so many fun projects.
This turned out so well! There’s no such thing as too many sunburst mirrors.
Love love love this. Great color. Dang, nothing’s free in Australia, so this would still end up costing, but I think it might be worth it for this gorgeous piece.
Suzy xxx
Thanks, Suzy! I totally agree that it would be worth it because it probably wouldn’t cost that much and it is a large, statement piece.
Thanks!
Amanda
What caught my eye on LC link party was not just your sunburst, but how you reflected the silhouttes in the background of your mirror! THAT was a great shot! Yes, super clever. I’m not sure how I would feel taking 50 paint sticks from my Lowe’s – I didn’t know if they’d let you do that? But, all the paint I buy there I probably earned them 🙂 Great job!
Becky B.
http://www.organizingmadefun.com
Organizing Made Fun
Thanks, Becky! I love that shot for the very same reason! I took 25 from Wal Mart and 25 from HD. If you frequent the stores, just grab a handful every time until you have enough. 🙂 And snag extras each time you buy paint. You’ve definitely earned them, I know we have because of all the paint we’ve bought over the years.
Thanks again!
Amanda
i love this! it looks so good!
Thanks, Sara!!
Ok, I am a novice so I have to ask the boring copy-cat questions…what is the black paint and the silver that you actually used??? i am ashamed to admit that I bought the wine cask plank starburst mirror from Ballard Design and the white wash is too blah with my decor. I love all things charcoal. Please let me know! Your website is lovely!
Hi Merry,
Not a problem! I used flat black acrylic paint (the cheapest stuff at any craft store will do. I used the ‘Ceramicoat’ brand) and a metallic silver acrylic paint, this was ‘Craft’ brand. Again, you don’t have to spend a ton of money. I tried mixing the black and silver to only have to do one coat, but I didn’t like that the finish was less varied and less metallic. So, just apply one even coat of black, let it dry, then paint on the silver. My silver paint seemed more like a clear paint with metallic pieces (but not glittery) so it was a subtle finish. Hope it helps! If you do this, I’d love to see pics on our Facebook page.
Thanks!
Amanda
Love it!!!!! This is the best one I’ve seen using paint sticks!! so cute!
I bought all the materials about two months ago to make the sunburst mirror and stopped because it seemed too hard. There are two things I love about your tutorial:
1) That you used a sharpie to help you mark your pieces.
2) The paint finish, which keeps it looking modern and contrast-y.
I am so going to copy!
Thank you!
Camille
Thanks, Christa!! That’s a high compliment considering there are probably tons out there! 🙂
Hi Camille!
Thank you so much for your kind words! Really, this is such an easy project. I didn’t use any power tools, either. The trick is to mark a spare stick with your measurement and then use that same one to mark the rest. I marked where I wanted the edge of my mirror to line up. Then, just make sure your second round ‘hand grip’ indents are hidden behind your first row. And, have plenty of glue sticks near by. Seriously, it’s so easy a caveman could do it. BUT, if you have any questions, just ask! I’m here to help!
Thanks!
Amanda
I so love the change in the paint color after the silver has been applied! This is a gorgeous mirror!
Love the bedhead too. He’s a cutie!
Thanks!! I think the silver makes the mirror. Black would have been boring. 🙂 Yeah, we think V is a cutie, bedhead and all, though his new summer haircut eliminates that.
Happy Friday!
Amanda
This is so cute! I love that you used a lot of materials that you already had or were free. Thanks for sharing
a very good work.. I’m also love DIY so much… please visit my blog at http://concretebiz.blogspot.com..
What type of liquid nails did you use to secure the hook? The multi-purpose version? Thanks!!
Hi Leane, Just the plain Liquid Nails. Nothing special about it. You could use any super strong glue, though. I’m sure Gorilla Glue or something similar would work, too. Basically, you want a multi purpose, maximum strength glue. Hope that helps!
Thanks!
Amanda
sweet!
I LOVE sunbursts! I am so doing this in my sitting room, with a cream paint and gold luster over it…hopefully it looks as good
I think this would be great to make…..
Thanks for all of your great ideas
Oh my word, I adore this mirror!!! I am sooo making this! Thank you so much for sharing!
I SO want to make this! I may try a bright color since I live in an apartment and all of our walls are white. Thanks for sharing the how-to! You did such a good job, and at $3 – that’s amazing!
Hi Laura,
I think you definitely should make this mirror. It’s quick, easy, cheap and huge. Oh, and it looks great. I think if you painted it a bright color it would look stunning against white walls. We’d love to see what you come up with, too. 🙂
Happy crafting!
Amanda
Hi, Amanda! Gorgeous mirror! I’ve made one, but the method I used (with the two wreath forms) took soooo much longer. Yours looks so great and much quicker and easier. I never realized you can glue right to the mirror back – how is it holding up for you? I can’t wait to try this method when I make a couple more for family members. Thanks so much for any info you can share. 🙂
Hi Carolyn! Thanks so much! It was super easy, the longest part was painting the sticks. I used regular hot glue and it has held up wonderfully. No problems at all. Just make sure to add a fair sized glob of glue and you should be fine.
Hope that helps!
Amanda
Thanks for the great tutorial. This will be hanging on my wall in no time!
I found this on pinterest, and can’t wait to make it myself! Such a simple idea, but those are usually the best ones! I could see this in other colors as well for children’s rooms. Thanks for the inspiration!
Thank you so much for this post. I just did this and the mirror looks amazing. I am so happy with how it turned out!
Great instructions and fabulous results!
Hey Sarah! I’m so glad the tutorial worked for you! It’s one of the best cheap projects I think I’ve ever made. Such an impact. Thanks so much for sharing your news!
Amanda
Great job, makes me wanna get all creativity
thanks for sharing
Just wanted to say I love this idea! I am in the process of letting my paint sticks dry while I reply.
FYI, my husband works at Wal-Mart and they are a major contributor to local communities not to mention one of the largest employers of the United States. I just found it funny that you would “snag” free paint sticks from them, but avoid them like the plague.
It is frustrating to hear people complain about Wal-Mart when they really are a great employer.
Hey Diane, I’m glad you like the mirror! I completely understand that Wal Mart is a huge employer and contributes to communities. While I respect their help to communities, our local Wal Mart is always so crowded. I’m sure Wal Mart is a great employer, but from a consumer stand point, I just don’t like how busy OUR store is and how long it takes to go through there. I should have specified that it is our local Wal Mart I avoid like the plague, not all Wal Marts. The local one in Minnesota is fine because you have about 15,000 people using it versus our local Montana store with 100,000 people using it. I’m glad to hear your husband likes the company. 🙂
Happy assembling!
Amanda
I had this idea then searched pinterest for a tutorial! Yours is fantastic! I want a metallic silver against my grey wall with stenciled black. BAH! I’m so excited after seeing yours! I already have the mirror, paint, hot glue, and a saw for those curved edges. Now I need some free paint sticks!
Thanks for the tute! …And I’m off to Home Depot!
xoxo, Mallory
Hi Mallory! I’m glad you like it! It was super easy, too. Would you please share a link/photo when you’re done?
Happy crafting!
Amanda
Hi I am from Greece and for some reason I can’t find the sticks you are using but I want to make the mirror it’s absolutely gorgeous, does anyone have an idea about what I could use instead of the sticks?
I absolutely love this. I have everything to make it but I am having a little trouble finding the semi transparent silver metallic paint. What kind did you use??
Hi tonya,
I used regular silver acrylic paint. The cheap stuff (I think Americana brand) is pretty thin, so it looks semi transparent. Its just really watery compared to non metallic paints. I hope that helps!
Please share pics when you’re done. I’d love to see it!
Amanda
Amanda,
I love this project. Couldn’t wait to try it out in my daughter’s room. With 3 kids, 2 of them boys under 2, I’ve been working on this for a few minutes each night. And when I went to pick it up off the shelf in the laundry room today, the sticks and the mirror were already separated….bummer! It appears the paint sticks are still intact, and I used the same hot glue for both….any suggestions?? How’s your mirror holding up after this post?? Thanks for the great ideas. : )
Beth @
alittlehouseahome.wordpress.com
Hi Bethann, Oh man, I’m sorry to hear that! I used plain hot glue, and a lot of it for each stick. Maybe the glue wasn’t hot enough when you attached the sticks? I placed a glob of glue and then a stick right away, repeating for each one so it was as hot as possible. If that’s not working try Gorilla Glue, but use it sparingly because it foams and expands, but it’s super strong. Just let it dry overnight or longer to set up.
Hope that helps!
Amanda
Thanks for the tip. I’ll try Gorilla Glue maybe? I’m assuming your mirror is holding up well?
Hi Bethann, Yep, it has held up great. Actually, I just moved it over to the new house today, carrying it by a few of the sticks and it’s great. Sorry yours hasn’t held up as well.
Thanks!
Amanda
You have inspired me. I have practically no art on my walls and just started splatter painting on canvas. II’ll have to send you a pic. I have all the supplies for the sunburst mirror and will show you as soon as I finish. I am using a linen white (a hint of yellow). I love how yours turned out and cant wait to start mine. P.S. I’m kind of afraid of the stacking part but I’ll give it a whirl.
Cute project, however something people should consider: the other day I went to Lowe’s and bought a gallon of paint. They were completely out of stirring sticks and the very apologetic (and frustrated) employee at the counter explained that they had been out for about a week.
This made me think of this post of yours that I had seen a few days prior. Yes, you’ve bought paint from them in the past, but I’m sure you took your “alotted” paint stirrers when you bought it.
I left the store paint-stirrer-less 😦
Hey Tish P!
I usually don’t take paint sticks when we buy paint. I prefer to shake the paint or I paint right after buying my paint. I do take sticks when we buy polyurethane, just because shaking makes little bubbles. So, if I had taken paint sticks each time, I probably would have had enough to make this project. Especially if you count all the paint Ben buys for his work and doesn’t take sticks for. 🙂 I totally understand where you’re coming from though. 🙂
Thanks!
Amanda
1. I’m new to your blog but I love what I’ve seen so far.
2. I see that there are a lot of comments about pictures and from both reader and when I click over to your actual page on my phone and on a computer I can’t see the last half off the photos. They don’t load and if I click on them it says page not found, which is sad because it’s all the photos of the finished product!
3. I’m looking forward to reading more of your blog!
Tara