Gimme a Giveaway: Siiso Winner!

It seems most of you would like to know how to draw or paint.  I think learning to use watercolors would be awesome, but if I could choose to have any skill, I’d choose rug making.  Seriously, rugs are so expensive and I’d save so much money and get a fantastically custom rug to boot!  Our winner, Lori W. would love to design and print.  Congratulations, Lori.  You’ve won this beautiful print from Siiso.

If you didn’t win, fear not.  You can get a 10% discount my messaging Siiso and mentioning Our Humble A{Bowe}d.  Happy Friday.  We’ll see you back here on Monday for Blog Fest: I.  That’s right, we’re having an extravaganza to celebrate our first full year behind the small screen.

P.S.  If you’ve got a question about or for us, please ask and we’ll answer next Friday as part of our blog anniversary.

Rain Checked Spring

Spring officially began March 20 and I was so excited to say au revoir to winter.  Then, mother nature played a mean trick on the folks in Montana (and several other places) by giving us a dose of winter mid-April.  We made the most of our snow day and the snow melted by evening.  Now, our temps are about 20 degrees below average and I’m not liking it.  Our fruit trees don’t seem to mind, though.  Ben is happy he hasn’t had to worry about a late freeze killing his prized trees.  We’re already in May and our plants are just beginning to turn green.

The bleeding hearts on the shady north side are doing swell.

As are the neighboring lily of the valley.  Last year, these had already bloomed.

Before we filled our front flower bed with roses and rocks to eliminate weeding, we had tulips and Allium.  A few obstinate tulips have popped up from under the layer of landscaping fabric and rocks.  Such a sweet surprise.

Notice the rose bush behind.  One tiny leaf shoot?  Seriously, I was hoping for tons (literally, one ton) of roses this year.  That and two tons of apples from our trees to make apple crisp.  Speaking of trees, this is depressing.

Where’s the beef green?  This day lily might do something this year.  The past three years have only given us green.  Sad, because the flowers are a deep purple.  Don’t ask why I haven’t removed the tag…

One thing that hasn’t had a problem growing or photosynthesizing is our grass.  In fact, it has over-grown our side-walk.

Ben and Vincent dug up the grass and our side-walk is about six inches wider.  More good news.  We stained our fence last fall.  Because we had never used the stain, we wondered how well the finish would hold up over winter.

Luckily, the stain is still in mint condition.  Yahoo to not re-staining this year.

Have you been stuck in a winter rut like we have?  Or are you a lucky duck and live in a warm climate?  Have your flowers and/or trees bloomed?  What is your favorite plant in your yard?  Are you like I am and wish a magnolia tree would grow in your climate?  What other plants do you wish you could have?  I can’t wait to get some plants in our window boxes and for the fruit trees to flower.  Just a little longer…

Sun Bursting

I’m sure you’ve seen DIY sunburst mirrors all around the blogosphere recently, but because this is a hot trend (pun intended), I don’t think you’ll mind if I share another one.  Last fall, I hot glued bamboo kitchen skewers to the back of a bevel edged mirror.  After spray painting it white and living with it in our master bedroom for the winter, I decided it wasn’t the right fit.  You see, most of the accessories and furniture in our room are black, and the white didn’t stand out against the wall like I had hoped.  And the skewers we a little too thin for my liking, at least in this case.  I may hang it in the basement bedroom for some drama.

So, I started brainstorming a cheap or free way to make an awesome, chunkier sunburst mirror.  Then, while planning a paint chip project, it figuratively hit me.  Paint sticks!  They’re free and chunky.  I snagged 27 from Wal-Mart thinking I would have plenty.  Then, I chose a 12 inch diameter beveled mirror from Hobby Lobby (in the candle section).  Candles were 50% off, so my mirror cost $3.00.

I went home ready to get my sun bursting on.  I started by marking the mirror in quarters, using a Sharpie.  Then, I placed a stick on each mark and filling in.  Then, I realized I wouldn’t have enough for two tiers.  Our weather took a turn for the worse, so I waited to get more sticks.  While waiting for the weather, Kate at Centsational Girl posted about her DIY paint stick mirror.  Apparently, great minds think alike.  Though our plans of attack were slightly different, I knew the results would be stunning, too.

Finally, our weather cleared up and I packed the kids to go to Home Depot.  I avoid Wal-Mart like the plague.  Immediately, I knew the Wal-Mart sticks were thinner and had rounded corners, so I had to make a few changes.

Turns out 80  grit sand paper rounds corners of paint sticks really quickly.

Now that I had all of my supplies, I got started.

I applied a coat of black paint to the front and sides of each stick.  For my first tier, I knew I had to cut the sticks so the curved edge didn’t show, so I didn’t bother painting that far.

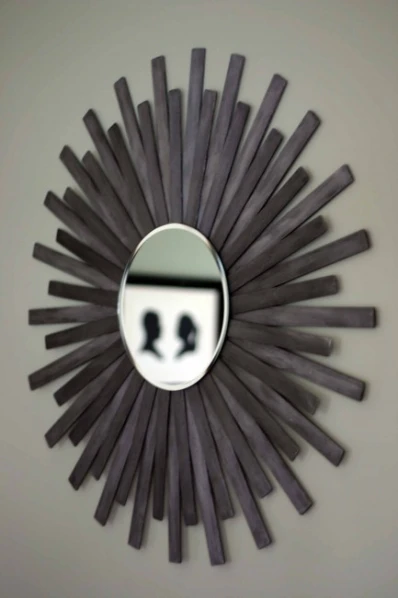
After the black paint dried, I applied a coat of metallic silver paint.  The silver is semi transparent, so the black still showed through making a really great metallic charcoal grey.  See the difference?

So, after a few hours of painting, letting it dry, painting again, and letting it dry, I warmed up my glue gun.  Before I could start gluing, I had to cut the sticks.  With a baby and toddler in tow, it wasn’t an option to use a saw.  I opted for a wire cutter.

I just squeezed hard twice on each side and then snapped it off.  Worked great, but not a super clean edge.  I measured 8 inches long on a sample stick and marked the back of each stick for a reference to keep the same length.

I tried to place each stick as evenly as possible.  A few lines of hot glue held each stick firmly in place.  After finishing the first tier, I flipped it for a quick look.  I’m a likin’.

On to the next round.  I was able to keep half of the sticks the full length by alternating non cut and cut.  This round is 10 inches long with the curved edges hidden behind the first round.  Yay for not needing to trim everything down.

With the sticks in place, I glued a picture hook to the back of the mirror with Liquid Nails.  48 hours of dry time later, I hung the mirror on our wall.

Paint Stick Sunburst Mirror Over Bench

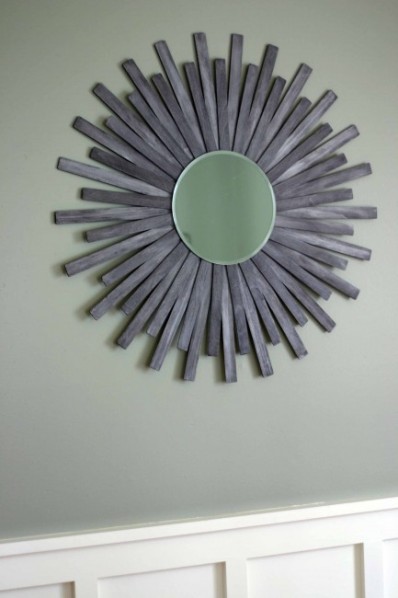
The grey contrasts beautifully against the grey/green walls.

Paint Stick Sunburst Mirror After

The metallic sheen also changes with the lighting.  The wall against the bench is now nicely filled with the sun burst mirror.

Paint Stick Sunburst Mirror Over Bench

How about a little budget breakdown?

50 paint sticks:  Free

Paint:  Already owned

Glue gun and sticks:  Already owned

Picture hook:  Already owned (are you noticing a trend?)

Mirror:  Originally $5.99, but 50% off to $3.00

Total:  $3.00

Have you jumped on the sun burst band wagon?  Did you go the store-bought or DIY route?  Which store version do you have your eye on?  Maybe you have a favorite tutorial?  If you’ve made a mirror, we’d love to see yours on our Facebook page.

We’re still looking for questions for our blog anniversary.  If there’s something you want to know, just ask.

P.S.  We’ve had another request to size down our photos.  What do you think of this change?  Too large, too small?  We need your opinions so we can make the best changes.

Green = Green: Nutrish

This is a Sponsored post written by me on behalf of Nutrish for SocialSpark. All opinions are 100% mine.

Now, I know this may seem strange that I’m discussing dog food today.  I’m sure the Tom’s of Maine post threw you for a loop, too.  Yes, this is a sponsored post, but I only accept sponsorship for items I would actually use.  I don’t want to push away any readers, though it isn’t home related, it does affect our family.  And if you think of your dog as a member of your family, this may affect you, too.

Recently, we received a sample of Rachael Ray Nutrish just 6 dry dog food.

Nutrish dog food has only six wholesome ingredients: lamb, brown rice, ground rice, beet pulp, poultry fat, and chicken flavor.  Vitamins and minerals are added, too, for complete nutrition.  I try to feed my boys healthy food, why not my dog?  Because the ingredients are natural, they are also dog and eco-friendly.  Jack didn’t seem to care about the health benefits, but she did like the taste.

And the texture.

In fact, she thought it was finger paw lickin’ good.

She finished the entire bowl within five minutes.  Usually her food sits around for a day before she eats it, perhaps waiting for something better? 

Everyone knows, pets can be expensive, racking up vet bills, grooming, toys and food.  Healthy diet and exercise do wonders for human and dog health.  This well-rounded doggie meal can help keep your dog healthy and happy longer, perhaps even reducing vet visits, saving you money.

I happen to love Rachael Ray.  She seems like such a normal, caring and giving person.  The kicker about this dog food?  The proceeds go to charities such as North Shore Animal League America and the ASPCA.  How great is that?  You’re helping save animals just by feeding your dog.  Gotta love a product with a cause.  If you want to know more, visit Rachael’s Rescue to get the scoop.

Now that I’ve shared our experience, sign up to receive a free sample to share with your dog.

Visit Sponsor's Site

Back Yard Grievances

Our back yard rarely makes an appearance, with good reason.  We haven’t done a lot of work to this space.  And we don’t like how it looks.  But, this is what we’re working with:

Before I start my backyard tirade, let’s note the positive, shall we?  Our yard is very open, especially compared to other homes in our ‘hood.  The yard is completely fenced in, we have a patio to entertain on, and plenty of trees, most of which are a fruit variety. 

Now, onto the picture riddled rant.  When you walk out the backdoor, you’re greeted by hoses, toys and an old rug.  Ben and I are always switching between the two.  He hates this one, so he always tosses it. 

You’ll also notice there is no barrier keeping the rocks from spewing all over the patio.  This is because the previous owners constructed brick planters against the house.  The planters started falling apart, so we yanked those out, but the concrete extends to the previously pavered area, so we poured rock in to cover that.  Now it drives me crazy.

Continue to walk along the uneven patio, until you’ve reached this odd mostly paver filled 4 foot square area.  I am told this had a water feature before Ben tore it apart.

To get to the garage, walk around a trash can, which is now filled with dirt and grass clumps.  You can’t really tell, but a small brick paver path leads from the patio to the garage.  Because the grass is taller than the brick, the walkway is always dirty and covered over.

Then, you’ll notice our giant wood pile with a large, dead, grassless area.  Great for dogs.

Though, this isn’t as bad as it once was.  In April 2006, shortly after Ben proposed, I flew out to visit.  The wood pile was much larger (keep in mind the house extends about 4 feet beyond the garage), and the rest of the backyard was much shabbier, then.

Now do you see why the grass is dead in this area?  The pine tree was much smaller, we had a random group of honey locust trees (which had huge thorns), and the old fencing.  Yikes, I had forgotten just how bad this looked until now. 

Technically this next annoyance isn’t part of the back yard.  Rather, the north side (left if you’re looking at the house from the street) is covered with mold specks because the siding never gets direct sun light. 

 I think a quick wash with a very watered bleach solution should do the trick.  Or do you know of a more eco-friendly solution? 

Other annoyances?  Having two grills.  I’m a vegetarian, so I don’t really care about the benefit of charcoal over gas.  And, if you look closely, behind said grills, is a dog house.  Also, the south side fencing is still chain link because we have to dig out a concrete post.  The north side fence is installed, but not stained and we have half of a hollow core door as a gate.  Can you say, “Redneck”?  And the Ash tree by the patio has to go.  I’m trying to talk Ben into two smaller, symmetrically placed fruit trees along with hydrangeas.  The problem?  I have a black thumb.  Scratch that, I don’t even have a gardening thumb, so Ben knows he’ll be the one taking care of the plants.   

All of this to say, I think we’re finally going to do something about this!  Talk of a poured concrete patio (and my dream of a pergola) has been going on in our humble abode.  Nothing is set in stone (pun intended), but we’re really hoping to have the time and weather to tackle this.  Sooner than later. 

Any suggestions for an eco-friendly, scrub-free, mold-kicking solution?  Or easy-to-care-for part-shade plants?  Yes, I tried to use as many hyphenated descriptions as I could.  Are you planning a patio?  Or any other outdoor sprucing?