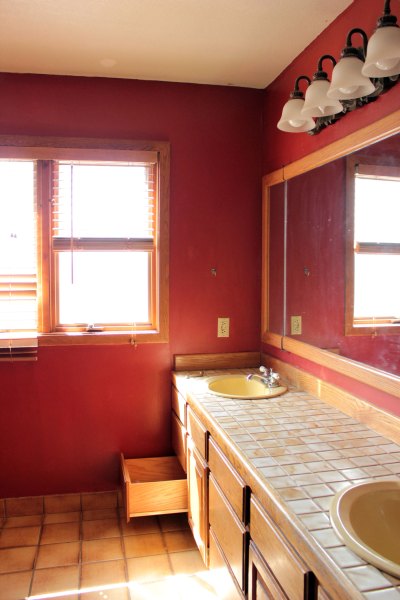
When we moved into this house, the master bathroom was dated with yellow tile on the floors, counters, and shower. The brown grout always looked dirty. And those red walls. Oh, I couldn’t stand those red, patchy walls.
Though the bathroom was large and filled with light from the big window.
A shower leak bumped this remodel up the priority list, and we couldn’t be happier to bid the old room adieu. Last fall I quickly painted the walls a light green, just to cover up the red (but didn’t bother taking the light fixture down to paint behind). So, here’s what the room looked like before demo work began:
Which is a stark contrast to the finished room we’re using today:
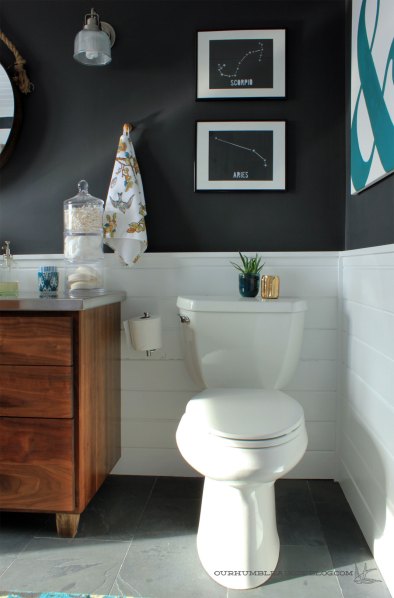
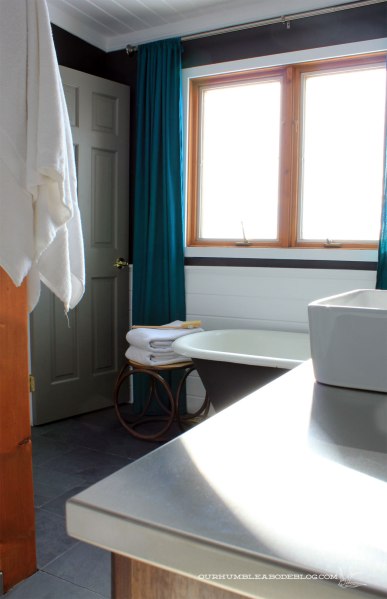
Ben built a custom solid walnut vanity topped with a vessel sink with stainless steel countertops.
Wood planked walls and ceiling give subtle texture and the nearly black painted upper part has a high contrast I love.
Accessories and the long teal linen window curtains pop against the neutral walls.
Simple DIY art, arrows, and a copper bud vase add personality and really make the room feel lived in.
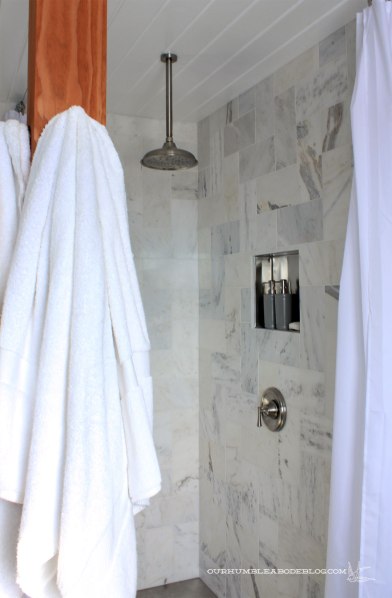
The new slate floor and marble shower tile feels ultra luxurious.
Our low profile curtain hanging system also helps keep the bathroom open and airy in a way even a glass wall couldn’t. And with far less cleaning and maintenance.
But we can’t forget the tub, because that’s a key piece in this remodel. By shortening the vanity to a single sink, we were able to make room for the claw foot tub.
I’d love to make a small shelf to rest on the tub, because the rattan stool is in the way of the door swing.
One last item on the bathroom to do list is replace the window and surrounding trim this spring or summer.
Finishing a room always feels great, but this one is especially satisfying. So many elements we love, some we weren’t comfortable putting in a main bathroom. Like the claw foot tub. The boys have used it a few times already, and we’re happy not to have to worry about four sides of splashes on a daily basis.


Awesome transformation! I like that you tried the green but kept on going to find the perfect paint color that works for you.
Hey Jennifer!
The green was a last ditch effort to rid the house of the awful red. 🙂 Glad we kept going, too.
Thanks!
Amanda
I love it!! I was not sure about the dark paint but it is wonderful. My favorite piece is that gorgeous vanity!!!!! Ben did a great job.
Hi Angel P!
Aww, thank you! You’re not the only one who was unsure of the dark paint. But I totally agree with you on the vanity. 🙂 That and the marble shower are my favorites.
Thanks!
Amanda
It really is gorgeous, and I am super into that color combo right now (white, dark grey, walnut wood tones, and gold… yum!!!) We recently remodeled our guest bathroom in these colors as well, so obviously, you know, great minds… haha. Good job!
Hi Andrea!
The high contrast and warm wood totally rocks my socks right now. So glad you’re on board with it. 🙂
Thanks!
Amanda
Crazy gorgeous transformation!!!
Thanks, Gabbi!
Lovely, lovely. I’ve enjoyed watching your progress on this room 🙂 Gives me hope for our ‘looks pretty hopeless’ master bath! Erin
Hi DIYpassion!
There’s always hope, especially with a full renovation. So much can change, just don’t give up on it. 😉
Jaw dropping good before and after. LOVE
Comparing before and afters is really fun, right?! So fun to see how far a room or space has come.
Love this….you all did an amazing job!
Well thank you, Bonita! So happy to hear you like the bathroom changes. 🙂
Thanks!
Amanda
I’ve been watching this transformation from the beginning and all I can say is F*** this looks good. SO GOOD. Thank you so much for inspiring my master bath color scheme!
Ha, your comment cracks me up, LizlovesCam! Isn’t it a crazy difference?! Always happy to hear someone got inspiration from us. Feel free to share pictures with us.
Thanks!
Amanda
Really gorgeous bathroom. The colour is perfect! I LOVE the arrows…well everything really 😀
Amazing! I love the high contrast of the dark walls and white wood planks. Would you share where you found those gorgeous hand towels?
Hi Sandra!
Why thank you! The towels were on clearance at Target. I couldn’t find them online, but they’re from the Threshold line, if that helps.
Thanks!
Amanda
so beautiful! I still love that giant ampersand 😉
OH my gosh! This is seriously unbelievable. I’m so jealous of your bathroom! Amazing, amazing job. Totally magazine worthy! Good luck with CWTS! How could anyone not love this room?
Thanks, Lindsay! You’re so sweet. And your bathroom is amazing, too. Love the fun mirror!
Wowza! What a before and after! This is seriously gorgeous! And I agree ^^ totally magazine worthy.
Thanks, Alexis! We’re so happy to have a fresh, clean bathroom and love the transformation. So glad you do, too.
Thanks!
Amanda
Stunning! 🙂
~Sarah
Wow! This is gorgeous! I’m dying over that wood vanity.
Love the dark paint! What is the color?
Sorry- just found the answer.
Thanks!
Glad you found it, Lulu. 🙂 It’s one of my favorites now.
Wow looks amazing. Got some inspiration for our guest bathroom. Very nautical and rustic. I can feel the Breez
Thanks! Glad you like it so much. 🙂
lovely! can I ask where you got the round mirror fromt?
Hi Renata!
I found the mirror at Hobby Lobby of all places. Hope they still have it!
Thanks!
Amanda
Beautiful! Where did you buy the walnut for the vanity?
Hi Erikaearle,
We got it at our local lumber supply. Most real lumber yards have a good selection or they can order it in for you. This is American Walnut and was so nice to work with and has a lot of character.
Thanks!
Amanda
Can you share the color of grey that you used? The company and color name? We are finishing up a kitchen remodel and want dark grey and you chose an amazing color. Your entire home was so incredibly well thought out – I love every detail. Inspiring.
Hello Megan Peri!
The dark dray is Wrought Iron by Benjamin Moore in their flat finish. It’s a great color, I hope it works in your space. 🙂
Thanks!!
Amanda
Where did you get that beautiful mirror from? I simply adore that.
Hi Otto!
The bathroom mirror is from Hobby Lobby, actually. 🙂
Thanks!
Amanda
I love this so much! My husband and I have been looking for some bathroom inspiration to tie together our disparate vision for our (much smaller) bathroom. Quick question- now that you’ve been living with this for a little while, are you finding the horizontal tongue & groove is tricky to clean or requires more frequent cleaning than your tiled surfaces? Thanks so much, and beautiful, beautiful job!!
Hello Chef Jill!
Thank you so, so much for your kind words! Actually, the tongue and groove hasn’t been a pain to keep clean. The grooves are fine, it’s just the top that I have to wipe down occasionally. I hope that answers your question, but if you have more, I’m always here to chat. 🙂
Thanks!
Amanda
How is that stainless weathering? (…maybe you have a picture. I’ll surf around.)
Industrial-sleek-easy looking space! Wow and what a size you got to play with! Well done:)
Please explain what you did to the ceiling and is that tile around the walls?
Hi Tina!
Both the ceiling and lower walls are covered with tongue and groove pine planks, primed and painted with white semi gloss paint for durability. Let me know if you have any other questions I can help you with.
Thanks!
Amanda
Where is the rug from?
Hi Kathy!
The rug was a Target find a few years ago.
Thanks!
Amanda
Do you remember where you found the hook for your mirror? I bought something similar and I’m having a tough time finding something big enough and pretty enough to fit the leather strap. I remember seeing your beautiful bathroom from a couple years ago and was hoping to find some source info or where to look 🙂
Hi Heather!
The mirror hook is actually a large drawer pull from Home Depot. I had the same problem that you did but spotted this one for like three dollars and it worked perfectly. There are so many pull styles that you should be able to find something. To make it work, you’ll need a matching bolt, minus the head and a wall anchor. Just rotate the but into the knob, then into the wall anchor. Ours doesn’t bear any weight, there’s a hook on the back of the mirror that it truly hangs from, this just gives the look of the mirror hanging from this knob. Let me know if you still have questions. 😀
Thanks and good luck to you!
Hi there! I have a very similar structural column in my bathroom that I’m using as the corner of a shower as well. Do you have any additional details on how they designed/built that shower base around the column? Is it wood construction covered in a material? It looks from the pictures that it might be a custom metal shower pan of sorts.
Hi Jeremy,
You could do a mud bed that gets tiled over for the shower base. We had a local stainless steel fabricator build a shower pan to fit the shower size, going around the post.
Does that help you with your questions? If not, please let me know and I’ll do what I can to answer better!
Thanks!
Amanda