Pressed Evergreen Ornaments

I know most people send out holiday cards this time of year, but I’ve never been the type. I hate picking out clothes and having my picture taken, so I send Christmas ornaments to family and friends. For 2017, I created personalized wood burned ornaments.

In 2018, I brought out the wood burner (it’s addicting!) again to make personalized burned leather ornaments.

Last year I painted metal discs with an evergreen design.

This year, I considered a fabric option, but then saw gray air dry clay at Hobby Lobby and decided to give it a whirl.

I gathered my supplies: clay, scrap canvas, rolling pin, evergreen clippings, twine, metal stamps, a straw, and a mason jar ring. I couldn’t find a round cookie cutter in the size I wanted, but that would be preferable.

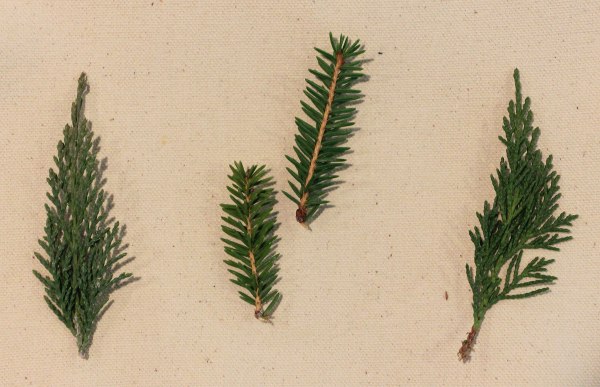
Before getting started with the ornaments, I cut small pieces of various evergreens from our yard to experiment with. The left is a juniper variety, middle is from a bird nest spruce, right is an arborvitae clipping. I also tried some cedar clippings from a Costco garland, but the thin frond didn’t leave a deep enough impression.

To get started, I sandwiched the clay between two pieces of canvas. Not only does the heavily textured fabric leave an impression, it also keeps the work surface clean. After rolling to roughly 1/4 inch thick, I lightly pressed the jar ring to know where to place the evergreens. Set in place, then cover again with the canvas and lightly roll to push the fronds into the clay.

Carefully pull the clipping from the clay. The arborvitae and juniper come out nicely, but the spruce needles kind of stuck in place. Then, use the straw to create the string hole.

The next step is optional, but I used the metal stamps I already had to press 2020 into the clay. You could skip this, or paint the year on.

I was able to reuse the clippings several times, and I love the texture of the different ones used, so play around with plants.

After letting the clay dry for several days, I used a fine grit paper to sand down the edges. You could run a wet finger over the freshly molded clay, but I found that the water also washes away some of the canvas texture. Finally, with the clay dry, seal with a coat or two of polyurethane or paint.

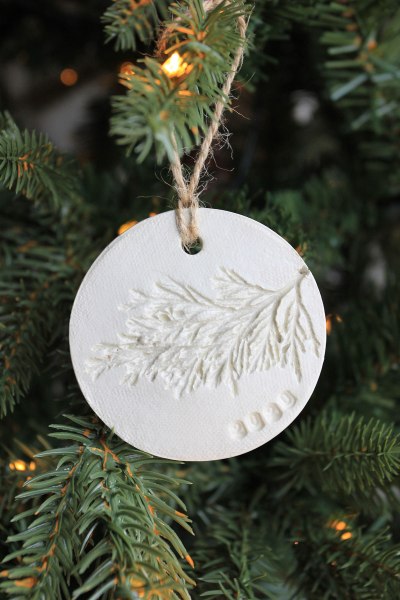
Loop twine through the hole and hang.

Now, a word of caution: I knew the clay was risky for mailing, and had a few break in the mail. The thicker clay seems more durable, unsurprisingly, so try not to get thinner than 1/4 inch.

Introducing Geneva

If you don’t follow along on Instagram, you aren’t yet aware that we purchased a mid century diamond in the rough. Built in 1953, Most everything is as originally built, though in rough shape from a lack of maintenance in recent years. The roof has been leaking for 3 or 4 years, hence the tarps you can see peeking out above the front door.

The front door is kind of like entering a time machine back to the fifties. Original stone walls and floors, large windows, even a vine, named Johnathan by the previous owners.

Turning slightly to the left is a 35 foot long, 12 foot wide main living space featuring a wall of south facing windows which I adore.

Along the back is the wood burning stone fireplace. In the photo below, the kitchen is through the doorway to the left, with what was the dining room peeking out beyond.

The kitchen is on the small side compared to the adjacent living room, measuring 14 feet long by 8 feet wide.

Water damage has wreaked havoc particularly in this area. Cabinets are falling off, with bricks holding the uppers in place.

Making a 180 degree turn, this is the view looking back toward the living room.

Off the kitchen and dining room, there’s a random little room, then a laundry room and garage through the opening next to the leaning door.

This living area is my favorite part of the house.

We’re the third owners of this house, and have been lucky enough to get a lot of history through the family we bought the house from. Living there since 1973, a lot of living has happened in this house. The weekend after closing, while starting some demo work, the daughter of the man that had the house built stopped in and gave us even more information. Originally, the area below was the dining room.

And that awkward space at the end was her mother’s sewing space, which could be blocked off with curtains.

I’ll share more information about our plans at a later point, but we do plan to make a few layout changes in here.

Also, note the severely broken window in this area.

Here’s the laundry area, as shown through the garage door. A little half bath off the garage is handy also, though so small that the door hits the teeny corner sink. Also note the original fire below the windows.

Going back toward the front door, slightly to the right are the stairs.

At the top of the three stairs, looking right is the hallway. The first door on the right is the bathroom, second on the right is the master bedroom. Straight ahead is a bedroom, and the door on the left is the smallest bedroom.

But, straight ahead from the three stairs up is this little office space.

It features a rock wall that I’m in love with.

And here’s the view looking back down toward the entry. Note the little closet with the window above.

The bathroom situation is…odd. It’s kind of a Jack and Jill arrangement, with a 4.5 foot square bathtub/shower sandwiched between two half bathrooms.

Here’s the master half bath with a peek to the right of the tub.

Another wall of rock with a big window, then shorter windows that face the front of the house.

Each of the bedrooms on this level have adorable original organizers.

In the other bedroom, another rock wall with big windows.

Here’s a peek looking back down the hall.

And here’s the final bedroom on this level, the smallest of them all.

I’ll be back to share the basement and other exterior photos of the house. I describe the house as a mullet house, low and unassuming from the front, but a window party in the back.

As for our plans for this house, we don’t plan to move in. Right now, we plan to fix up the house, furnish it, and rent it short term. Not weekly vacation rentals, thinking more as a one month minimum lease, but we’ll get a more solid idea as we near that point.

Favorite Accessories from Bassett Furniture

This post is sponsored by Bassett Furniture.

A while ago, Bassett Furniture contacted us, asking if we were interested in adding some of their accessories to our home. After a look at their amazing accessory options, we said yes! Before, our living room had a mismatched pair of large thrifted lamps, see both photos below.

While I liked both thrifted lamps a lot, paired with the two different sofa styles, our living room needed balance from matching lamps. When I spotted the handsome and hunky Devereux Lamps I fell hard for them. The concrete has an aged, pitted, handmade look to them that makes each one unique.

Then, I looked at the measurements, as this space needs big lamps, which can be tricky to find.

Standing at 30 inches tall with an 18 inch wide shade, they fill out the room nicely. Even better, the lamps weigh 28 pounds each. Why is the weight important you ask? Well, because of the floating furniture arrangement in here. The lamp cords have to reach back to the wall, and though not a main traffic area, people do still walk over the cords. Thanks to the heavy weight, if someone does snag their foot on the cord, the lamps aren’t easily pulled off the table. Also, here’s a tip if long cords irritate you: With many lamps, you can easily stuff any unnecessary length of cord back into the lamp base. No bundles, no messy tangle, and no work!

Now, our living room feels balanced and a Clyde Pillow flanks each sofa. The woven neutral cover is beautiful and durable, adding a modern touch.

Our living room is the room with the view and the television, so it gets a lot of use. In our adjacent family room, without a tv, it’s a bit quieter and my favorite reading spot. The addition of the sleek and sophisticated Dwight Adjustable Floor Lamp and a down filled Alden Pillow makes reading even easier and more comfortable.

I can scrunch the large pillow into place and turn the lamp on to act as a spotlight on my book. No eye strain here!

Our boys love turning the lamp on with the foot switch and it’s super convenient when I have my hands full with a book, snack, and drink.

Finally, our master bathroom got an upgrade, too. Originally, the bathroom had a smaller round mirror:

We swapped out the sconces and hung the Manning Wall Mirror. At 36 inches wide, it’s a full foot wider than the original. The simple frame, tiny loop at the top, and bevel edge are all small details that make the mirror something special.

Before I recommend products, I prefer to use it and live with it to make sure it’s worthy of recommending. After a year of use, I can say we’re happy with the look, quality, and design of all the Bassett items in our home.

Planning a Basement From Scratch

While we chip away on a full house remodel, we have a few smaller projects to tackle, too.  Just starting, creating a finished laundry room and bathroom in an unfinished basement area.

Basements in old homes can be tricky, usually requiring working around load bearing walls/posts, low hanging duct work or goofy plumbing placement.  Sometimes, all three and then some obstacles are thrown in.  In this case, we have a strangely placed furnace, water line, and water heater.

These photos are from before framing, but after plumbing had been added.  That big pipe stack had to stay in place, so we set that as the edge of the bathroom we’d be adding.

Basement-Before-Toward-Bedroom-Space

Looking from that side to the other, there was a laundry area and then shelving.

Basement-Before-Toward-Storage-Room

We have air ducts to work around, but we were able to move the water heater to the other side to maximize the space.

Basement-Before-Hall-Space

Basement-Before-Bathroom

Below is the area where the washer and dryer had been set up, with a window opening into a crawl space.

Basement-Laundry-Room-Before

After meeting with the clients and discussing their needs and taking a bunch of measurements, I put pen to paper.  Well, more specifically, I put mouse to Photoshop to mock up a floor plan to work in all of the required items.

Basement-Bathroom-and-Laundry-Room-Plan

Adding a hallway to access a future but currently unfinished bedroom space was necessary.  The jog in the hall accommodates the furnace and water heater closet. With the remaining space, we added a five foot wide by 8 foot long laundry room and a bathroom to the left.  An unfinished space that tucks under a staircase will remain unfinished, but closed off with a door.

Framing and plumbing are underway, and the laundry room is taking shape.  The appliances will go on the back wall, with custom cabinetry above that will have a false back to allow access to the crawl space when needed.

Basement-Progress-Laundry-Room

Below, the photo shows the view from the unfinished bedroom looking into the bathroom door on the left and the new hall on the right.

Basement-Progress-Toward-Bathroom-Door

Directly ahead of the bathroom door, a floor to ceiling shelf stack will take up the right corner with the vanity to the left.

Basement-Progress-Toward-Vanity

Basement-Progress-from-Bathroom-Door

The shower fits in the nook between the wall and new hall, against that big pipe stack that gave us a hard finished edge.

Basement-Progress-Shower

The home owners are excited to add a second bathroom to the house and we’re excited to see it all coming along!

Grown Up Furniture

Hello friends!  It’s certainly been a while since I’ve been here.  Our business officially hit the one year mark and things have been hectic, in a really good way!  With that, my time and attention have turned elsewhere.  While renovations on our house are complete (minus a few small changes), we’re up to our eyeballs in client projects.  But, I thought I’d pop in with a fun little change we have made to our house recently.  Here’s a photo of our living room into the dining room from a year and a half ago:

Five-Year-Home-Tour-Living-Room-Toward-Dining

And here’s the same space now:

Seno-Dining-Table-with-Living-Room

We’re slowly upgrading our thrift store/Craigslist furniture that we’ve purchased because, well, we needed a place to sit or eat.

Seno-Dining-Table-with-Sofa

Now that money isn’t being directed at remodels, we’re able to make some furniture upgrades.  You’ve already seen the sofa, but the dining room has been upgraded.

Seno-Dining-Table-from-Entertainment-Center

The Mission/Craftsman style set that was here was a Craigslist table that fit our space and needs, but that’s kind of where the pros ended.  Wrong color and style aside, we didn’t like the bulky, high backed chairs.  Or that people always hit the arms of the two end chairs against the table.  Cleaning around the vertical pieces was a pain, and the placement of the legs and base didn’t allow much more seating than six.

Five-Year-Home-Tour-Dining

Now, the sleek lines of the Seno table from Article allow seating for 8.  Four chairs easily fit on each side.

Seno-Dining-Table-Toward-Deck-Window

Made from solid white oak in a clear finish, the table is what I’d wanted all along.  The smooth, seamless table is easy to clean.  No more digging crumbs out from between the table leaves.

Seno-Dining-Table-Toward-Kitchen-Detail

Seno-Dining-Table-Detail

For contrast, I chose 8 metal Thonet style chairs.

Seno-Dining-Table-Kitchen-Vertical

These chairs are fantastic.  Slim lines, but still comfortable.  Plus they’re light weight, but still sturdy and stackable.  And affordable to boot!

Seno-Dining-Table-Toward-Entry-and-Family-Room

It’s funny how only the table and chairs have changed, but the updates have made the other elements feel fresh and more modern.

Seno-Dining-Table-Toward-Entry-Horixontal

It’s a change that I’ve wanted to make for nearly 7 years, but I’m so happy with how it has come together now.  Any furniture upgrades you’ve made recently that change the whole look and feel of your room?

Hopefully I’ll be back more regularly, maybe not with our home changes, but client remodels.  Do you want to see the progress of their spaces?