Trim: Office

While planning my office, I fell in love with a box pattern so much, that we added it as trim.  The custom cabinets Ben built were already in place, so we wanted to have the top of the trim match the top of the cabinets.

Our cabinets are 36 inches high, not including the Brazilian cherry top, so our total trim height is 36 inches.

After determining the trim height, measure each wall, marking the center.  If you have cabinets, mark the center of the area between the wall and cabinet to make the design centered on the visible area.  Then, mark the center of the height.  The easiest way to calculate the center is to add the height of the baseboard and top trim pieces then subtract that number from your total height.  For example, we used 5 inch base board, 2 inch top trim and a 1 inch thick ‘shelf.’  Subrtact 8 from 36 to get 28 inches.  Now, divide in half and mark.

To create your box grid trim, first install the baseboard.  Now you’re ready to start creating the boxes.

We wanted 10 inches of space inside the boxes, so Ben marked 5 inches each side from his center lines.  We cut 3/4 inch thick MDF sheets to our dimensions, but you can also use square stock trim.

After ripping down the pieces, Ben cut the horizontal box trim 14 inches long to allow the vertical box pieces to butt into the horizontals.  Secure the horizontal pieces to the wall, keeping level.  Once the horizontals are in, add the vertical pieces to complete the box.  After completing one box, measure from the outside of the box to the baseboard and top trim.  Cut several pieces to length, ours are 7 inches on all sides,  nailing centered on the box.  Use the additional pieces as spacers to continue creating the boxes.  Repeat, repeat, repeat.  Then, fill the nail holes, sand, prime and paint both the trim and wall.

Trim: Main Bathroom

Before we remodeled our main bathroom, it had pink on nearly every surface.  Even the walls were covered in a metallic pink floral wallpaper.

Before the wallpaper removal began, we planned to have 18 inches of white trim at the top of the walls, a shelf below and lilac paint covering most of the walls.  We thought the paper would be easy to remove becuase it was peeling.  With our trim plan in mind, we began tearing down the wall paper.

It turned out to be far more difficult than we initially thought.  After hours of scraping, peeling and subsequently damaging the sheet rock, we had removed about 18 inches from the ceiling down.  And that was on one wall!  Time for plan B; we opted to install sheets of beadboard to cover up the remaining wallpaper.  A few more hours of scraping and we had the top 18 inches of wallpaper removed from the entire bathroom.

Once we had the paper removed from the areas we knew would be visible, we cut our sheets of bead board from 4 foot by 8 foot down to 76 inches, leaving them four feet wide.  Ben used an air nailer to secure the sheets to the wall, going in to the studs.  Then, we covered the bottom of the bead board with baseboard, hiding the unevenly cut ends and gap between the panel and floor.

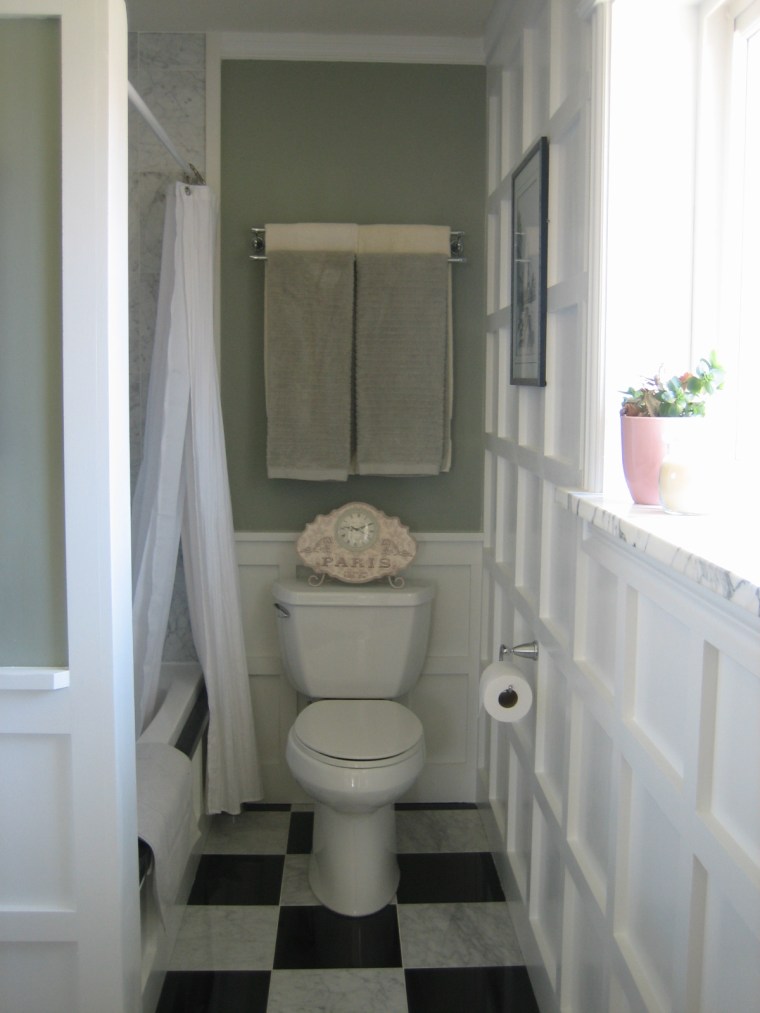
To build the shelf to display and store items, Ben cut a sheet of 3/4 inch thick MDF into 3.5 inch,  3 inch, and 1.25 inch wide pieces.  Then, Ben nailed the 3.5 inch cut piece to the wall 77 inches from the floor, checking to keep it level.  He added shims in areas because this piece was partially covering up the bead board panels.

Once the trim was secured, the 1.25 inch pieces were added to provide additional support for the shelf.  Keep the tops of the trim flush with one another.  Cut the trim pieces at a 45 degree angle when approaching doors or other vertical trim.  Finally, the 3 inch shelf was installed on top of the trim pieces.

Then, of course, fill, sand, prime and paint.  This can be modified to any height.  If a shelf is added, be sure the height works for the use of the space.  You don’t want to bump into it.

Weekend Painting: Chevron Rug

As if painting a magnet board and making a piece of art wasn’t enough, I decided this was the perfect weekend to start mission rug redo.  I bought a jute rug from a local thrift store recently and decided this would be the perfect chance to paint a rug.  Martha Stewart did a segment on painting stripes on a sisal rug, so I used that as a starting point.

First, I created a template to use as a guide for my design.  Starting in the dead center of the rug, I used painters tape to mask off a chevron design, placing my template down and taping around it.  I also made a second template to use as a spacing guide.  After I had my design completely taped off, I used the handle end of a screwdriver to rub the edge of the tape down.

I sent Ben off to the hardware store to get a quart of white oil based paint.  He came back with this:

I started by ‘pouncing’ along the taped lines, just like stencling, to prevent the paint from seeping under the tape.  Then Ev started crying, so I took a break to feed him.  I let my first area of paint dry and peeled back part of the tape to check my lines.

Happily, the paint didn’t bleed under!  So, I painted, and painted, and painted.

Then, I ran out of paint, so I bought a gallon.  I returned home, full gallon in hand and painted some more.  This was by no means a speedy process.  It took about 4 hours to get everything painted.  I let everything dry for 24 hours before removing the tape.  Definitely do this outside, as the dry paint flakes off the tape, making one big mess.

I like the bold pattern.  I think it’s just what this room needed.

In all honesty, I love the look of the painted rug, but not the feel. The paint does dry crunchy, BUT, a jute rug is never squishy and cushy, so it’s not that different than the unpainted rug.  This would be much better in an outdoor setting, like a doormat or ourdoor living area.  Until I can find a plush rug I can afford, this will stay in the boys’ room.  I do think it will make an appearance outside at a later date.

How To: Update a Room with Trim

Over the weekend, a few readers asked about our trim and how we make it.  Well, it’s your lucky day, because I’m here to do just that.

I’m going to explain my how to with the dining room as my example, but it’s almost the exact same for each room.

First, determine the design you would like to have.  In our case, we needed a plate rack and that determined the 67 inch height of our trim.  We already had our 5 inch tall baseboard installed, so we left those.  Ben had installed chair rail, so we removed that.  We decided to place the top of our horizontal piece at 36 inches from the floor.  We measured the length of our wall to find the center.  Once the measuring was done, we bought our trim and got started.

Most of the trim we use throughout our house is MDF (medium density fiberboard – pretty much sawdust glued together).  I will note where we have used real wood.  We use MDF for several reasons.  1.  It’s cheaper than wood and we know we’re going to paint it anyway.  2.  MDF is very flexible, especially compared to wood, so it’s easy to work with.  3.  Because MDF is mostly sawdust, it’s a green material.

We went to a local home improvement store and bought several pieces of 3 1/2 inch wide by 1/2 inch thick square style trim.  This trim does not have any decorative cuts, but does have slightly rounded edges.  We also got one piece of MDF crown moulding , 2 pieces of wooden symmetrical trim for the horizontal center, one piece of 3/4 inch wooden quarter round moulding and one sheet of 3/4 inch thick MDF.

As I said before, we left the existing painted MDF baseboard.  We knew we wanted the reveal (the amount on each side of the symmetrical piece) of the horizontal piece to match the width of the verticals.  Our vertical trim pieces are 3 1/2 inches wide, so we doubled that and added 1 1/2 inches for the symmetrical trim spacing.  So, Ben cut an 8 1/2 inch piece from our 3/4 inch thick MDF sheet.  Then he nailed that piece at 36 inches from the floor, making sure to nail into studs.

Ben cut another piece from our MDF sheet for the top horizontal, to be almost completely covered by the crown moulding.  To determine the size of this piece, measure the height of your crown moulding and add 1 inches.  Secure the trim to the wall 3/4 of an inch lower than your final height.  Nail your crown moulding in, making sure the top of the crown is even with the top of the MDF piece.  Cut another piece from the MDF sheet 1/4 inch deeper than the crown moulding and MDF backing.  Secure this piece on the top of the crown, leaving a 1/4 inch overhang, completing our ‘shelf.’  If you choose to display plates or rest other items on top of this, add your quarter round trim.  Keep the quarter round flush with the edge and nail it into the 3/4 inch MDF piece.

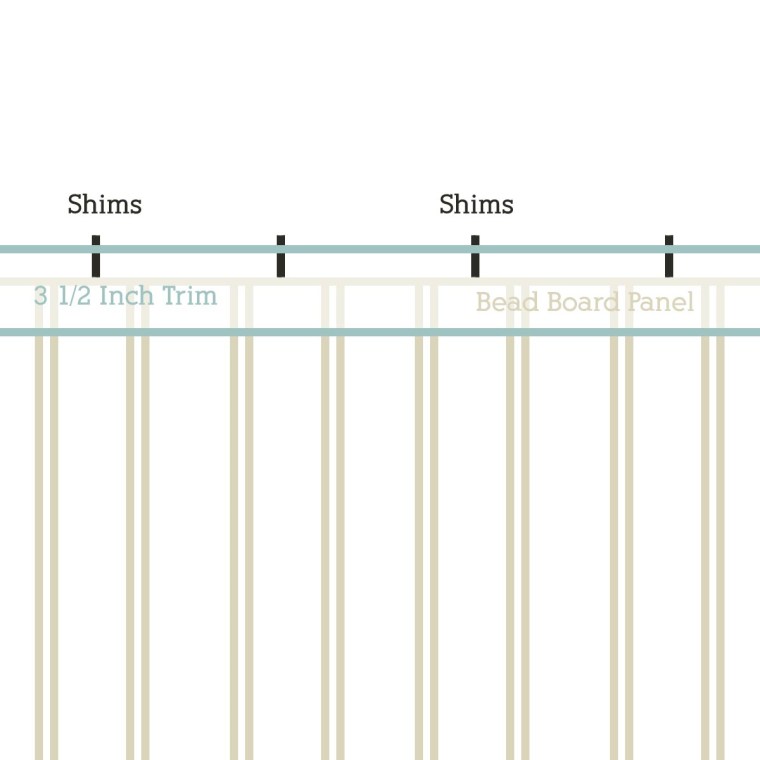
After completing the plate rack portion, Ben started installing the vertical trim pieces.  First, he placed one in the very center of the room.  If you can’t locate a stud, angle your nails toward the center of the piece, helping keep the trim on the wall.  Next, place verticals in the corners as shown on the diagram below, leaving a dead space.  This will leave the same reveal of the corner pieces.

Depending on the length of your wall, you can place additional verticals centered between the middle and corners or break it up in to thirds.  Our verticals are 12 1/2 inches apart.  Do this to the entire room and you’re ready to fill and sand about one million holes.  Caulk all the seams and smooth out.  Prime and paint all the trim pieces as well as the wall.  The end result will be a seamless panel look.  Stand back and enjoy the view.

Additional Notes:  Measure the depth of your trim.  It is much easier to create a wall of trim if your depths a slightly different (1/2 inch and 3/4 inch).  If you use all of one depth, you may have uneven joint that will require sanding until smooth.

If you don’t already have baseboard, it may be easier to install square stock.  This will allow butting the verticals right up to the baseboard, rather than notching out the baseboard to accommodate the verticals.

If you have any questions or need clarification, please ask!

Choosing Paint Colors

Paint colors can be difficult to choose.  A lot of colors look great as paint chips, but not as great in mass quantity on a wall.  We have definitely had our share of colors that seem great, but are atrocious.  We have learned a few tips and tricks (some the hard way) about painting. 

A few months before Ben and I were married, I came out to Montana to visit.  During that visit, we started brainstorming ideas for the first few rooms we planned to finish.  We easily agreed to install white trim in every room.  Then, we chose paint colors, bought a few gallons and went back home.  We chose Ralph Lauren’s Riesling and Behr’s Squirrel.  I liked the airiness of Riesling and the moodiness of Squirrel.  Ben lovingly agreed.  We painted the first finished bedroom Riesling and loved it. 

Then we finished the guest room.  Then we repainted the living room.  When we finally got around to the master bedroom, the tone of the house had been set.  Dark, moody Squirrel was out.  It just didn’t fit.  I loved the color, but it didn’t work with the rest of the house.  We tried a lighter grey, but decided we needed a color that coördinated with the finished rooms. 

Moral of the Story: When choosing paint colors, first think about if the color will coördinate with other colors in your house. 

I am more drawn to colors on the cooler side of the color wheel, like greens, blues, and purples.  Red, orange, and yellow are on the warm side of the color wheel.  In my opinion, pale blues and pinks are by far the least forgiving.

Our master bedroom color scheme is green with pink accents.  When we finished our master bathroom, which is attached to our bedroom, I wanted to switch things up, but not too much.  Rather than green walls with pink accents, I wanted pink walls with green accents.  Well, I chose a light pink, got home and started painting.  Oops!  Definitely not a light pink.  More like bubblegum pink!  Needless to say, our bathroom did not stay pink.  Nope, it’s the same color as our bedroom. 

Moral of the Story: If you’re looking for a pale color, choose one that you like, then buy the lighter version.  Believe me, paint seems to get brighter when you start putting it on your walls.

By far, my favorite paint colors are from Restoration Hardware.  Saturated hues toned down with grey equals perfection in my book.  Thus, many of the colors in our house are Restoration Hardware colors, color matched at Wal-Mart.  Our main bathroom is RH Lilac:

The guest bedroom is painted RH Sea Green:

Our master bedroom and bathroom is RH Bay Laurel:

Our basement and dining room are mis-tinted versions of RH Silver Sage.

The basement bathroom is RH Sycamore Green:

Moral of the Story:  When you find something that works, stick with it.  I love that most of our colors are from the same line of paint, so everything is cohesive and goes well together.

We use satin finish paint in almost all our rooms, with the exception of the bathrooms, where we used semi gloss.  We chose these finishes for durability purposes.  Flat finishes do not stand up to the damage our two-year old doles out on a daily basis.