
For the last five years, I’ve never felt like our living room was complete. The elephant in the room, the entertainment center, was never fully finished. More than anything, it had become a piece I became increasingly unhappy with the look and function.

With a lull between projects, I begged and pleaded with Ben, stating all my grievances and presenting a plan to rectify said problems.

After hammering out all the details, he relented, probably just to shut me up once and for all. We made a trip to the lumber store, gathered all the necessary supplies, and dug right in.

What we have now is exactly what I wished for, with flexibility in mind.

A combination of six drawers and one large center cabinet can store a variety of items, including all. the. electronics.

Upper shelf bays have adjustable tracks to accommodate anything. Even the wider center shelves are held in place with pegs, but to keep it as sleek as possible, we didn’t drill extra holes at this time.

Allowing the appropriate time for the paint to cure is always my biggest struggle. Loading these shelves with all our favorite treasures put a huge smile on my face.

So happy in fact, that I can ignore the unpainted adjoining walls…for now. I’ll paint those, we’ll hang the tv, and also make a stand to better display the stick.

Walking the fine line between curated and cluttered can be hard, so I started my styling endeavor by gathering my favorite items to display. Our boys’ tiny inked footprints, travel time capsules, photos, and other found objects.

For every item placed, I made sure to have a pair or something similar.

Symmetrically styling the shelves feels more thoughtful and less unrestrained.

A black and white photograph taken near the area Ben grew up previously hung in our bedroom entrance. It’s a favorite of mine, never receiving adequate attention where it lived before. I plucked it off the wall and it fit perfectly on a shelf; it’s the perfect anchor piece, filling it, while a few corked jars filled with finds from our journeys round out the grouping.
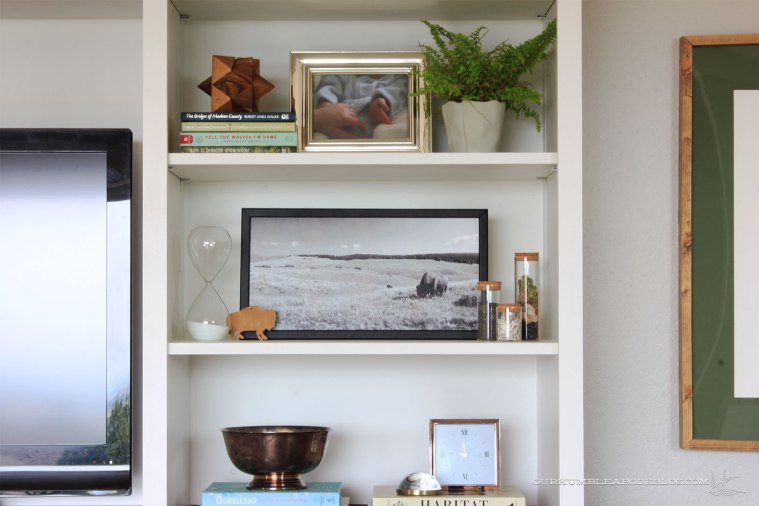
But, I had only one, which didn’t work with my symmetrical styling, so I whipped out a quick DIY art. My goal this year is to get more photos off my hard drive and into view, so I scrolled through photos from our recent Yellowstone trip and opened several in Photoshop. Before landing on ‘the one’ I converted the files to black and white to determine which looked best. With the bison selected, I cropped in different ways to make an interesting composition. Once happy, I saved the file to a USB drive, went to FedEx Office and printed it as a basic 11 by 17 piece. While out, I popped into Lowe’s to get an 8 foot section of corner molding to create a small frame. Mitered corners, a touch of glue, overnight in clamps, bada bing, bada boom, picture frame. Three more jars, an hourglass and small wooden bison complete this side.

Though Ben agreed to do away with two of the five front speakers, we still had three to work into the new design.

By selecting three matching speakers, one set in each bay, tucked close to the ceiling, they draw as little attention as possible.

Even with the same overall dimensions, version 2.0 boasts much more storage potential, equipped for future needs. A version 3.0 shouldn’t be necessary.

Wow! Nice work! Your design is clean and uncluttered and Ben’s woodworking skills shine. The white is much better, too!
Thanks, Peggy!!
This looks great and so functional. I’ve got a questions about how you manage the knick knacks — I’ve shied away from putting too many out because it becomes a pain to dust them all properly. Have you found this to be true or do you have any tricks? I also have two cats who would love to turn some of these into playthings — or just knock them off wherever they’re perched for the fun of it. Not sure if you’d have any ideas for that!
Thanks, MEL! Our house does get dusty pretty quickly, but I’ve whittled down accessories to my favorites or the most sentimental. It also helps that many of mine are natural objects, so dust doesn’t really show up the same way a man made object does. I wish I had a trick, but I just try to keep what I love to limit the amount of stuff. I’m not sure if that helps you…
Thanks!
Amanda
A tutorial on how you did the picture frame would be fun!
Hi Michelle!
I’ll put together a tutorial to share. 🙂
Thanks!
Amanda
Where did you find those cute cork jars for the time capsules of your trips? So cute
Hello Elizabeth!
The jars are from Hobby Lobby! I saw three sizes, and if I remember correctly, they range from $1.99 to 3.99 each. Stock up when Hobby Lobby has their 50% off glass sale.
Thanks!
Amanda
It just looks so perfect! I think you did a great job decorating the room, wouldn’t recommend anything different!