
Last week I shared my thought process for clearing off and painting the bookshelves surrounding the guest bed. Though the version below was the more calm, neutral styled shelves, it recently started to feel too chaotic.

Normally I don’t think there is such a thing as too many books, but I realized I thrift a lot that look good at the time. Then, when looking for a book to read, I decide it doesn’t seem interesting enough and pass it over.

So, when I cleared the shelves, I touched every. single. book and asked myself whether I’d want to read it or not. If the answer was no, it went in a pile. If I didn’t like it enough to recommend it, it also went in the donate pile. Soon enough, I had gotten rid of nearly half of the books.
I had already gone through accessories and have made a strict policy not to buy things on a whim or because I like the clearance price enough to get it. What we now have is a pared down collection, a pretty equal mix of books to accessories.

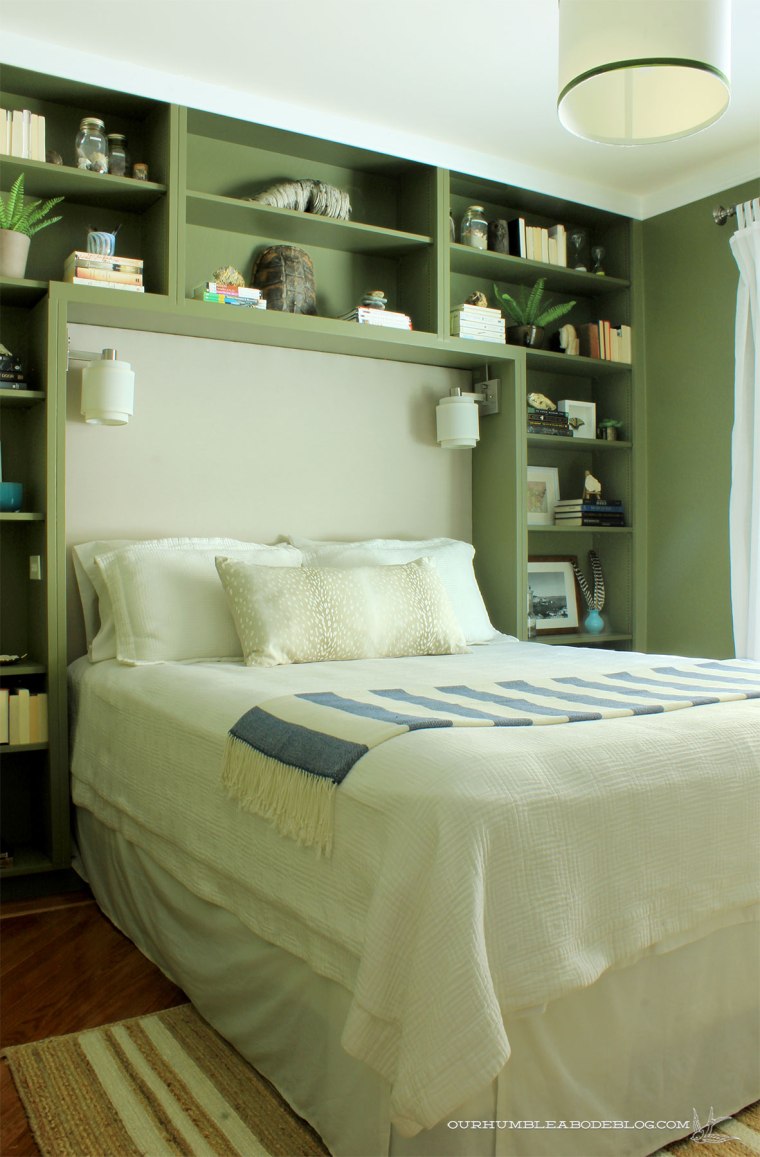
When it came time to load everything back on, I first sorted my books into fiction and non fiction, then sub groups like thrillers and biographies. The left side holds the fiction, while the right is dedicated to non-fiction. Before adding a single accessory, I put a row of colorful books near the bottom, spines facing up to minimize the color, but still leave the title visible. From there, I worked my way up, placing groups of books in a zig zag pattern. This prevents any single area from feeling too heavy, and leaves pockets for accessories later.

With the books in place on one side, I repeated the process on the other, making the sides symmetrical. Now, time to accessorize! The shelves at bed height double as nightstands, so I kept those pretty clear.

Each side has a framed black and white photo from trips taken, a small vase with feathers, and something decorative but still useful. A ceramic tray to collect items and a carafe. I like that the photos have significance to us, but aren’t overly personal for a guest space.


On the top center shelf, I placed an interesting log to simply fill the space. On the lower center shelf, I placed a turtle shell in the middle, flanked by a stack of travel books and interesting rocks.

Very few of the accessories are decorative items purchased from a store. Most are items we’ve collected from various places, from walks around our neighborhood to items collected on trips. A clear plastic tray holds teeny tiny jars of sand and such, pressed pennies, favorite shells/coral, and little trinkets picked up. To most people, these are worthless items that cost a few bucks at most. But to me, they’re priceless reminders of time spent and places visited.

A photo taken by a local artist fills one wall, and I love the view from this bedroom toward ours.

I also love catching peeks as I walk from our boys’ room, spotting a little bit of a fun bit of color.

More than anything, I’m happiest with the breathing room I now feel. It feels amazing to let go of some things, making what is kept even more noticeable and worthy of space.

The green is so beautiful! It’s such a restful, earthy color. I love that you decorate with natural items and mementos from trips. Why keep them stored in a box when you can enjoy them every day? I’m sure each of your guests will feel right at home in this room. 🙂
Alicia
I love the things you included on your shelves! I like how you turned some of the books on their side while still being able to see the titles. Books and items from nature are my favorite. I recently reorganized some of our shelves and included books about our hobbies, field guides and state park info, games we play often, and DVD’s. Everything on it is so useful, and I love how it looks. It was inspired by a nature room at a park hotel when I looked at their shelves and thought, why didn’t I organize our shelves like that? Ha,ha. So, I came home and did it. Thanks for sharing your projects!