Closet Configurations

With all of the major projects finished in our house, I’m hoping to turn our attention to the smaller tasks.  Assuming we have the time and desire between client remodels.  The biggest to do is updating our master closet.  When we moved in, I was thrilled to have a walk in closet, but it was a bit beat up and seemed to have a lot of storage.

Master-Closet-Before

I painted the shelving white and the walls a fun teal color before moving our stuff in.  It certainly has plenty of space for our needs, but not the greatest for our needs.

Master-Closet-from-Bedroom

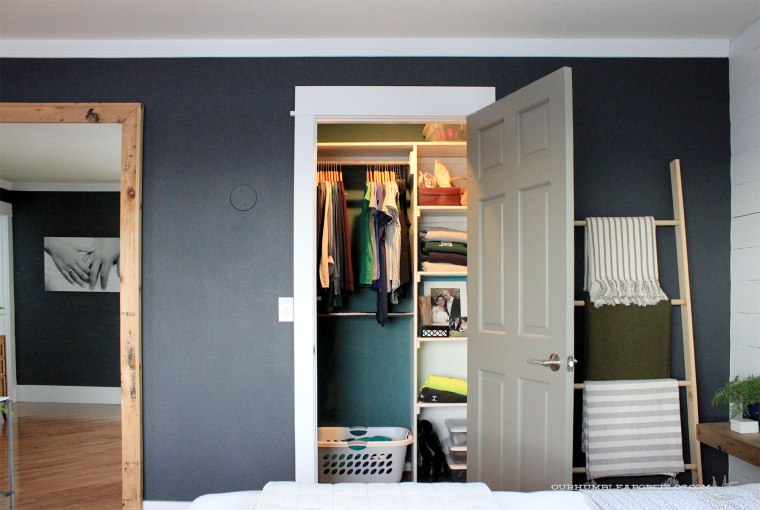
While I love the shelving stacks, the shelves aren’t adjustable, leaving big gaps.

Master-Closet-Center-Divider

The flooring is also cheap commercial like carpet tiles, which I’d love to replace with hardwood floors to flow seamlessly.  Replacing the flooring would require tearing out the current shelving, so I’ve been planning what I would like to change, and here’s what I’ve come up with:

Master-Closet-Layout-Plan

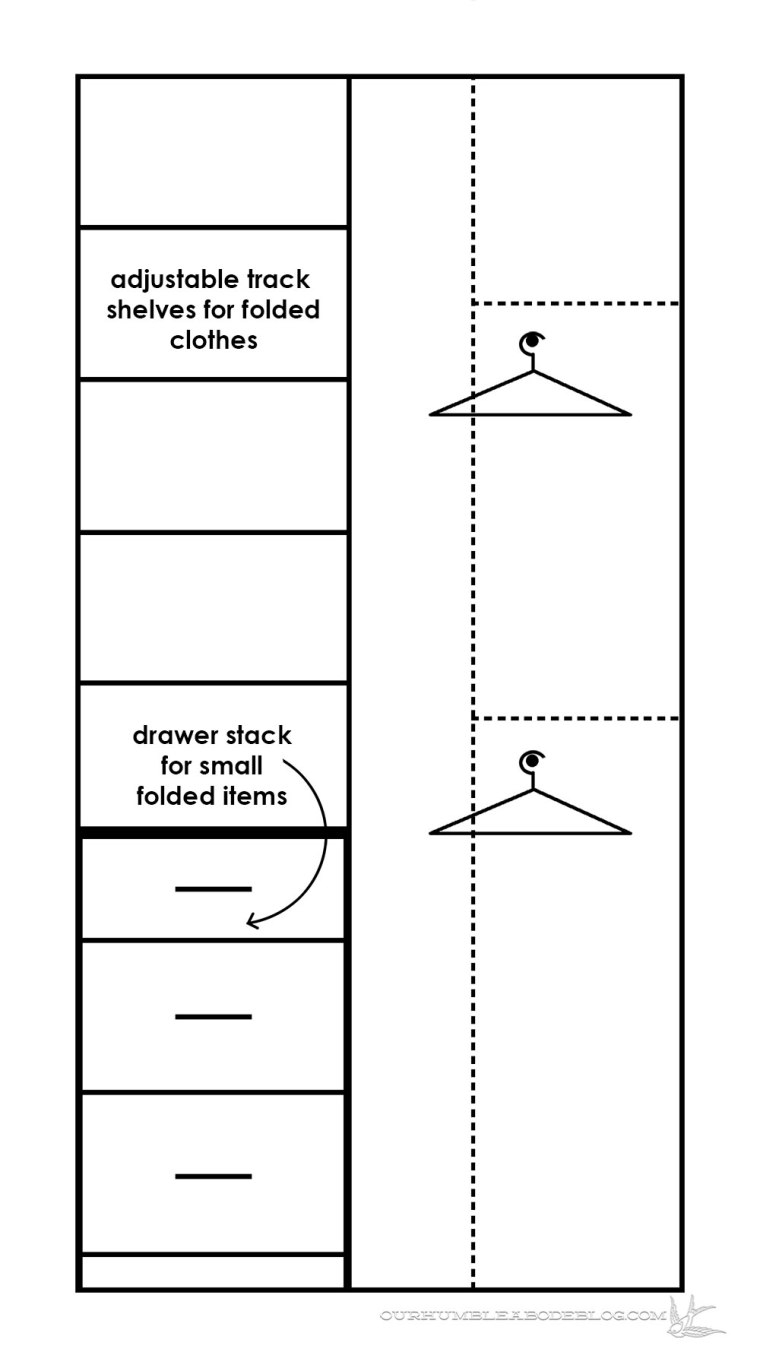
The double hanging rods are great, so we’re keeping that set up.  A tall center stack to divide our sides is also really nice.  I’d like to widen the center tower, adding a tilt out hamper to the bottom.  Shelving with an adjustable track above will allow us to store shoes within easy reach, not in bins along the top shelf.  I’d also like to add a shelf above each hanging bar.

Master-Closet-Right-Side

Each end of the closet is currently set up with a shelf stack.  Again, it’s good storage, but not great.

Master-Closet-Left-Side

Drawers on the lower 36 inches to store socks, underwear, folded shirts, and pajamas will be a game changer.  More adjustable shelves above will allow flexible storage, from bins to purses to seasonal items.

Master-Closet-End-Layout

At 4 feet deep by 11 feet long, there’s not much wiggle room for other configurations, so it’s more about smart solutions.

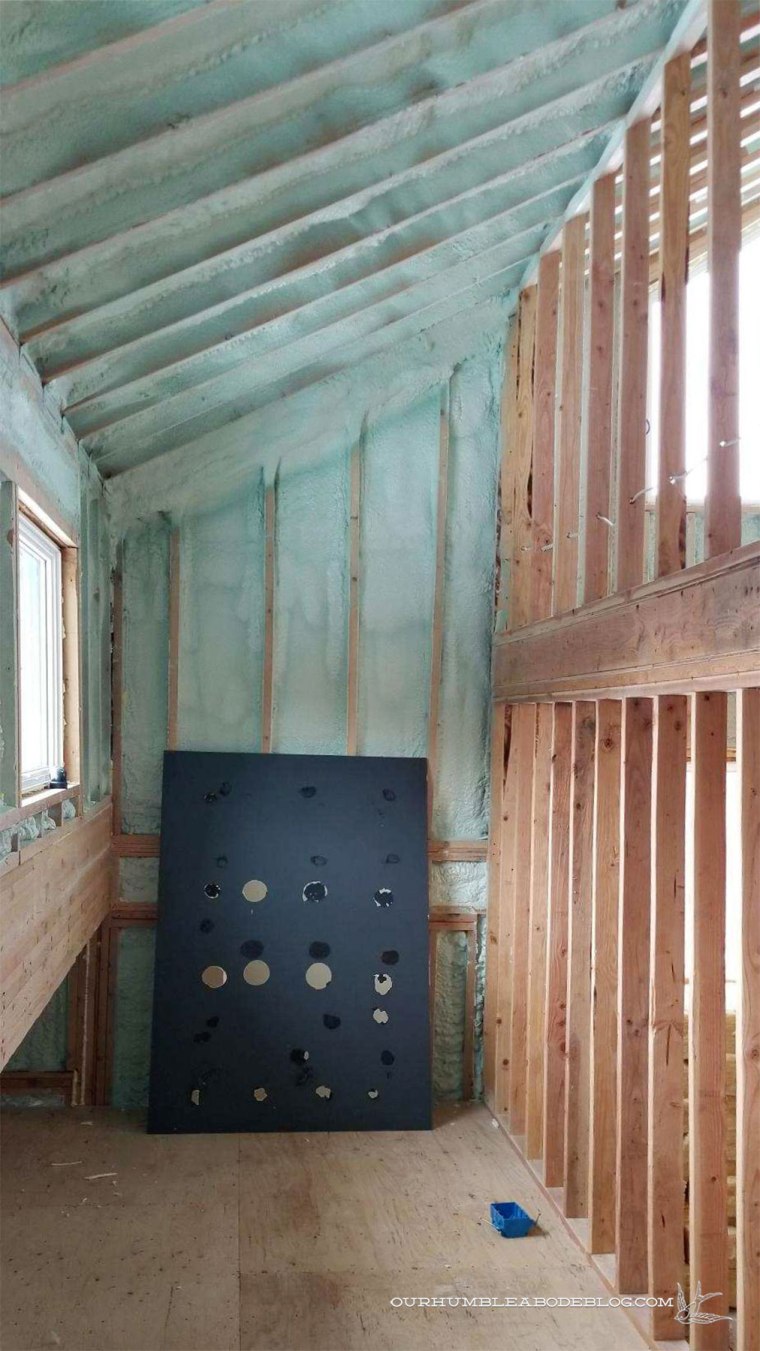
Apparently it’s closet planning season, because a few weeks after discussing my plan with Ben, I was asked to help plan another closet.  Currently, it’s an unfinished shell with loads of space and potential.

Alaska-Closet-Window-Wall

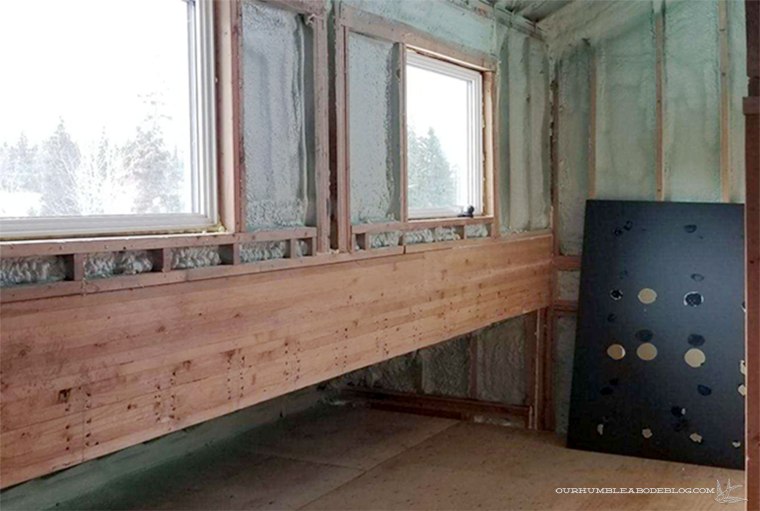
I recommended cabinet doors below the windows, allowing easy access to the deep storage while keeping everything hidden.

Alaska-Closet-Entry-End

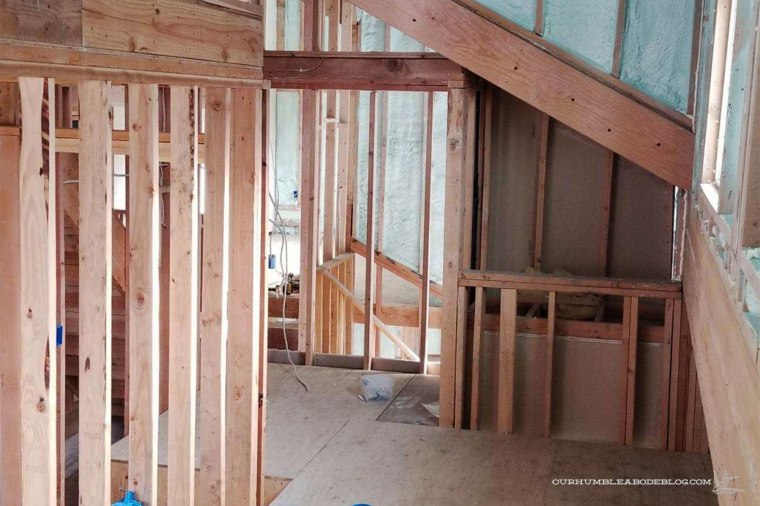
It’s a unique shape for a walk in closet, with the option to create zones for different types of storage.  Daily access, seasonal items, and over-sized/infrequently used items.

Alaska-Closet-Floorplan

Daily access items on the far end and right side of the photo below.

Alaska-Closet-Toward-End

The far end would allow for a shelf stack and a spot for long dresses and such.

Alaska-Closet-Narrow-End

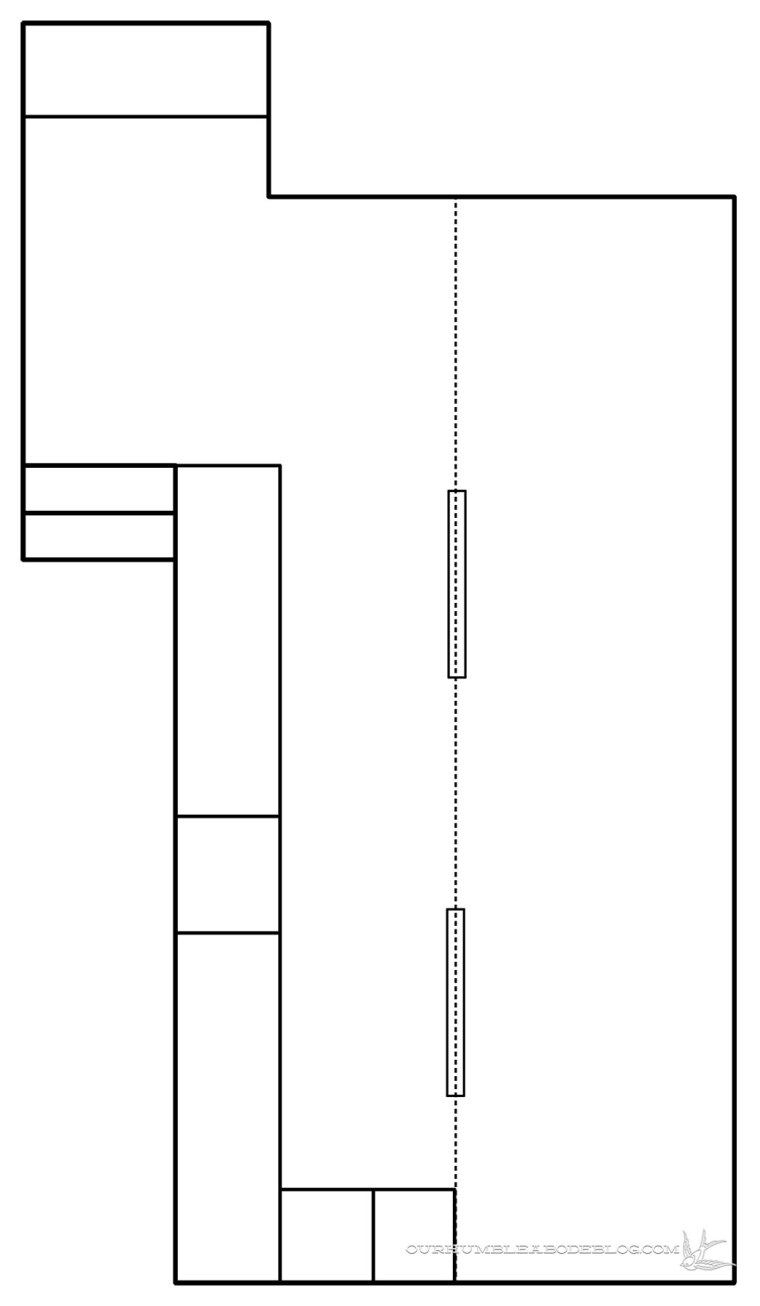
On the right side, a bigger version of our plan:

Alaska-Closet-Wide-Side-Plan

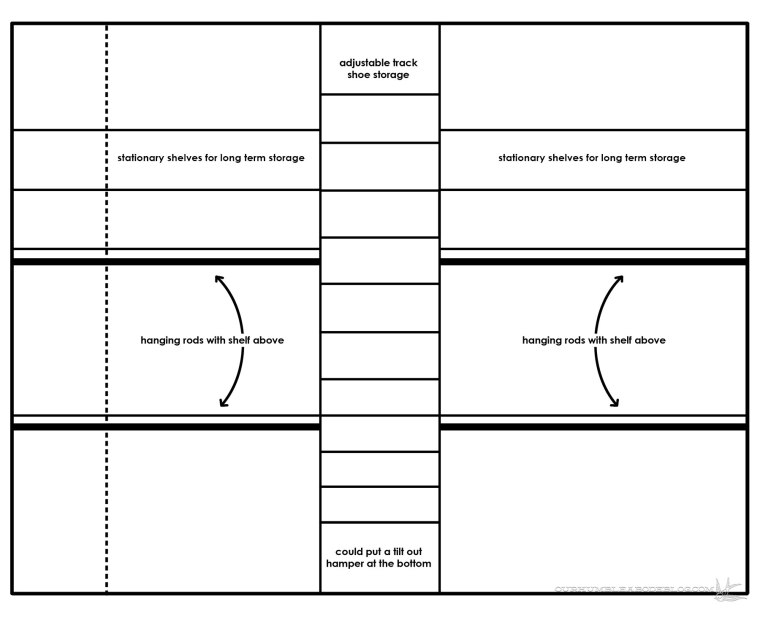
I love the combo of stationary and adjustable shelves to maximize storage options.  Shelves can easily be lowered to fit oodles of shoes.  Or raised to accommodate a taller bin for hats or other items.

What are your favorite closet organizing solutions?

Simplifying and Styling a Bookshelf

Last week I shared my thought process for clearing off and painting the bookshelves surrounding the guest bed.  Though the version below was the more calm, neutral styled shelves, it recently started to feel too chaotic.

Guest-Bedroom-Bookshelves

Normally I don’t think there is such a thing as too many books, but I realized I thrift a lot that look good at the time.  Then, when looking for a book to read, I  decide it doesn’t seem interesting enough and pass it over.

Green-Bookshelves-Vertical-Overall

So, when I cleared the shelves, I touched every. single. book and asked myself whether I’d want to read it or not.  If the answer was no, it went in a pile.  If I didn’t like it enough to recommend it, it also went in the donate pile.  Soon enough, I had gotten rid of nearly half of the books.

Green-Bookshelves-Styled-Overall-from-Door

I had already gone through accessories and have made a strict policy not to buy things on a whim or because I like the clearance price enough to get it.  What we now have is a pared down collection, a pretty equal mix of books to accessories.

Green-Bookshelves-Styled-Left-Side-Overall-Book-Arrangement

When it came time to load everything back on, I first sorted my books into fiction and non fiction, then sub groups like thrillers and biographies.  The left side holds the fiction, while the right is dedicated to non-fiction.  Before adding a single accessory, I put a row of colorful books near the bottom, spines facing up to minimize the color, but still leave the title visible.  From there, I worked my way up, placing groups of books in a zig zag pattern.  This prevents any single area from feeling too heavy, and leaves pockets for accessories later.

Green-Bookshelves-Styled-Left-Side-Overall

With the books in place on one side, I repeated the process on the other, making the sides symmetrical.  Now, time to accessorize!  The shelves at bed height double as nightstands, so I kept those pretty clear.

Green-Bookshelves-Styled-Right-Night-Stand

Each side has a framed black and white photo from trips taken, a small vase with feathers, and something decorative but still useful.  A ceramic tray to collect items and a carafe.  I like that the photos have significance to us, but aren’t overly personal for a guest space.

Green-Bookshelves-Styled-Left-Night-Stand

Green-Bookshelves-Styled-Right-Night-Stand-Detail

On the top center shelf, I placed an interesting log to simply fill the space.  On the lower center shelf, I placed a turtle shell in the middle, flanked by a stack of travel books and interesting rocks.

Green-Bookshelves-Styled-Overall

Very few of the accessories are decorative items purchased from a store.  Most are items we’ve collected from various places, from walks around our neighborhood to items collected on trips.  A clear plastic tray holds teeny tiny jars of sand and such, pressed pennies, favorite shells/coral, and little trinkets picked up.  To most people, these are worthless items that cost a few bucks at most.  But to me, they’re priceless reminders of time spent and places visited.

Green-Bookshelves-Tiny-Glass-Jars

A photo taken by a local artist fills one wall, and I love the view from this bedroom toward ours.

Green-Bookshelves-Styled-Overall-from-Window

I also love catching peeks as I walk from our boys’ room, spotting a little bit of a fun bit of color.

Green-Bookshelves-from-Hall-with-Frames

More than anything, I’m happiest with the breathing room I now feel.  It feels amazing to let go of some things, making what is kept even more noticeable and worthy of space.

Going Green

A week ago, I posed the question on Instagram: To paint, or not to paint the guest bedroom bookshelves.  Here’s how they looked last Friday:

Guest-Bookshelves

White with lots of items filling the shelves.  This whole paint or not situation started festering in me about six months ago, but I always talked myself out of it.  Not because I didn’t think the change would look great, but because I didn’t want to take the time to clear off the shelves and take the time to paint everything.  So, I made up a quick Photoshop rendering to convey the idea of painting the shelves.

Photoshopped-Green-Bookshelves

Many on the Instagram poll said yes, but about one-third said no.  I found this inspiration image, which I think better showed my intention to paint than the above Photoshopped design.

House-Beautiful-Palmer-Weiss

I’ve been on a purging kick, so I had already started to clear out unwanted items from the shelves, so I took painting as an opportunity to start fresh.  On Saturday morning, I went to Sherwin Williams with my color, Olive Grove, selected and bought a gallon of the Emerald Urethane Trim Enamel paint.  I started with the backs, before moving onto the rest of it.


Green-Bookshelves-Starting-with-Backs

The paint is on the thin side, but two coats covered most everything.

Green-Bookshelves-Starting-with-All

I decided to keep the upholstered linen headboard for contrast, but did paint the walls to match.  Just after putting the bed back in place, the sun came out and made it appear much bolder, more Chartreuse on camera:

Green-Bookshelves-Painted-Overall

Green-Bookshelves-Vertical-Side

In actuality, it’s a deeper, muddy, but not too muted olive-green, more accurately shown below:

Green-Bookshelves-Vertical-Overall

I love the way the headboard and sconces now stand out against the colored shelves.

Green-Bookshelves-Left-Side-Detail

Letting fresh paint dry and cure before loading everything back up tends to be the hardest part for me.

Green-Bookshelves-Side-Detail

In the time I wait to load back up, I’m going through every.single.book and brutally whittling down to only those I truly want to read, have read and would read again or recommend.  My goal is to keep about half, making the shelves appear simpler.

Artful Personal Touches

I’m a big believer that homes should function as the family living there requires while also being a display of the personalities inside.  Art is such a personal preference and should tell our stories.  I love a mix of pieces from artists, but also photos we’ve taken.

Photo-Stack-Toward-Guest-Room

To make photos appear more artistic, I prefer simple black and white.  I love this photo taken on our recent trip to Zion National Park, but in a small space such as our hall, color photos feel more chaotic.

Zion-Sheep-Color.jpg

By converting it to black and white, I now have a photo that can mix well with any other photos.

Zion-Sheep-Black-and-White

For photos featuring people, candid shots are so much better than staged photos.  I find I’m always behind on a hike, or off to the side to capturing (or attempting to) the moments going on.  Which means I often have photos of my family taken from behind in beautiful scenery.

Glacier-Black-and-White.jpg

I opened my favorites into Photoshop to adjust to black and white, bumping the contrast and adjusting to see which photos translate best to black and white.  Some photos look great in color, like the contrast here between the pale blue sky and the deep red cliffs.

Red-Cliffs-Color.jpg

When converted to black and white, it doesn’t have enough contrast and variety to work well.

Red-Cliffs-Black-and-White

After testing a variety of photos, I selected my top four to have printed at a local print shop on white card stock.  The four sheets set me back 84 cents, so it’s an affordable way to update as more favorites come along.

Photo-Stack-Detail

I grabbed four frames from my stash, popping the prints in behind white mats.

Vertical-Photo-Stack-from-Boys-Room

Hung in a stack in a narrow sliver of our hall between doors, the photos are a perfect mix of art and memories.

Vertical-Photo-Stack-in-Hall-End

While on an art swapping kick, I decided to simplify the shelves off to the side of our fireplace.  Before, I had a collection of photos, some recent and some of our parents as children.

Family-Room-Shelf-and-Fireplace

Instead of the full, layered shelf display, I limited myself to about 5 elements per shelf.  Ignore the dimensional scrap lumber thrown into the wood box and pretend it’s all pretty logs.

Fireplace-Shelves-and-Fireplace-from-Sofa

Simplifying the pieces allows more attention per item.

Fireplace-Shelves-from-Sofa

I started with a piece of driftwood, giving an organic, sculptural form to the top shelf, balanced by a small green vase for a tiny dose of color.

Fireplace-Shelves-Overall

Below, a framed black and white photo in a square frame layers behind a wooden shadow box.  A plant  to add life and a wooden star puzzle to add warmth round out the middle shelf.

Fireplace-Shelves-Lower-Detail

The shadow box displays a rainbow group of rocks, all collected from a lake near Glacier National Park.  To enhance the rock colors, I sprayed each with a coat of a satin polyurethane before gluing the rocks in a grid.

Rainbow-Lake-Rocks-in-Shadow-Box

On the bottom, a vase of long matches, a pair of silhouettes of our boys as babies, and a vintage wooden bowl filled with loose photos rounds out the grouping.

Bowl-with-Photos-on-Shelves-by-Fireplace

These updates cost little to no money, using everything I already head with the exception of the black and white printed photos.  Despite these being small changes, I take notice of them and love the fresh feeling.

Cottage Inspired Quick Changes

We’re mid way though a main level remodel in a cute little cottage.  There were plenty of things the owners didn’t love, such as the kitchen, hence the remodel.

Cottage-Kitchen-Before

Through the years, some changes have been made, taking out original elements, but there are still beautiful details original to this 1940’s charmer.

Cottage-Dining-to-Kitchen-Before

The mix of red and white oak short cut floors, wall vent registers, one single panel door with original hardware, and most casement has stayed throughout the home.  While working on this remodel, our goal is to update, but make it look as if it is a fresh version of the original.

Some items below have already made their way into the house.  Others might in the near future, while some are simply inspiration.  I love the character this 40’s cottage has, and all happen to be relatively quick and affordable updates to make to any home to add charm to a room.

Cottage-Quick-Change-Selections

Single Panel Door     2  Hinge with Ball Finial     3  Clear Glass Sphere Chandelier     4  Flush Mount Light      5  Semi-Flush Mount Light     6  Primed Base Moulding     7  Primed Casement     8  Cabinet Knob     9  Cabinet Pulls     10  Vent Cover     11  Door Knobs

Cabinet install started today, so keep an eye out for updates on the #client40scottage soon.  Are you planning on any quick updates to your home this weekend?