Guest Garden: Hernando House

In the interest of sharing many types of gardens, today, we have Cait from Hernando House to share her plans for a future garden.

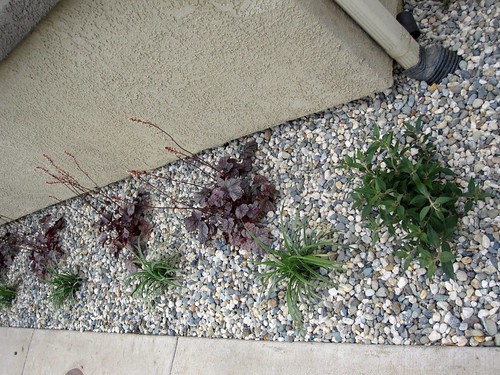
I’m so excited to be guest posting for Amanda today! However, when she first asked me to do a guest post she mentioned that she was hoping for something garden-related, and unfortunately I have a brown thumb and our backyard has been looking like this recently:

And this is an improvement, trust me.

My husband, Robert, and I have plans for a reclaimed brick patio in the works, so we recently sledgehammered out some oddly placed concrete (old deck foundation maybe?) and began chipping away at some wavy tile (which we think might cover a former pool deck or an amoeba shaped patio). The plan from there is to cut the wavy portion of concrete off about 12 inches out from the porch wall for drainage purposes, and then re-tile with some terra-cotta tile we got from my parents, which should coordinate better with the brick patio than the mismatched indoor tile below. We’re hoping to only spend about $250 between materials and saw rental, especially since we were fortunate enough to get reclaimed brick from friends and family. You can read more about our planning and budgeting here.

We have had to take a break from working on the yard recently, thanks to Florida’s afternoon & evening summer showers and the thick smoke from nearby wildfires. During this forced break, I have been daydreaming about what our backyard will look like when everything is “finished” (which honestly won’t be for quite a while, even after the patio is done), and refining the plan we came up with this spring (originally created with Better Homes & Gardens Plan-a-Garden, since refined in Photoshop). Robert and I are drawn to a rustic industrial look with modern influences, so most of what we have been planning follows along those lines.

This is the layout I daydream about; not to scale.

We built an outdoor shower surround along one side of our house this spring, and though we have yet to plumb it we know it will get a lot of use after summer yard work and it’s already great for washing our two dogs without getting a drain full of dog hair.

Our galvanized outdoor shower surround.

We’d like to have a walkway from the patio to the outdoor shower, most likely using gravel and stepping stones like the picture below.

from Pinterest

The fence along the back of our yard needs to be replaced and we are considering something galvanized, to fit in with the look of the outdoor shower. This should be fairly simple (assuming our neighbors also like the look) because we already know about working with galvanized sheet metal from building the shower.

from Pinterest

In one corner of the yard we envision a shallow pool made from a livestock tank, an idea that we saw when The Brick House featured the one below (from bigBANG Studio, and it has become very popular on Pinterest recently). We also plan to put a low deck around our pool.

bigBANG studio

I would like to have a couple of galvanized planters along the edges of the patio, filled with Lemon Balm and Purple Heart plants (also called Purple Wandering Jew; the purple plant seen below), like the ones Erica from Urban Grace Interiors has in her garden. My aunt recently told me that Lemon Balm is a great natural mosquito repellant, and my parents have had good luck with Purple Heart plants, so hopefully even my brown thumb can grow those. As for the rest of the yard, we’re planning to try some hardy, drought resistant grass.

As for furnishing the patio and deck, I’m constantly changing my mind. We will probably work with our existing table and chairs when we first finish the patio, and save up for some newer things while we make up our minds. Currently I’m loving the combination of the Ikea Applaro chaise lounge, the Regal Rochester Metal Frame chair from CSN, a couple of Portfolio Outdoor Wall Lights from Lowe’s, and a couple of strings of Commercial Patio String Lights. The plant shown is a Lemon Balm from here.

Thanks so much to Amanda and Ben for letting me guest post today! I hope you enjoyed reading about my plans for our backyard.

Guest Garden: Design Build Love

We started off garden week by sharing what our garden has looked like over the past five years.  We’ve invited four fantastic bloggers to share their gardens with you as well.  First up, we have Ashley from Design Build Love, a DIY blog with so many inspiring ideas.

Design Build Love Blog Header

Hi y’all, I’m Ashley and I blog over at Design Build Love!  Let’s just say that I was super excited when Amanda emailed me about guest blogging over here, and I was more than willing to participate in her week-long garden series! I absolutely adore Amanda and am in LOVE with her house and her blog, as I’m sure many of you are too!!! And, I’m totally diggin’ her recent AA meeting bench re-do! Go Amanda!!!

If you happen to head over to my blog, you might notice that I often refer to my blog as “our” blog and that’s because I have an amazing husband named Eric, who’s always by my side to join in on each and every project I dream up! This is us:

summer-2010-319We’re young, newlywed professionals who moonlight as designers/home-improvement-DIYers! Our motto: We’re BUSY, we’re FRUGAL, and we LOVE to DO-IT-OURSELVES. We save to buy what we want, and if it’s out of reach, we build it ourselves! We’ll never pay someone to do something that we can do ourselves (unless there’s a safety issue), because we both believe in learning, and with a little eagerness and determination, we usually can accomplish any of our projects!

Anywho… on to the outdoors! If you follow our blog, it’s no secret that we’ve been feverishly working on our front and back yards for most of the spring and summer, but I just thought I’d give you guys a quick snapshot of our front yard.

We started with a fairly unattractive situation when we bought our house. Things were ugly, poorly groomed, and sparse. It’s safe to say that little love when into this…

122

126

IMG_1634

127

After holding out for a little over a year (while we tackled some major project inside), we finally plunged, head-first into some major tearing out and prepping of the planters, and ended up with this!

IMG_2119

IMG_2124 v 2

IMG_2071

IMG_2131

You can see more pictures of the process here and here, but our basic steps were tearing out everything, rototilling the dirt, laying a drip system, planting plants, placing weed cloth, and bringing in the rock to finish it off!

We even potted some flowers to make the front entry more inviting! (please ignore the unpainted strip on the door… it’s temporary while we’re refinishing our solid mahogany door) The pots were a sweet birthday score from my momma! Being the amazing shopper that she is, she snagged these heavy duty, painted pots at Ross for $12 and $15! Score!!! And they totally compliment the colors inside our home!

IMG_2128

When we decided to delve into yard projects, we wanted to be certain we got the best prices and selection, but also the most information. So, to properly select all of the plants, we visited our local Lowe’s and our local nursery, Green Acres. Both were extremely helpful, but the local nursery is where newbies like us can really get a great botany lesson!!!

Overall, we are absolutely IN LOVE with our new curb appeal! Our favorite things is probably the rock, the Mexican Petunias, and the Sweet Pea bushes.

IMG_2066

IMG_2061

The only things that we would change are these ugly square patches of “plants” that someone (no names) convinced us to get… BUT… they’re already gone (sorry, no updated pic at the moment)! Aren’t they totally oogly

IMG_2123

All-in-all, we’re super proud of what we accomplished and can’t wait to see all of the plants flourish! DIYing all of it saved us some serious cash, as well as buying the less mature plants! So, cruise on over to the blog for updates on the growth! Oh ya… and see that paver patio just behind the plants… that’s new too and we’ll hopefully be DIYing a bench for that spot in the near future!!! After that, the bench just might be our new favorite thing!

I hope y’all stop by our blog for a visit! We’d love to have you!

~Ashley

How Does Our Garden Grow?

We’re kicking off the first annual garden party week, starting with our humble garden.  The catch?  Before you’ll see our current garden, you’ll have to endure the past five years.  Be prepared, it wasn’t always pretty.  And it could still use some work.  Ha.

In the spring of 2006, our front yard was so bare.  One pine shrub, one dead something and large rocks.  That’s about it.  Yes, rocks are the manly version of landscaping.

In the fall of 2006, we planted tulips and allium.  Spring of 2007 rolled around and we had bulbs galore, along with a few other perennials.  And a lot of dirt.  Oh, and a dresser waiting to make its way inside.  And untrimmed windows, installed the year before.  We really are classy.  Ha.

Honestly, I have a black thumb, so even this was a huge accomplishment.  But, I almost forgot just how ugly this actually was.  The dirt really bugged me the most.  Especially because the other side had boxwood, my favorite evergreen, surrounded by washed river rock.  And, if you look closely at the far right corner, you’ll notice a small topiary tree.

By the end of the season, it died.  Too little sun under the giant maple trees.  The small three trees (the two on the left were peach trees and the right was a weeping cherry) in the foreground followed a year later.  Fruit trees are Ben’s kryptonite.  Seriously, he is a sucker for any fruit tree.  I’d like to say I was sad to watch them go, but I wasn’t.  I don’t want our front yard to look like a mini orchard.

While the front yard was getting attention, the north side was not.  Shade areas were tricky to me, so all we had were two lily of the valley I had transplanted from my great grandma’s garden back in Minnesota.

Notice the chain link fence, too?  That has changed since, too.

In the summer of 2008, we let the perennials die ripped out the front garden to plant several rose bushes and covered the dirt with more washed river rock.  Sadly, I don’t many photos of this.

Apparently, I was too busy trying to raise that cute little boy.  We built the window boxes and shutters that same year.  No photos of the boxes then, either.  However, in 2010, here is the green and purple color scheme we had.

The boxwood have ha their ups and downs.  This year, they’re looking better than ever.

My favorite rose-bush had flowers that started off an orange-peach color and turned pink as they aged.

Sadly, this past winter killed the plant.  Odd, considering I’ve had really good luck with the roses.  But that’s the way the cookie crumbles.  We planted three new pink rose bushes this year.

How has your garden grown?  Have you ever planted something only to realize you don’t like how it looks a year or so down the road?  Or have it die from some unknown (or known) cause?  Other than normal growth, does your garden change often?

Gimme a Giveaway: Jessica Alpern

***This giveaway is no longer accepting entries, Thank You!***

You remember Jessica Alpern Cuts Paper, don’t you?  Yes.  Good!  No, well let me refresh your memory, because you’re going to love her and her fantastic work.  We have one of Jessica’s fantastic, intricate cut outs in our bird, tree and feather art gallery.

The black nest to the top left is a hand cut silhouette, filled with charm and character.

My favorite detail is the little feather.  So cute.  And, I love that Jessica mounts the cut outs to vellum or plexi glass, so you can change up the background color if your room (or mood) changes.  We also picked up a Spork, Welcome to the family cut out for our kitchen, but those weren’t the only cut outs we loved.  In fact, it was hard to choose.  Jessica has everything, from real, nature inspired cut outs like these:

Leaf Skeleton

Dinomite

Peacock Feathers

But, if you’re looking for something with a little more personality, Jessica’s got you covered with light-hearted, humorous cut outs like these:

Long Stride Evolution

I Made You a Mix Tape

Heck, she can make a custom silhouette of you furry friend.

The Goods: One $30 and another $45 store credit, good for or toward anything by Jessica Alpern Cuts Paper

To Enter: Subscribe to follow Our Humble A{Bowe}d, if you’re not already.  To subscribe, click the “Sign Me Up!” button under “Be the first to know.”  Once you’ve subscribed, leave a comment, which can (but doesn’t have to) include our Just for Fun question.

Just for Fun:  When I was younger, I loved when Dave Coulier, aka Uncle Joey said, “Cut it out” on Full House.  What is your favorite TV catchphrase?  If not a catch phrase, favorite funny TV moment that frequently pops up in conversations?

For additional entries:

1. Add Jessica Alpern to your Etsy favs, come back and leave a comment telling us what your favorite item is.

2. Like Our Humble A{Bowe}d on Facebook, come back and leave another comment.

Contest Closes: Thursday, June 30th at 11:59 pm, central time.

Number of Winners: Two!

Ships: Anywhere on the globe!

Other Info: We will select the winner using random.org and announce on Friday, July 1st.  Good luck!!

Don’t Take Any Wooden Gifts

No, there is nothing wrong with wooden gifts. Just making a joke about the old “Don’t take any wooden nickles” saying. The traditional five-year anniversary gift is wood.  Ben is tricky to buy for, especially when it comes to wooden gifts.  He already has wood working tools, and the one he wants is about $1000, so that wasn’t happening.  I considered a nice wooden cutting board like this from Red Onion Woodworks but that seemed a little too utilitarian and not so romantic.

I switched gears and started thinking of art ideas.  We always need art, right?  A quick search on Pinterest yielded a  few results, like this sweet cut out.  I’ve actually seen Julene’s amazing work before on her site and love the attention to detail.

Seriously, check out these custom pieces.

Pretty fantastic, huh.  Well, luckily, Julene has an Etsy shop to sell limited edition laser cuts.  I thought this listing was adorable.

But, it isn’t wood, is it?  Well, a wooden frame can fix that in a hurry.  Ben thought it was cute, too.

I thought about wrapping it in a faux bois paper, but ran out of time.  Oh, and, I could always swap out the backing for a piece of stained wood veneer.  I recently created a custom Family Tree cut out with a wood veneer backing.  I think it’s fabulous.

That’s the 411 on our anniversary gift giving.  Ben gave me a dinner to our favorite restaurant, sans kids.  That rarely happens.  Do you give traditional wedding gifts?  If so, what creative year gifts have you come up with?  Year six is iron.  That could be tough.