Tubs, Tile, and Inspiration

I’m seriously chomping at the figurative bit to get started on our bathroom remodel.  Hopefully we’ll finalize measurements soon and start ordering and building.  Eek, I’m so excited.  Want to see what we’re thinking?

The claw foot tub that we pulled out of the main bathroom will go our master.  We need to refinish it, and I’m thinking a charcoal gray exterior with gold feet, like this:

Or going all charcoal on the outside, feet included, like this:

Either way I think it will be fantastic.  And we’re probably going to use the brass plumbing the tub already has, too.

For the vanity, we want to include warm, dark wood, probably as a countertop.  A sleek round mirror and brass hardware accents, like this will tie in the brass tub plumbing.

A semi recessed vessel sink like this one would be perfect with a faucet similar to the photo above.

On the floors, we’re going to the dark side with gray slate (same stuff we used on the fireplace) set in a brick pattern, like this:

But in the shower, we want light and bright.  What’s better than white marble?  Well, white marble set in a herringbone pattern of course!  Similar to this, but a smaller tile:

And a barn door to allow space for the tub.

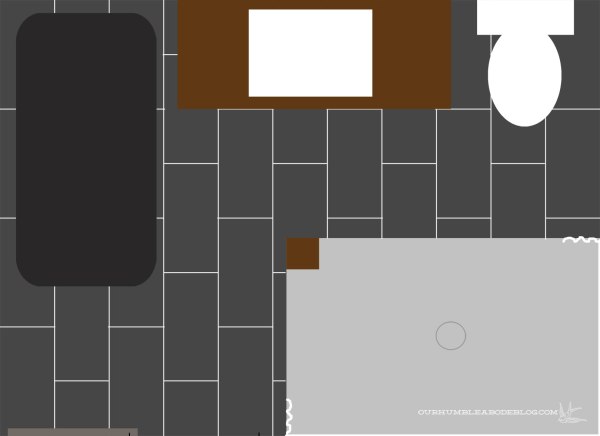
If we left the door as it currently is, it would bump into the proposed tub spot.  So here’s the proposed floor plan, with a single sink, free-standing tub, and an open shower.

Master-Bath-Floor-Plan-with-Tub

I’m ready to get this party started.  By party, I mean demo.  Of course more details to come as we make progress.

A huge thank you for all the kind, encouraging words and support on Monday, too!  You all are wonderful.

Be Brave

I usually try to keep this blog home, improvement, and project related.  On occasion, personal life creeps in.  Today is one of those days.  My 24-year-old sister was diagnosed with stage 3a Melanoma Cancer in March.  Sadly, it seems everyone knows someone who is battling or has battled cancer.  In honor of the loved ones fighting this monster disease, I’ve created a Be Brave text bubble cut out.

Customize this art piece with a backing color of your choice.

We’re hosting a benefit to help my sister with her ever-increasing medical expenses.  All proceeds from the Be Brave text bubble cut outs will be donated to her fund on November 16th.

If you feel like shopping and helping a young lady recover, head over to the shop to get your own Be Brave piece.

Pillow Party

By now I’m guessing you’ve noticed my pillow obsession.  But it’s a crazy easy way to quickly change the feel of a room.  For this fall, I made (and still have a few in the works) new covers in jewel tones.  This diagonal cover was as easy as cutting an eggplant 19 inch square.  Then I used a yard stick to make a line across to cut along.

Diagonal-Color-Block-Pillow

And pinned a 3 inch strip of gray along.

Diagonal-Color-Block-Pillow-Pinned

The corner is a darker gray piece.  To finish it off, the back is an eggplant envelope back.  Another pillow started with the same light gray cotton and I marked a grid on the back with a yard stick.  Using embroidery floss, I made small plus signs along the grid.  By keeping a 1 to 2 inch tail, then stitching the plus, I could easily tie the loose ends together.

Fall-Plus-Pillow-Inside-Stitching

It made a cute, simple design.

Embroidered-Plus-Pillow-Cover-Detail

Embroidered-Plus-Pillow-Cover

For a reversible cover, I used scraps of light gray, eggplant, and dark gray to make a striped envelope closure.

Embroidered-Plus-Pillow-Cover-Back

Oh, and the mirror pillow from Sears is awesome.

Diagonal-Color-Block-and-Mirror-Pillow

Thin gold threads hold the mirrors in place, making a great texture and shimmer.

Mirror-Pillow-Cover-DEtail

Also, I’ve added custom Sit and Stay pillow covers to the shop.

Now I’m going to finish my living room pillow covers.  What pillows are you loving this fall?  Target has a really, really fun selection that I’m trying my best to not take home with me.

Outdoor Update

Just over a month ago, our nearly complete freshly landscaped yard took a hard hit of rain, leaving it looking like this:

Saturday-Rain-Storm-Back-Yard-Overall

Thus putting our master bathroom renovation on the metaphorical back burner.  Instead, Ben dug out all the muck and crushed limestone.  I sorted and washed mud from the rocks.

Back-Yard-Fixing-Waterfall

A new, larger drain to hold up better if this happens again.

Back-Yard-New-Drain

And the waterfall pond containers were pumped dry, buckets of sand removed, and repeated until clean.

Back-Yard-Waterfall-Containers

While it’s annoying to re-do what we just did, we’re lucky we didn’t get water in the house.  Actually, we’re super lucky this storm didn’t hit last year, before we started landscaping.  Originally, the dirt was level with the sill plate and foundation of the house.  Rather than cleaning up a back yard, we could have gutted the basement.  Of course we now know to expect the unexpected.  Hopefully the new trench above the hill will direct water away from the house if we get another torrential rain.

Back-Yard-Trench

Our limestone came late last week, so we spent the weekend spreading more rock and getting things put back together.  Before winter hits.

Back-Yard-and-Waterfall-October

Color me excited.

Back-Yard-and-Waterfall

Back-Yard-Nearly-Finished

No more dirt, ah-hem, mud for the kids to play in.

Back-Waterfall-and-Fire-Pit-October

And we found a new patio set so we can enjoy it all.

Back-Yard-with-New-Table-and-Chairs

Ben found this on Craigslist for a steal.  Even though it’s not my favorite in the looks department, it’ll work.

Back-Yard-New-Table-and-Chairs

Now we’re solidifying bathroom plans and materials.  So excited for this reno.  What are you working on this fall?

Gold & Herringbone-What Could Be Better?

Here’s another tale about tables in the family room.  Apparently I can’t get enough tables.  But this change was prompted by Ben.  Whenever he wore cargo pants, the pocket caught on this little table.  Thus resulting in knocking over my succulent at least three times.  Until the gold pot shattered.  Time for a change.

Gold-Succulent-Pot-in-Family-Room

My small table buying habit came in handy this time.  An old, boring black Target table sat in the entry.  A round table with heavy base should be okay, right?  But it was ho-hum.  So what’s a girl to do?  Pull out the gold spray paint and go to town, that’s what.

Black-Side-Table-Before-Gold

Why stop at gold when herringbone would make it even better?  So I got thin poplar strips and cut into 1 by 4 1/2 inch strips.

Gold-and-Herringbone-Side-Table-Strips

You can find poplar at Home Depot or balsa and basswood at Michael’s and Hobby Lobby, if you’re interested.  To start on the herringbone pattern, I used a tray with a square corner to guide my starter strips.

Gold-and-Herringbone-Side-Table-Step-1

I started with wood glue over the old top and let these two pieces dry.

Gold-and-Herringbone-Side-Table-Step-2

With the starter strips dry, I easily lined up the rest of the rows.

Gold-and-Herringbone-Side-Table-Step-3

With the entire top covered (I used Liquid Nails for the edge pieces), I taped around the outer line to reduce wood splitting and chips.  After testing a hack saw, I used a sharp utility knife to cut follow the round top.

Gold-and-Herringbone-Side-Table-Step-4

For a clean edge, I glued on birch wood veneer.  Two quick coats of Polycrylic and here she is today:

Gold-and-Herringbone-Side-Table-in-Family-Room

A mix of shiny metal and warm wood to liven up this little corner.

Gold-and-Herringbone-Side-Table-from-Above

It’s not perfect, but it makes me smile.

Gold-and-Herringbone-Side-TableDetail

And ties in perfectly with our fall color scheme and decor.

Gold-and-Herringbone-Side-Table-to-Fireplace

But it can work in year round.  If I change my mind, I can give it a quick coat of spray paint, too.  What do you think of this quick and cheap makeover?