
Around a year and a half ago, while searching for thrifted treasures in need of some love, I found a pair of chairs, each priced at only five bucks. Of course, at that price, the chairs weren’t perfect. Far from it, in fact with torn orange vinyl seats and dark stained wood. Basically, all 70’s glory.

After a few hours of sanding, several yards of fabric, and elbow grease, the chairs were much more sturdy and neutral.

Rewind two weeks ago and I had a similar experience, stumbling on a pair of mid-century chairs in need of help, for a mere five dollars each.

The size and shape are exactly what I wanted, offering a more relaxed, reclined seat. The wood wasn’t in terrible (or excellent) condition, but each came with only bottom cushions that had been quickly recovered in a two-tone damask fabric. After removing the outer fabric, I found the original mustard fabric lurking beneath. Ugly, but in good shape.


Following my usual refinishing process, I backed out the screws, disassembled the chairs, and started sanding with 220 grit paper. Sanding is a little tedious and time-consuming, but in my opinion, the easiest and most effective way to get a clean slate. Paint strippers leave behind a residue that’s tough to clean off and gums up sanding pads after. For hard to reach, detailed, or delicate areas, strippers are okay, but for all flat parts, stick with sanding. Whew, got out the pent-up feelings on paint strippers and now I’m carrying on.
With the similar style wood and linen sofa in the neighboring living room, I wanted the new chairs to coördinate. A coat of Special Walnut stain warmed up the wood beautifully, followed with a teak oil protective coat. As long as the sanding process can seem, that was the easy part. I took my first crack at sewing box cushions. I’m pleased to report, after a few trials, moments of frusteration, and a broken sewing needle, the box cushions didn’t get the best of me. Full tutorial for the cushion covers coming at you soon. We now have beautiful, updated chairs in the family room.

Even though I liked the previous chairs, the upright, smaller seat was comfortable, but not inviting or especially conducive to relaxing. This low-slung style and deep base are comfy and stylish.

Just look at the old versus the new.
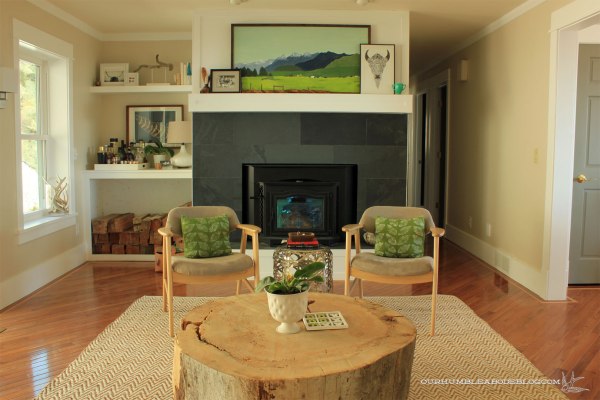

A slightly darker wood tone offers a better contrast against the stump turned coffee table, too.

Applying a lighter toned and thinner stain also lets the pretty grain shine through. Before, it wasn’t obvious.

Now, look at that great detail!

For a small dose of my favorite color, I used leftover fabric from our headboard to create lumbar pillows to jazz up the neutral fabric.

Because I’m a fabric hoarder, I mean lover, I was able to use an upholstery fabric I already had. Reusing the base cushion foam, sturdy metal zippers, and stain I had on hand means the only purchase made (besides the chairs themselves) was two-inch foam to create the back cushions. Total monetary investment per chair: a whopping $14. Total time invested: countless hours. Outcome: priceless, and worth it.

Wow!! What a difference! I liked the old chairs, but the new ones? The room feels so polished, now! So “finished”!
Seriously impressed! Beautiful job. And I agree that as cute as the old chairs were these are meant to be.
They turned out so pretty! Great job! And agreed that they say ‘come sit awhile.’
The new chairs look more ‘living room’ish. Great find and job on refinishing!