Flags as Art

For a long time, I’ve admired the look of a big flag hung in a room to serve as art.  Doesn’t matter how simple or detailed the flag, I’m a sucker for the look.  Emily Henderson has two that show how great this large-scale art can be.  A vintage Red Cross flag above a sofa fills that large expanse without feeling overbearing.

In her current house, she has a simple blue and white stripe flag above a credenza.  Both designs are simple, two color styles that make a bold statement, without needing a frame.

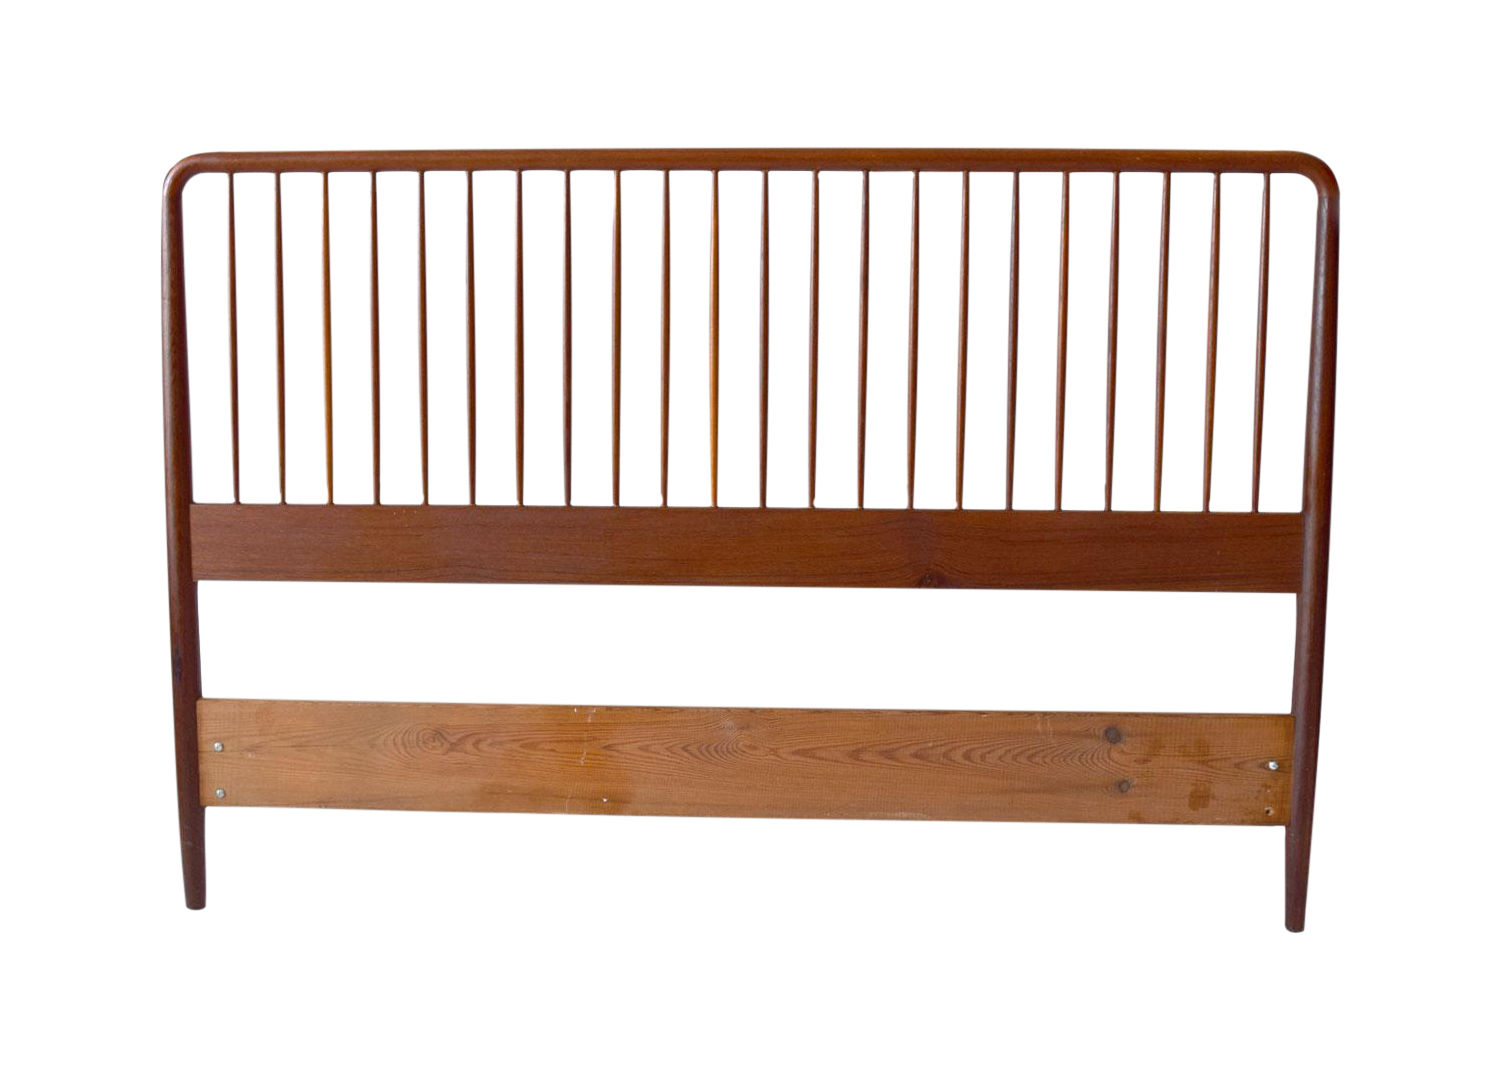
Or, when framed, the flag becomes a piece big enough to anchor a bed, serving as a headboard.

Division Street

So I know flags as art isn’t a new thing, but I’ve recently added one to our home, with a twist.

Flagology-Flag-in-Laundry-Room-2

The lovely ladies behind Flagology recently asked me if I’d want to try a custom house flag, either outside or indoors.  A million options ran through my mind, designs, colors, even where I could hang it.

Flagology-Flag-in-Laundry-Room

With such a neutral laundry room, I thought it’d be fun to add large scale, colorful art in the mix.  At 28 inches wide by 40 inches tall, the size fills the end wall perfectly.  While I loved everything about it, I realized the light weight piece would work even better in the basement hall.

Flagology-Flag-in-Hall-by-Laundry-Room

Why does the weight matter so much on this wall?  Well, this wall is mostly a pocket door and essentially only drywall to hang anything on.

Flagology-Flag-in-Hall-with-Laundry-Sink

So I found a section of wooden dowel, ran it through the top pocket, and added twine to hang the flag from.

Flagology-Flag-Dowel-Detail

A thumb tack easily holds the flag in place, and doesn’t need heavy-duty hangers.

Flagology-Flag-Hanging

Thanks to the thick, outdoor quality fabric, I don’t have to worry about mess hands, shoulder bumps (not to be confused with shoulder pads), or anything else damaging the flag.  That’s not something I can say about traditional frames with glass or even canvas paintings.

Flagology-Flag-Fabric-Detail

Creating a custom flag was as simple as uploading a .jpeg file, clicking the mouse a few times, and done.  Knowing I wanted this to look a bit more like art than a traditional flag, I created a design based on a paint by number scene.  The Flagtastic fabric kept the greens of the mountains and trees vibrant to really liven up this dark little hallway.

Flagology-Flag-in-Basement-Hall

Now to get some more art on these walls!  I’ve had a special print waiting in the wings for that wall at the end of the hall.  Getting to the accessory stage is so much fun because that’s where the personality and life come into play.

If you like this idea, you’ll love that Flagology is giving one custom house flag or doormat to a lucky reader!  Just for our readers, Flagology is offering 20% off all custom flags and doormats (does not include Create4Me or accessories)-just enter the code OHA20 to redeem your deal.

This post was sponsored by Flagology, but all ideas, opinions, and photos are my own.  

A Simple Headboard

Sometimes it feels like we’re treading water on big projects-you know, doing a lot of work but easily goes unnoticed.  Wow, what an encouraging, uplifting way to start, huh?  You know what is uplifting?  Small, quick, straight forward projects to break up the longer, meatier ones we have going on.  With most of the basement wrapping up, we’re getting to the fun, really obvious changes stage of the game.  One of those changes was getting the Sleep Number mattress up and off the floor with a custom bed frame.

Basement-Bedroom

Basic dimensional lumber, stain, and poly can come together to create a sleek, modern frame.  To create the base, we followed almost the exact same steps as our bed frame.

King-Bed-Frame-Finished-Left-Side

It has held up well, costs about $100 in materials, and can be assembled in less than a day.  One noticeable difference is the headboard.  I love the splash of green in our bedroom, but wanted something warmer to contrast against the blue-gray in the basement.


Basement-Bedroom-Headboard-Overall

After debating a variety of wood designs, I went with the KISS method and kept it simple, stupid.

Basement-Bed-and-Nightstand

Ben used 2 by 4 boards for a completely solid design.  I’m usually 100 percent opposed to the rounded edges of dimensional lumber, so we ran each board through the table saw before assembling.

Basement-Bed-HeadboardDetail

With boards prepped, we cut to length, lined each up on the garage floor, and screwed boards to the back, connecting the pieces together.  For a finished edge, we used more 2 by 4 material to create a frame to wrap the edges.

Basement-Bed-Headboard-Corner-Detail

These boards hide the edges as well as the vertical connecting pieces, leaving a 3/4 inch reveal.

Basement-Bedroom-Headboard-Corner-Detail

We now have a neutral base to layer anything and everything on and around.

Basement-Bed-Pillow-Detail

Pinstripe sheets, small plus sign pillow cases and a kilim throw pillow add a boost of pattern and playfulness to the room.

Basement-Bed-Pattern-Mix

Next step, new night stands to replace the single petite dresser that is standing in.

Laundry Room Progress

In what feels like a never-ending saga, let’s dive into the progress we’ve made in the basement.  Specifically, the laundry room.  For it’s purpose, it’s a decent sized room at nine feet wide and eight and a half feet deep.  We started out with our washer and dryer side by side, below a row of orange oak upper cabinets.  Since we immediately ripped out the pet stained carpet, we tossed a rug below to have a less dirty floor to walk on.

Laundry-Room-Washer-and-Dryer

Just to the left of the appliances was a big, plastic wash tub and open floor space.

Laundry-Room-Behind-Door

Opposite the washer and dryer was a full wall of dark oak upper and lower cabinets, complete with stunning orange countertops.

Laundry-Room-from-Door

Based on the cabinet configuration and the large mirror, we think this room was a designated sewing space for a previous owner.  While the room boasted a lot of cabinetry, it wasn’t laid out in the most functional way for our uses.

Laundry-Room-Door-Side

When we gutted the entire basement, we decided to tweak the door placement to throw more depth to the appliance side.  This minor change centered the door on the open floor space, making each side a better depth for what would go on the walls.

Basement-Moving-Laundry-Door

After five months of working toward an updated basement, we are nearing our finish line.  Let’s take a look behind the pocket door.

Basement-Laundry-Pocket-Door

We still have the sink, washer, and dryer on the left side of the door, but opted to stack the units to accommodate an upright freezer.

Basement-Laundry-Room-Left-Side

For the most finished look, we built a floor to ceiling panel to block the side of the stack.  A 40 inch wide by 24 inch deep cabinet, which will have a sink once we get our countertops, fills in from the side panel to wall.

Basement-Laundry-Room-Left-Side-Toward-Door

Above, we opted to skip an upper cabinet, and built two floating wood shelves instead.  At eight inches deep, we won’t have to worry about crashing heads, but we still have enough room for laundry essentials.  Of course the shelves can also hold a few pretty things to add a bit of personality to even a laundry room.

Basement-Laundry-Room-Sink-Area

Over on the other side of the room is a wall-o-cabinets.  Sleek white cabinets keep this dark, windowless room from feeling dingy and depressing.  At the back of the room is a 5 foot tall by 2 foot wide vacuum/ironing board cabinet.

Basement-Laundry-Room-Vacuum-Cabinet

This leaves us with a 6 1/2 foot long counter space, which will be great for folding, but also getting laundry baskets off the floor.

Basement-Laundry-Room-Right-Side-Storage

A pair of upper cabinets gives us ample space to store, well, I’m not sure yet, but whatever we need.

Basement-Laundry-Room-Right-Side-Toward-Door

Clearly the bottom drawers aren’t finished, but the shallow tops aren’t actually drawers.  Surprise, it’s a pull out drying rack.

Basement-Laundry-Room-Drying-Rack

To be honest, we don’t have much that can’t go in the dryer, but we didn’t have an option before.  Yes, we could have added a pull down wall mount version, but I love that these are discreet when not in use.  More than anything, we built the cabinets, so we easily added the option.

Basement-Laundry-Room-Pull-Out-Drying-Rack

Even when fully extended, there’s a little more than two feet of space to get around.

Basement-Laundry-Room-with-Drying-Rack

Like the kitchen and master bath, all drawers and doors are soft close.  It’s a small feature that is just so nice to have; no more accidentally slamming anything shut.

Basement-Laundry-Room-Upper-Cabinet

Before we can call this room finished, we still have a few things to finish up.  Two more drawers to build, a cabinet will go above the freezer, a panel to cover the top of the dryer, countertops/sink/faucet to install.  Baseboard and crown can go in soon and then it’s fill, caulk, prime, and paint.

Basement-Laundry-Room-Cabinets-to-Build

Even with those lingering tasks, how about a side by side to show just how far we’ve come in five months.

Basement-Laundry-Room-Before-and-Almost-After

Guys, we have floors that don’t feel gross underfoot.  We’ll have counter space by the sink to actually set stuff like soap.  No more mirror to creep everyone out.

Basement Bedroom Plans

Now that we’re nearing the end of (parts of) the basement remodel, I’m determined more than ever to put together a cohesive, inviting, and colorful room.  The newly created bedroom will serve as an overflow/more secluded guest room, at least until our kids are old enough to want separate sleeping spaces.  Right now, the room looks like this:

Basement-Bedroom-Window-Wall-Painted

She’s all dressed up with nowhere to go.  All the trim is painted Simply White and walls are Templeton Gray, both from Benjamin Moore.  Carpet has been finalized and ordered, but we’re waiting on install.  After that, we can put closet doors on, and get what little furniture we have back in here.

Basement-Bedroom-Closet-Painted

Right now, the only piece of furniture we have is a mattress.  Everything else still has to be built/found, but that hasn’t stopped the ideas swirling around in my brain.  Some days I want a plush upholstered headboard.  Others, I’m brainstorming up a beautiful leather creation.  And then there are days I want nothing but a simple wooden headboard.  This beauty has stolen my heart (as with many of the other items in the mid century Chairish collection), but it’s two sizes too small for our California King sized mattress.

Even if the size isn’t right, it doesn’t mean I can’t use it as an inspiration/jumping off point to create something like this:

Basement-Bedroom-Design-Board-Ideas

I’ve mimicked the wall, trim, and carpet colors before layering in some of my favorite elements.  Neutrals mixed with a few bits of color, but nothing overwhelming.  Above the bed, I’d love to frame a turkey tail my father-in-law gave me.

If the final headboard is neutral, I’d love to add in some more color with painted night stands or dressers flanking the bed.  These green beauties by The Painted Hive are so fantastic. ;lkuefrlkaseliuth  Oops, that was me, wiping the drool off my keyboard.  Lamps are still up in the air until I find a pair I love.  Sconces are also an option, depending on the size of the night stands I can muster up.  Have you noticed the trend?  Everything is in flux, each item depending on another to know which way to take the design.

Over the years, I’ve realized I absolutely loathe making king beds with solid colored sheets.  Since the dimensions are so close, it always seems like I get the wrong side on and have to start over again.  Striped sheets not only look pretty, but the directional pattern is helpful when making a nearly square bed.

When I selected the wall color, I knew I wanted something that wasn’t a neutral, but would easily pair and complement my favorite colors: blues, greens, and mustards.  A beautiful, but simple color blocked lumbar pillow in a neutral and mustard colorway is just enough color.

For a bit more green, I’d love to hang a pair of beautiful prints by the ever so lovely Living Pattern shop.  I especially like the Pine and Maidenhair ferns.

Depending on how the space feels, I may or may not add a bench at the foot of the bed.  If that happens, I’d love a natural linen tufted beauty.  At this point, I haven’t had much luck finding pieces I absolutely love.  A test of my patience is probably going to happen, and I’m always impatiently waiting.

Carpet Sampling

Choosing carpet isn’t something we’ve done often.  In our first house, the only rooms with the cushy stuff were the basement bedrooms.  At this house, hardwood and tile are the only flooring types currently installed, but that will change soon.  Before we can get to install, we had shopping and serious deliberations to go through.  Ironically (or luckily?) carpet is the element Ben and I disagree on most.

At the beginning of our search, I said I preferred patterns created by texture, something like this.  A shorter, dense pile that holds up better to foot traffic, with subtle interest from the pattern.  All great selling points in my book.

Home-Decorators-Texture-Pattern-Carpet-Sample

Ben, however, prefers for his carpet to feel, well, like a wall to wall mattress.  Thicker + cushier = better.  I tease that he’s a princess about area rugs and carpet, and he doesn’t argue against that.

Basement-Carpet-Samples-Sharkskin-and-Gray-Flannel

He also wanted nylon fibers, which greatly whittle down the available options.  After hitting up several stores, we dragged any and all interesting sample boards home to evaluate.

I nearly had him ready to pull the trigger on the waffle-esque  pattern, but then he talked to installers.  Always researching, that guy.  Turns out, installers don’t really like the pattern, because it takes considerably more time and effort to keep the lines straight.  Essentially, the pattern is like tile and grout lines, but can easily be stretched out of alignment.  Crooked walls are even more of an obstacle.  Unlike tile, as carpet wears the fibers loosen and look saggy, needing restretching down the road.  Often times, the wear is not even throughout the room, and certain areas can be stretched up to several inches while others go untouched.  For these reasons, a patterned carpet was officially out of the running.  Womp, womp, wooooomp.

Back on the hunt for a plush carpet we could agree on.  Here were our basic considerations to get to our final choice:

1.  Fiber type:  In our search we found that the majority of carpets carried are polyester, polypropylene, or a polyester blend.  Yes, there are some nylon, wool, cotton and other fibers, but polyester seems to greatly outnumber the other options.  Generally speaking, nylon costs more, but is the strongest fiber, thus can handle heavier foot traffic.  Nylon carpets hold their twist better, preventing the worn look of frayed ends.  For this reason alone, Ben wanted a nylon carpet.

2.  Pile length:  From my wish list, I wanted a shorter, dense pile to minimize the look of traffic patterns.  Just like grass, the longer it is, the more obvious the wear.

3.  Face weight:  The face weight of a carpet is how many ounces of one yard of actual fiber (not including the backing).  To generalize, the higher the weight equals a more dense and better quality carpet.  That is, assuming the pile length is the same.  If it’s really easy to feel (or even see) the backing, the lower the face weight will be.

4.  Coloring: With the carpets we considered, we had the choice between solid or flecked.  I immediately eliminated the obviously speckled look, since it’s just not my thing.  On the other hand, in some cases, Ben likes the interest it adds.

5.  Price:  Like all products, there’s a wide variety, covering all ends of the price spectrum.  We didn’t set a budget for carpet, instead, we wanted the quality and durability to take priority.

After checking all of those boxes, we had our winner: a nylon, 70 ounce face weight, subtly speckled plush carpet that feels like walking on a cloud.

Basement-Carpet-Sample-Back-Info

Of course, there was one last debate-colors.  I loved the lighter slightly oatmeal gray, Sharkskin, to keep the rooms feeling bright.  Ben, being the more practical of the two of us, liked the darker, more forgiving if spilled on Grey Flannel.


Basement-Carpet-Samples-in-Bedroom Both are good neutrals and will work, but I really pushed for the lighter, arguing these aren’t high traffic areas.  Ben still insisted on the dark, and I gave up the fight.  When making so many house design/decor decisions, we’re in 100% agreement.  Sometimes, Ben just doesn’t have an opinion (typically when paint colors are involved).  Since he so rarely insists on something, I couldn’t argue.

Basement-Carpet-Samples-in-Theater-Room

In both doorways, the carpet will butt up to the slate tile, so the darker will allow the color to flow a bit more seamlessly.

Basement-Carpet-Samples-by-Slate-Tile

The basement has been measured, carpet is ordered, and we’re waiting for it to arrive and be installed.  One last step to moving furniture back into these rooms and finishing the laundry and bathroom.