Cover Up, Part Deux

Before getting to decorating, I want to say how deeply saddened and sorry I am for the families in Connecticut.  Such a senseless tragedy.  Our thoughts and love go out to the families, friends, and community of Sandy Hook.  Here’s a link offering various ways to help.

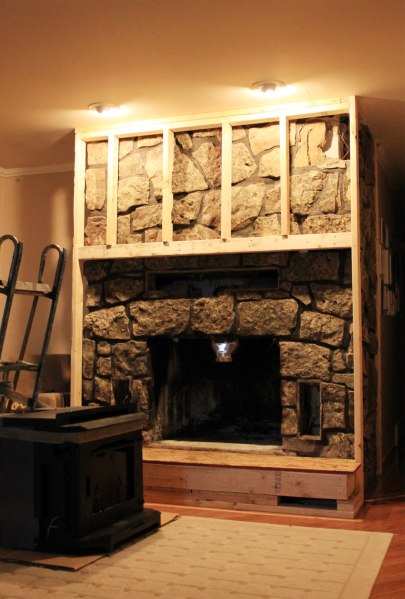
Well, the cover up is working; the fireplace has never looked better.  Ladies and gentlemen of the jury, I present to you exhibit A:

Fireplace-Cover-Up-Side-by-Side

On the left, 70’s moss rock, complete with poorly placed vents.  The right side shows step one of the great cover up consisting of studs and cement board.  And now, exhibit B:

Fireplace Cover Up with Slate Overall

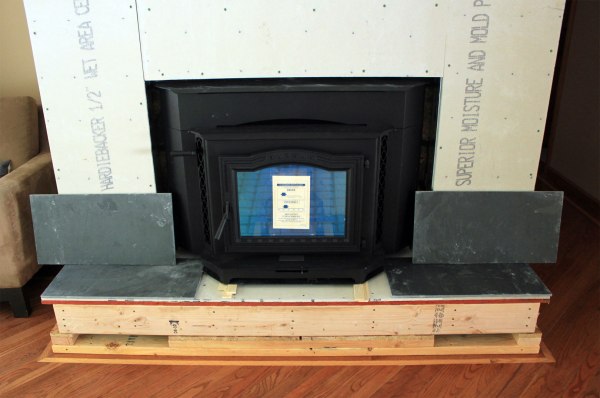
A clean slate, pun intended.  Ben laid the slate tile, saying it was the easiest tile he’s ever worked with.  And we’re both head over heels for the pretty, slightly varied, textural tile.

Fireplace Cover Up with Slate Bottom

Because the insert has angled sides, we decided to tile the insides of the walls, too.

Fireplace Cover Up with Slate Inset

Everything outside the combustible free area (the tiled surround) has gotten a layer of plywood.  This should come in handy if/when we want to hang something above the mantel.

Fireplace Cover Up with Slate from Side

Speaking of the mantel, we considered a solid piece of reclaimed wood.  Then we thought it might stick out (not in a good way) with the rest of our plans.  Instead, Ben built a simple plywood box to place over a few 2 by 4 boards.  Basically a mantel slip cover over supporting studs.

Fireplace Cover Up with Slate Mantel Detail

Clearly, we’ve still got some work to do before we can call this a wrap.

Fireplace Cover Up with Slate to Hall

For starters, we’ll add 1/4 inch thick by 2 inch wide trim around all the edges, including the mantel.  Because the rock extended into the hall, we covered it up just like the rest of the fireplace.  As it currently is, it seems like an odd little bump out.  To make it fit with the rest of the fireplace and differentiate between the normal walls, we’ll add  more 1/4 inch trim to make a grid.  Then, to brighten up the space and balance out the dark slate, a few coats of white paint.  Something kind of like my Photoshopped version:

Fireplace-Cover-Up-with-Slae-Photoshop-Version

In addition to painting windows, baking cookies, squeezing the boys a little tighter, and usual errands, that pretty much sums up our weekend happenings.  What did you do this weekend?

Cover Up

The great fireplace cover up has begun.  After a day of being annoyed that we couldn’t remove the rock, Ben decided on a plan of attack.  It involves wood 2 by 4s, steel studs, plywood, and concrete backer.  First, he started with the wood studs, building a frame slightly larger than the deepest rocks around the top and sides.  Combustibles shouldn’t be too close to the insert, so we have a slightly higher than we’d like mantle.  The bottom of the 2 by 4 is where the bottom of the mantle will start.

Fireplace Build Out

A 2 by 6 box (basically a very short version of a wall) makes up the base of the hearth, which is sturdy enough to support the weight of the 600 pound insert.

In the hall, the framing is minimal to keep the walkway wide and show as much of the inlay floors as possible.

Fireplace Build Out in Hall

Then Ben had the pleasure of installing the new duct work, with plenty of annoyances and obstacles along the way.  Finally, time to haul up the beast, I mean insert.  Ben and Handy Sammy loaded it on a dolly, hefting it up, one stair at a time.  I pulled in the dolly, trying to help, but I couldn’t get it to budge.  Luckily, the guys are much stronger and got it up the stairs without hurting themselves or the house.

Fireplace Build Out Insert

The next morning, they carefully hoisted the insert, scooting it around to get it in place.

Fireplace Build Out Insert In

As I mentioned before, combustibles can’t be close to the insert, so Ben used steel studs to frame out everything below the mantle.

Fireplace Build Out with Concrete Board

Oh, and we took down the huge mirror.  Fortunately four clips held it in place, so there’s no wall damage.  Oddly enough, the room feels bigger without the mirror reflecting the kitchen.  A layer of concrete board on top and we’re ready for tile.

Fireplace Build Out with Cement Board Detail

Awkward angles of the surround won’t let us tile up to the insert, so we’ve got a small frame around.

Fireplace Build Out Steel Stud Framing

Speaking of tile, we chose 1 foot by 2 foot black slate tiles at Home Depot.  Why?  Because we’re suckers for natural stone, love the color, subtle color differences, the matte finish, and the price.  Most importantly, the dark tile should better disguise soot or ash from the wood fireplace.  Had we gone with a gas insert, we would have chosen a lighter tile.

Fireplace Build Out Slate Tile

To balance out the dark tile, we’ll paint the upper part and hall side white.  Best of both worlds then.

What’s your favorite tile?  Do you prefer the convenience of a gas fireplace?  Or the crackle of a wood fire?

Rockin’ It

Right now, we’re kind of between projects.  Planning some while waiting for materials to come in/get delivered for others.  One of those projects is a fireplace revamp.  First off, neither Ben or I like the look of the 70’s moss rock; it’s dark and looks dirty.

Family-Room-Fireplace-After-Move-In-April-30

Secondly, the placement of the vents and fan are less than ideal.  What’s a fireplace without a mantel?  But most importantly, the open wood burning fireplace is a huge cause for concern.  We can’t leave a burning fire unattended, fearing an ember will land on the rug and burn the house down.  The ash gets everywhere, and we can’t control the intensity of the fire.  So, we’ve ordered and are waiting on our wood burning insert.

Because the insert weighs about 600 pounds, Ben decided to start on the surround before we have to move a hulking insert around.  To get started, Ben laid out wood (to protect the floor) and chipped rock off the hearth face.

Fireplace Rock Removal Starting

Seeing a pile of rubble inside wasn’t exactly a good surprise as we expected the cinder block to continue up from the basement.  Hoping to find better news, Ben cut a small hole in the sheet rock on the side of the fireplace.  Looked like rock and cinder block.

Fireplace Rock Removal Vents

With nothing to lose, we pulled off the sheet rock to see what we were looking at.

Fireplace Rock Removal Left Side

Some block and some rock.  Really makes us wonder what the previously covered up the cinder block.  Knowing there was cinder block on the other side had us hopeful again, so we chipped away at a rock on the other side.

Fireplace Rock Removal Behind

Cue the sad face, more rubble.  This was the biggest blow to our plans because this side extends into the hallway.

Fireplace Rock Removal To Hall

It seems this rock isn’t a façade, rather a structural part of this fireplace, which means it has to stay.  Now we’re stuck building over the rock, which is less than ideal on the hallway side.  We’ll build out as little as necessary over the rock to keep the hall as wide as possible, but we’re bummed.  Rebuilding the front isn’t as much of an issue because we’ve got space to extend, but we have to work within the confines of the inlaid floors.

Fireplace Rock Removal Base

Until the insert arrives, our fireplace will look sad, like this.

Fireplace Rock Removal Overall

With the insert, we’ll be able to get accurate measurements necessary to rebuild and reface.

P.S.  We realize removing/covering the moss rock isn’t for everyone, but neither of us have ever been fond of it, so we’re doing what works best for us.

Open Season

Ben’s happy about hunting season.  I’m excited for painting season.  Okay, it’s really not a season, more of an itch I need to scratch.  A desire to make this house feel more like us, and less like the previous owner.  And what bigger, cheap, and quick change than paint?  So I’ve hoarded samples and painted swatches on the walls.  For the guest bedroom, I’m set on yellow, though it is proving to be difficult.

On the far left is Anjou Pear by Ben Moore (which I got for the boys’ room, but tested in here, too), middle is Willow’s Gold from Dutch Boy and the right is a 50% tint of Willow’s Gold.  During the day, I loved the middle color.  Sadly, the CFL bulbs turned the pretty greeny-gold to key lime at night.  More swatches, this time in the tan-ish gold department.  I think I’ve pinned down a color from the chips shown.

Finding a pale, muted green-blue-gray for the north facing family room is really hard, too.  Now I’m considering painting the living room a blue-green and use Wood Smoke in the family room.  The blue colors seem to look better in brighter, sunnier spaces.

I have made some paint selecting progress.  Anjou Pear by Ben Moore for the boys’ bedroom.  During the day, it reads as a warm green, but at night it takes on a more muddy green.  Against the tan it looks a little crazy, but the striped curtains tone it down.

And I’m gearing up to paint all the doors Squirrel by Behr, color matched to Glidden.  Actually, I’ve already started.

The dark color should hide dirt and grime, and the muddy gray modernizes the shiny brass door handles.  We’re happy with the quality of the six panel doors, but some of the grain makes the doors look a little like plastic.

Sun rises and sets are stunning this time of year, too.  Here is a shot from last week, with a perfect crescent moon.

Hope all our fellow U.S. residents have a safe and happy Thanksgiving!

Laboring on Labor Day

Nope, not pregnant.  No new baby here.  I’m talking about windows.  Now that all most of the windows are in, let’s go inside to take a look at the difference the new windows have made.  First, check out the kitchen in all it’s 70’s wallpapered, oak, bay window goodness.

And now with the sliding white window.

Making this window flat lets in so much more light, and the window seems bigger without dividing it into three sections.  Oh, and the fact this window actually opens.  Go figure.  The same can be said for the breakfast nook window.  Before, V and E used the bay window as their personal dance floor/kitchen/play room.

Despite shortening the window, I think it feels more open.  Perhaps not having a mass of dark oak helped?  Whatever it is, I’m liking it.

Just a breath of fresh air to see a lighter, brighter kitchen.  Removing the ugly wallpaper definitely helped.

In the family room, we replaced the two stationary side lights with shorter double hung windows.  Hooray for air flow.  For some reason, I always feel guilty putting furniture in front of windows.  So this arrangement works better for us.

Also, I think the shorter windows feel more intentional and less like “this is a door, but let’s just take off the handles and no one will know.”   The window height actually matches, instead of looking like someone scored a lot of assorted windows on Craigslist and made it work.

Oh, and these windows and doors are so quiet to open and close.  The old door squeaked and squealed.  Ben is a ninja leaving in the mornings now, sneaking out the quiet door.

While window shopping, we discovered most energy-efficient windows have a low visible transmittance thanks to the UV blocking coatings.  This concerned us, because about 50 or 60 percent of light makes it into the house.  Luckily, we don’t see a drastic difference.

To gain egress in the bedrooms, our city requires 5.7 square feet with a minimum opening of 24 inches tall by 20 inches wide within 44 inches of the floor.  The original height of the bedroom windows was fine, but our casement windows only opened about 18 inches by 4 feet.

To use the same brand and line of windows throughout, our only option was a large (4 foot wide by 66 inch tall) double hung window.

Luckily, our windows sit about 19 inches off the floor, so we didn’t have to use tempered glass.  Wahoo for saving a little money.

These are my favorite windows.  I love the cute courtyard feel of the back yard.

And from outside, the windows are almost the same size.

No more awkward bay windows bumping out, either.

Ben used three layers of 2 by 4s to get the windows out.  When he wraps the house in insulation, the siding will sit flush with the edge of the window.  Using the 2 by 4s is a simple and strong way to support the windows while extending for the future insulation layers.

Now to get the insulation on the outside and frame the windows on the inside.  Of course we’ll keep you updated on our progress.

What do you think of the new windows?  Have you gotten new windows recently?  Did it make a world of difference?  Both in looks and monthly savings?