Our Kitchen Organization

I’m always curious about houses and love seeing what’s lies behind the front doors of houses I admire.  Walking through open houses and estate sales is my idea of a fun day.  On a creepier side, I even enjoy getting glimpses of the interiors of homes while driving at night.  Come on, you know you do, too.  Don’t confuse that with stalking or walking up and peering in windows.

House-Tour-Four-Years-In-Kitchen-Pantry

Part of the appeal is just seeing what the homes look like.  It’s also interesting to see how people live in the homes, as each person has a different style, set of needs, and way of using the home.

In that vein, I thought I’d show where and how things are stored in our kitchen.  Our pantry holds the bulk of our dry goods.  Baskets on the highest shelf (not shown) hold bulk spices that we use to refill our containers.  The next shelf down has a basket of chips/crackers, nuts, peanut butter, and dried fruit.  Below that is the microwave and canned goods.  Another basket holds oatmeal, snacks, and extra cereal.  The last shelf is dedicated to extra condiments, oils, vinegar, produce, mac and cheese and rice.  At the very bottom are the heaviest items like juices, protein powder, and the bin holds dry pasta.

kitchen-pantry-organization

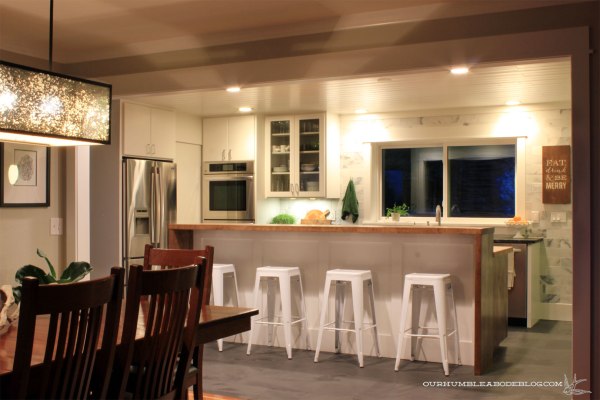
Rotating just to the right are the double ovens with a drawer below and cabinet above.  The cabinet stores our vertical items like serving platters, cookie sheets, and cutting boards.

kitchen-cabinet-vertical-divider

In the tall drawer below we store large baking dishes, muffin pans, our food processor, and the crock pot is normally in that open spot.

kitchen-drawer-baking-extras

Our glass front upper cabinet stores our most often used dishes, keeping the daily use items closer to the bottom.

kitchen-cabinet-upper

In the drawer stack below the glass cabinet is our junk drawer, as well as our overflow storage.  Glass baking dishes, pie and loaf pans, and coffee supplies aren’t used too often around the house, so they’re handy, but not in the central area.

kitchen-drawer-junk

kitchen-drawer-baking-dishes

kitchen-drawer-baking-pans

The top drawer of the stack nearest the sink holds sponges, towels, foil, and storage bags.

kitchen-drawer-towels

kitchen-drawer-kids

Kids dishes and food storage containers are in the middle drawer, with extra foil, bags, straws, water bottles, and lunch containers below.

kitchen-drawer-bags

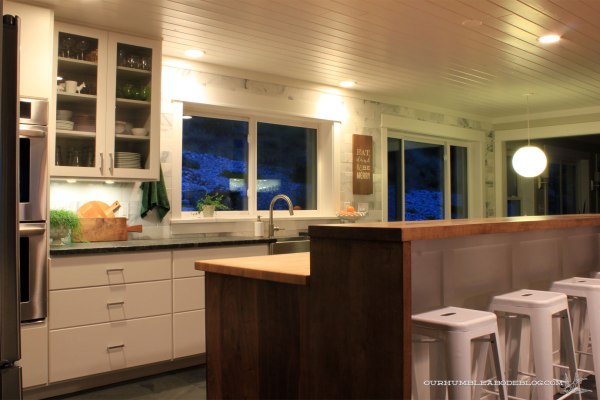
Typically, we do our prep work on the left side of the island, near the cooktop.  To keep everything as close to the work area, the knives and utensils are directly below.

kitchen-drawer-utensils

Pans and a salad spinner tuck away in the middle drawer while larger pots and lids live below.

kitchen-drawer-pans

kitchen-drawer-pots

Directly below the left side of the cooktop, and just to the right of the work surface, is our trash drawer with a recycle bin and extra bags.

kitchen-drawer-trash

Lunch supplies and snacks are within arms reach of our lunch making spot.

kitchen-drawer-lunches

Under that are the small appliances we use on a regular basis, including the toaster, waffle maker, and blender.

kitchen-drawer-small-appliances

Baking usually happens on the right side of the island, near the pantry and ovens.  Again, to keep things handy, the top right drawer stocks our spice jars, labeled on the top for easy finding, but are easily refilled when low.  A few baking specific utensils are also in here along with oven mitts and a small recipe binder.

kitchen-drawer-spices

The middle drawer has mixing and serving bowls, a few cookbooks, and hand mixers.

kitchen-drawer-baking-bowls

Storing the baking staples in the bottom drawer has been so handy.  The red lid containers hold white and wheat flour, sugar, brown sugar, and chocolate chips.  A few round containers have powdered sugar, cocoa powder, and baking soda.  Containers with flip lids keep cereals fresh, but handy for the boys to pull out.

kitchen-drawer-baking-supplies

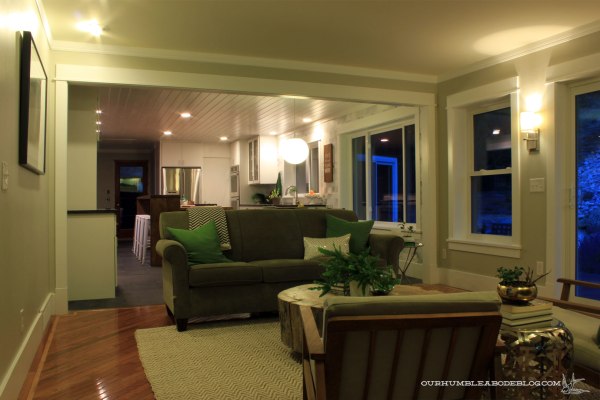
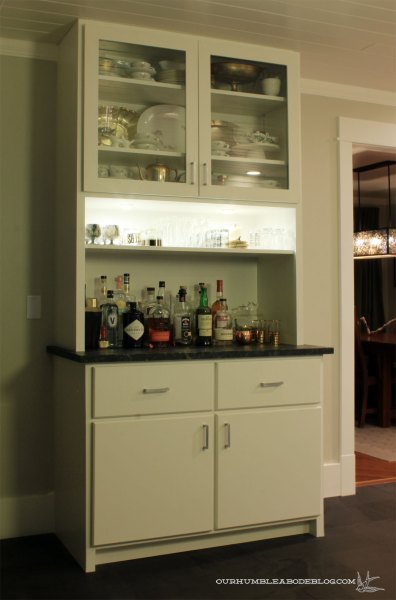
Across the kitchen, near the breakfast nook and dining room is this built-in hutch.

House-Tour-Four-Years-In-Bar-Cabinet

It’s stocked with liquor, drinking glasses, and extra serving pieces.

Lingering-To-Do-Hutch-Top-Trim

The left drawer keeps the boys’ art supplies close at hand, but not in the main area.

kitchen-drawer-kids-art-supplies

The other drawer is stocked with napkins, candles, bottle openers, and other randomly used items.

kitchen-drawer-napkins

If you’re a nosy house lover, I hope this post satisfies that curiosity.

Our Home at Night

We all love seeing photos of beautifully designed, sun drenched homes, right?  I know I’m drawn to those bright, airy spaces that are so often featured in magazines, advertisements, and blogs.

For a few months now, I’ve wanted to share a different approach, featuring night shots to show how cozy a dark home can look.  Honestly, many rooms in our south-facing home do receive a generous dose of sunlight.  But what happens when the sun sinks?  Life still goes on, of course, but rooms don’t lose their beauty without sunlight.

Granted, taking true to life photos that capture the warmth and details is one hundred times more difficult.  Our family room, on the darker north (back) side of the house always feels a bit cozier.

family-room-at-night

I think it’s a combo of the indirect light, privacy/courtyard feel of the back deck, fireplace, and the surrounding rooms.  Being adjacent to the kitchen certainly feels less formal and more inviting.

family-room-toward-kitchen-at-night

Due to the floating furniture arrangement with main walkways around, table or floor lamp cords would pose a tripping hazard.  Instead, we have three different sources of lights; directional can lights above the fireplace, another set angled toward the right wall, and a pair of sconces flanking the door.

family-room-fireplace-at-night

A little nook for firewood and family photos is laid back and casual.  How cute would a little lamp look tucked in there?  I may have to make that happen, if I can find a perfect fit.

family-room-shelves-at-night

In the kitchen, a small table and four chairs create a breakfast nook with a vintage globe light above.

kitchen-toward-dining-room-at-night

In that same area, a built-in hutch cabinet stores pretty dishes and serving pieces, as well as a stocked bar for entertaining.  After I took this photo, I added a set of ceramic house candle holders for a soft, flickering option.

kitchen-bar-at-night

In the main kitchen area, simple recessed can lights shine down on the walnut island centerpiece.

kitchen-sink-at-night

Glass front cabinets are one of my favorite features because the addition of dishes and accessories add character to a utilitarian space.

kitchen-ovens-at-night

Our dining room is right off the kitchen, which is where we eat family meals, entertain guests, play games, and do homework.

kitchen-at-night

Finding a light fixture that offered a warm glow was crucial for us, as we wanted a diffused, candle light feel.  In my opinion, bright or downcast lights in a dining room don’t give the ‘come, sit, stay a while’ feel.

dining-at-night

As you can see, I need to add another shell over the other picture frame, but I hope you’ve enjoyed this alterative view of our home.

Four Year Home Tour: Part One

In some ways, it’s hard to believe, but today marks four years since getting the keys to this house.  Often, I have to think hard to remember just how (bad some) things were when we moved in.  Others are fresh in my memory since we’ve only recently made changes.  Either way, it’s always fun and satisfying to take a walk down memory lane, if for no other reason than to appreciate how far we’ve come.

Four years feels fast, considering we’ve tackled every room (or are in the process of reworking, as is the case of the basement).  Four years also feels slow, chugging away, waiting for the right time to start projects, or finishing another before moving to the next.  Home is a constant creation, finding each perfect piece and putting it into place.  Overall, we’re both so happy with the progress and love living here, enjoying the views, and are excited to continue our progress.

Okay, enough of the sapiness, on with the then and now tour, starting in the entry.  In the past, I’ve done these tours in one long post, but this one is especially picture heavy so I’m splitting it into two parts; today you’ll see the living areas.

Before felt dark, dated, and dingy.  Those peach walls always looked dirty, the dark wood door and side lights overwhelmed, and an overly intricate Tiffany style light felt stuffy and too traditional.  And the railings, oh the sheer amount of orange toned oak.

New-House-Entry April 13 2012

Swapping the standard height door for a double wide, 8 foot tall one (taken from the dining room) and shorter, transom style window above dramatically brighten and update this small space.

Horizontal-Railing-from-Top-Toward-Door

To add interest to the large wall (and cover up the heavy knock down texture), we added tongue and groove planks, painted white, to lighten up and add the good kind of texture.  The stained beige marble floors days are numbered, to be replaced with Montauk black slate.

House-Tour-Four-Years-In-Entry

Replacing the traditional spindle railing for a sleek horizontal design made a huge difference.  A modern, multi arm light juxtaposes with the more rustic elements, like the horns.

House-Tour-Four-Years-In-Entry-Railing

Once at the top of the stairs, the living and dining rooms are to the left.  Before, the traditional windows with grids and the eight foot tall door were dark and broke up the beautiful views out front.

New-House-Living-and-Dining-April-13-2012

New windows, light trim and paint, and bold doses of green add vibrancy to the south-facing rooms.  Ignore the sofa backing the window, it’s here until the basement theater room is ready for it.

House-Tour-Four-Years-In-Living-Room-Toward-Window

Those ornate fixtures, both hanging and the pair of sconces were poorly placed, neither centered on anything.  With the open flow of rooms, the arch separating the entry and living room didn’t make sense.

New-House-Dining-into-Living-Room April 13 2012

Knowing we planned to use this room daily, for tv watching, relaxing, and toy playing, we built a large entertainment center with drawers for ample storage.  Nearly all the boys’ toys are stored in those nine drawers, so it certainly has served its purpose.

House-Tour-Four-Years-In-Living-Room-Toward-Hall

Dual mismatched sofas, one leather, the other a slim wood and linen design, face one another, offering plenty of seating.  This arrangement still allows a full view of the mountain and city scene out the windows.

House-Tour-Four-Years-In-Entry-and-Linen-Sofa

Positioning the leather sofa parallel to the dining room offers a bit of separation of the open floor plan without a formal divide.

House-Tour-Four-Years-In-Living-into-Dining

Ugh, every time I see this light I remember how many times I smashed my head on that dang thing.  Why the previous owner placed an eight foot tall door in a room with eight foot ceilings, I’ll never know.  Not only does it look awkward, it didn’t allow for a proper header and wasn’t stable.  The bay window sagged over time, making it non functional.

Dining-Room-After-Move-In-April-30

After pulling the door out and installing it in the entry, we swapped the arrangement of window and door, extending the deck over to make a more usable arrangement both inside and out.  A large mission style dining set, centered on the window and door, fills the space.

House-Tour-Four-Years-In-Dining-Room

To further open the floor plan, we knocked out the majority of the wall between the dining and kitchen.  The twelve-foot wide door makes entertaining and daily living even more enjoyable.

House-Tour-Four-Years-In-Living-Room

Opening the wall also floods the north facing kitchen with natural light.  Dark oak cabinets, 80’s country blue wall paper, and an over sized flourescent light didn’t help this kitchen.  However, it was a large, open size.

New-House-Kitchen-April-13

Swapping the dated, broken cabinets for sleek white DIY ones really changes the look and function.  A full wall of white Carrara marble brings in natural tones and subtle texture variation.  Dark slate floors are used throughout the house, for continuity and, well, we love the material.

House-Tour-Four-Years-In-Kitchen-Island-Back

Two more bay windows that couldn’t open properly, yet another gaudy light, and heavy knock down texture on the ceilings were primary offenders.

New-House-Kitchen-from-Breakfast-Nook-April-13-2012

For the most part, the new layout is very similar to the original.  All drawer lowers keep everything organized and completely accessible.  As much as I adore white kitchens, I like the balance of warm wood tones, so we created a custom walnut island.  As with the slate floors, we’ve used white tongue and groove boards in designs around the house.  The ceiling here was textured, cracked, and had several holes from lighting.  Rather than painstakingly skim coating the ceiling and hoping it didn’t crack again, we put up our favorite material to hide the flaws.

House-Tour-Four-Years-In-Kitchen-Pantry

A wall of floor to ceiling cabinets made a main walkway even smaller, and made a not so fun Ring Around the Rosie game to get pantry staples out.

Family Room Before

After opening up the wall, we still had about seven feet of space off to the side.  For added function, we built a bar/hutch in this space.

House-Tour-Four-Years-In-Split-Sitting-Areas

Vases, extra dishes, and overstock liquor are stored below, leaving the upper for pretty dishes and a fully stocked bar.

House-Tour-Four-Years-In-Bar-Cabinet

At the back of the house is our family room, previously seen with a dirt covered moss rock fireplace, an unused nook, and broken windows.  For reference, the arched doorway to the right leads straight down the stairs.

New-House-Family-Room-April-13-2012

Covering the fireplace, adding a wood burning insert, and shelves in the nook, are all changes we love.  We also replaced the old, broken windows with energy-efficient functioning ones.  It’s nice to be able to open windows in here to get some air movement.

House-Tour-Four-Years-In-Family-Room-Toward-Fireplace

Another open layout, the family room backs up to the kitchen and breakfast nook.  Yet another arched divider that didn’t fit the style of the house.
New-House-First-Showing-Family-Room

Landing on the most useful, functional furniture arrangement in this room surrounded by walkways wasn’t easy.  After trial and error, testing, and rearranging, this layout has proven to work.  Sofa backing the room, large stump coffee table centered, with two modern chairs flanking the fireplace still leaves walk space.

House-Tour-Four-Years-In-Family-Room-into-Kitchen

House-Tour-Four-Years-In-Family-into-Kitchen-and-Dining

Bedrooms and bathrooms will come tomorrow, so stay tuned to see those changes.  To see the progression of these spaces over the years, check out the first year, second, and last year.

It hasn’t been an overnight transformation, but I’d say each room is at least 90% finished.  Most of the changes I want to make are simply waiting to find the right furniture or accessory to finish it off.  A larger rug for the living room.  Perhaps a different set of chairs around the breakfast table.  A bench at the foot of our bed, but nothing major.  Nope, the main level is feeling like home.  The basement now, that’s a different story.  Don’t even get me started on the pool house situation-haha.

Luck of the Irish

I may not have Irish heritage, but I undeniably love the color green.  As a kid, when coloring or painting, I didn’t consider my work done until I added a splash of green somewhere.  If you’re wondering, yes, I was a complete nerd who loved to draw, paint, build and decorate cardboard doll houses.  I remember making a yellow-backed floral wall paper by drawing on white printer paper.  It’s too bad I don’t have photos, because I’m sure it was just lovely-haha.

To me, green adds a vibrancy and lively element no other colors can.  Yes, yellow is bright and cheery, but it doesn’t add the right warmth.  Blues are beautiful and soothing, but can’t quite make the statement green can.  Green is so abundant in nature, whether light, fresh spring green, dark mid summer grass-green, or the muted tones found in fall and winter.  As a general green lover, I’ve incorporated some of each throughout my home and I urge you to do the same.

Some rooms have just a sprinkle (nothing too in your face) of green, such as our family room. In a mostly neutral space, nearly citron green pillows liven up the couch and add a jolt of color.

Sofa-Swap-Old-in-Family-Room-Detail

A brightly colored green and blue landscape painting perks up the mantle while the lumbar pillows pull the color down to the neutral chairs.  Just a few small green accessories like books, a small vase, and candles pepper the color around the rest of the room.

MCM-Chairs-Updated-in-Family-Room

Our kitchen counters are dark, nearly black green soapstone that still reads as a neutral.

Long-Narrow-Cutting-Board-in-Kitchen-Toward-Ovens

Small additions like towels, plants, dishes, even fruit are quick, zero commitment ways to add even more color.

Kitchen-Dish-Cabinet

Other rooms have a slightly bigger swath of green, like our living room.  Six sets of luscious grass-green velvet curtains flank the windows.

Parallel-Couch-Window-Seat-Arrangement-From-Stairs

Cover the curtains with your hand and you’ll notice just how much life and personality they bring to the room.  When in doubt, always default to house plants to get that bit of color without overwhelming a room.  Bonus, you don’t have to deal with picking paint colors or fabrics.

Horizontal-Railing-and-Living-Room

Speaking of paint, sometimes a quart can make the biggest impact.  At less than $20, what do you have to lose by giving it a try?  Our main bathroom rocks an olive-green vanity, which has so much more character than any neutral ever will.

Campaign-Mirror-in-Bathroom-Overall

Toss a few more green accessories, in this case, hand towels and a nearly ugly 70’s landscape painting, around the room to complete the look.

Main Bathroom Overall

According to the color wheel, green is a cool color, but it certainly adds warmth to any space.  A muddy sagey olive acts as an almost neutral backdrop in our guest bedroom.

Guest-Room-Makeover-Green-Walls-Upholstered-Headboard

Pairing with bright white it feels so fresh, clean, and simple.  But greens really shine next to warm wood tones, much like a tree trunk and leaves.

Green-Guest-Room-Dresser-Chair-and-Art

By far the most overtly green room in the house is the boys’ bedroom.  Back when I gave their room a makeover, I asked each of them what color walls they wanted.  One said green and the other said yellow.  We compromised with this lemongrass yellow-green.  It’s fun and happy, but is tempered by white, gray, and navy.

Boys-Bedroom-with-Large-Rug-from-Door

Our master suite, though mostly white and black, has green tucked here and there.  More grass-green velvet wraps the headboard for a touch of color against an otherwise white wall.

King-Bed-Frame-Finished-Overall

Opposite the bed, a few bright green plants and (soon to be framed) landscape painting flank a dresser, bringing color around the room in a simple, easy-going way.

Craigslist-Dresser-with-Emily-Jeffords-Art-by-Bathroom

Even our master bathroom has touches of green via plants and a very abstract landscape.

Abstract-Landscape-Painting-in-Bathroom-Version-2-with-Vanity

Though we’re not quite at the point of the basement remodel to paint and add accessories, I’m trying to narrow down green paint options to use down there in a few ways.  I think we all have a color we naturally gravitate toward, right?  What’s yours, and more importantly, how do you use it in your decor?

Thoughts on Soapstone Counters

Fifty one weeks ago, I shared our thought process and decision on soapstone countertops for our kitchen.

Kitchen-Soap-Stone-Counters-Detail

To be completely honest, the owner of the stone yard didn’t do much to upsell the product.  In fact, in a way, he made us somewhat apprehensive about soapstone saying it’s soft, easy to scratch and chip.  They only sell a few kinds locally, and he said a few customers have returned to share they hated that they had to be careful so as not to damage their new, expensive counters.  But at $100 for everything we needed, it was a low risk situation to try something different.  If we really hated it, neither of us would have felt too bad replacing it.  After a year of living with the counters, we can safely say we’re big fans of this dense, but soft stone.

Soapstone-Counter-Left-Side

In addition to the amazing price, we love that it is non pourus, can handle direct heat from pots and pans, can’t stain, and doesn’t require sealing.  All great points, especially if you’re a germaphobe.  Every few months I apply light coat of mineral oil, even so that’s strictly because I like the darker look.

Soapstone-Counter-Toward-Ovens

It’s true that it is softer, much softer, than granite.  Our old brown granite counters didn’t have a single chip, but we have a few small ones in these.  Near the sink there’s a chip about the size of a pencil eraser in diameter.

Soapstone-Small-Chip-by-Sink

If the stone had a glossy sheen, it might be more noticeable, but thanks to the matte finish, it’s hard to find unless looking for it.  Can you spot it in the photo below?

Soapstone-Counter-Left-Detail

No?  I’ve circled it now to show where it is.

Soapstone-Counter-Left-Detail

Comparing the soapstone to the old granite, it’s no more work to maintain, and we aren’t any more or less carfeul working on these.

Soapstone-Counter-Sink-Edge

Occasionally sealing granite can be annoying simply because the counters can’t be used while the sealer cures.  When I apply the oil to darken and enhance the soap stone, it’s quick.  I wash the counters as usual, then pour on a little mineral and spread with an old cotton cloth before rubbing off the extra with a different one.  As I mentioned before, this step is unnecessary, but I like the look of the darker stone.  Here’s how it looks without:

Soapstone-Counter-Unoiled

And the difference a light rub of oil makes:

Soapstone-Counter-Half-Oiled

If a kitchen or bath remodel are in your future, and solid surface counters are on your list, I’d highly recomment checking into soapstone options.  In fact, my cousin asked my opinion and that’s what spurred this post.  One hundred plus years ago, soapstone was common in homes, either as countertops and/or sinks.  More recently, granite has become popular, but I’ve never been a big fan of the glossy finish.  For us, and perhaps for you, soapstone was the perfect choice.