A New Rug or Two

This little update has literally been years in the making, so I’m stupidly excited about it.  As such, many pictures are included in this post, be warned.

Now this is the story all about how our living room got flipped-turned upside down*:  this week, our house benefitted by the addition of not one, but two new rugs.  I know that seems stupid and insignificant, but rugs are something Ben and I often disagree about.  He wants sink in softness, I care more about size and design/color.

The only reason it took me so freaking long to order this was because I had pined for the Marquis rug from West Elm.  For whatever stupid reason, West Elm doesn’t have a product review feature on their site.  Ugh, when ordering site unseen, those reviews are really crucial in the decision-making process!  I tried to see it in person, strike one.  Order a sample?  Strike two.  I finally decided to ask the people who had featured the rug on Instagram for their opinion-the reviews were not great.  Strike three, the Marquis was out.

So, I went with my fall back option, a 9 by 12 Moroccan Trellis rug that I, and apparently everyone else, recently snagged for under 300 bucks.

living-room-rug-rolled-out

The boys helped me place it, rolling across it to ‘steam roll’ the curved edges.  They even ‘helped’ me move the furniture back in place.

living-room-rug-overall

Yes, this rug is popular, but for good reason(s).  First, the neutral design.  The reason the Marquis was appealing was the neutral color scheme with subtle geometric pattern.  This rug has both features, but was less than half the price!

living-room-rug-under-leather-sofa

Secondly, that price!  Like seriously, how do you pass up a giant rug for $300, plus free shipping?!
living-room-rug-coffee-table

Third, the five-star rating with nearly 400 reviews.

living-room-rug-sofa-table-detail

The only negatives I read were about the color, which wasn’t as white as some wanted.

living-room-rug-detail

A true white rug wouldn’t work in our house with our kids, but the slightly oatmeal tone pairs beautifully with our leather and linen sofas.

living-room-rug-thickness

Do I feel the same as other reviewers?  Absolutely, so far, I have zero regrets ordering this rug.  Considering the rug was under $300, it’s far more plush/thick than I anticipated, though still not crazy thick.  I added a felt rug pad below to give that sink in cush Ben really wants.

living-room-rug-from-entry

Unlike the Marquis rug, this is polypropylene instead of wool, but it’s still incredibly soft underfoot.

living-room-rug-from-kitchen

Finally, we have a rug that all legs of the furniture can rest on.

living-room-rug-toward-kitchen

AND, it looks great.

living-room-rug-toward-entry-door

Despite being a trendy design, I think the neutral base will work well and look great for years to come.

living-room-rug-detail-by-wood-sofa

Go on down those stairs and you’ll see the Trellised Garden runner for our garage entrance/mud nook.

basement-blue-runner-bison-art

When setting out my search, I wanted an easy to vacuum/not thin, subtly patterned, dark, but still colored rug.  With all the neutrals in this area, I thought a navy or deep green rug would liven things up.

basement-blue-runner-mud-nook-2

Again, this rug is polypropylene, so it can stand up to heavy traffic and isn’t too precious to use in this area.

basement-blue-runner-mud-nook-toward-garage

Unlike so many new made-to-look-old/worn/faded rugs, this has a smaller ‘wear’ patterns.

basement-blue-runner-detail

Not only is this pattern forgiving, but it also looks more realistically aged than others I’ve seen.  All in all, I give these rugs two very enthusiastic thumbs up.  And I’m kicking myself for taking so dang long to make up my mind.

*One million bonus points to you if you recognized and sang the Fresh Prince of Bel-Air theme song.

Four Year Home Tour: Part One

In some ways, it’s hard to believe, but today marks four years since getting the keys to this house.  Often, I have to think hard to remember just how (bad some) things were when we moved in.  Others are fresh in my memory since we’ve only recently made changes.  Either way, it’s always fun and satisfying to take a walk down memory lane, if for no other reason than to appreciate how far we’ve come.

Four years feels fast, considering we’ve tackled every room (or are in the process of reworking, as is the case of the basement).  Four years also feels slow, chugging away, waiting for the right time to start projects, or finishing another before moving to the next.  Home is a constant creation, finding each perfect piece and putting it into place.  Overall, we’re both so happy with the progress and love living here, enjoying the views, and are excited to continue our progress.

Okay, enough of the sapiness, on with the then and now tour, starting in the entry.  In the past, I’ve done these tours in one long post, but this one is especially picture heavy so I’m splitting it into two parts; today you’ll see the living areas.

Before felt dark, dated, and dingy.  Those peach walls always looked dirty, the dark wood door and side lights overwhelmed, and an overly intricate Tiffany style light felt stuffy and too traditional.  And the railings, oh the sheer amount of orange toned oak.

New-House-Entry April 13 2012

Swapping the standard height door for a double wide, 8 foot tall one (taken from the dining room) and shorter, transom style window above dramatically brighten and update this small space.

Horizontal-Railing-from-Top-Toward-Door

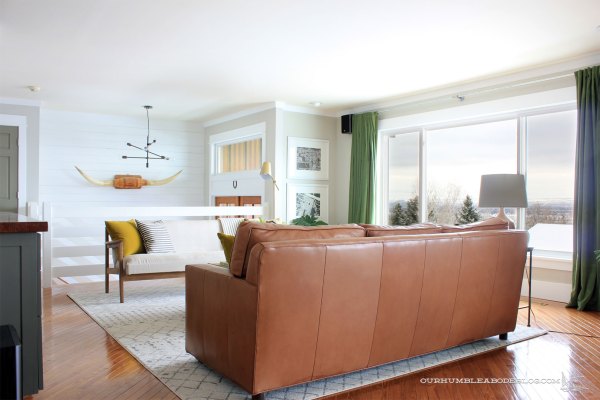
To add interest to the large wall (and cover up the heavy knock down texture), we added tongue and groove planks, painted white, to lighten up and add the good kind of texture.  The stained beige marble floors days are numbered, to be replaced with Montauk black slate.

House-Tour-Four-Years-In-Entry

Replacing the traditional spindle railing for a sleek horizontal design made a huge difference.  A modern, multi arm light juxtaposes with the more rustic elements, like the horns.

House-Tour-Four-Years-In-Entry-Railing

Once at the top of the stairs, the living and dining rooms are to the left.  Before, the traditional windows with grids and the eight foot tall door were dark and broke up the beautiful views out front.

New-House-Living-and-Dining-April-13-2012

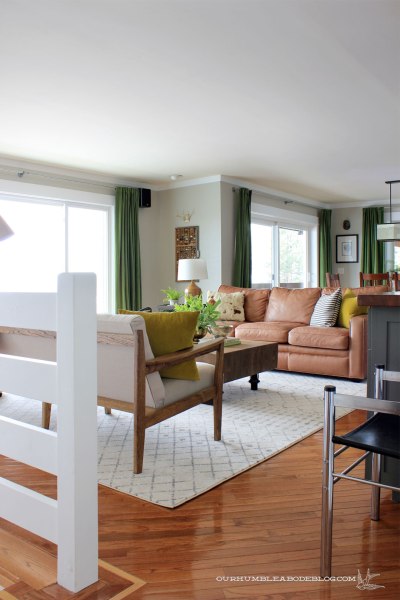
New windows, light trim and paint, and bold doses of green add vibrancy to the south-facing rooms.  Ignore the sofa backing the window, it’s here until the basement theater room is ready for it.

House-Tour-Four-Years-In-Living-Room-Toward-Window

Those ornate fixtures, both hanging and the pair of sconces were poorly placed, neither centered on anything.  With the open flow of rooms, the arch separating the entry and living room didn’t make sense.

New-House-Dining-into-Living-Room April 13 2012

Knowing we planned to use this room daily, for tv watching, relaxing, and toy playing, we built a large entertainment center with drawers for ample storage.  Nearly all the boys’ toys are stored in those nine drawers, so it certainly has served its purpose.

House-Tour-Four-Years-In-Living-Room-Toward-Hall

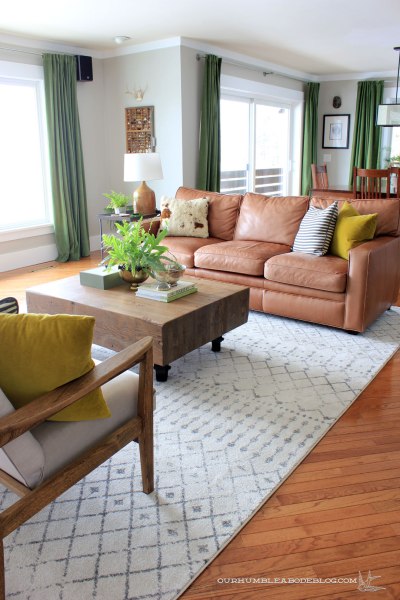
Dual mismatched sofas, one leather, the other a slim wood and linen design, face one another, offering plenty of seating.  This arrangement still allows a full view of the mountain and city scene out the windows.

House-Tour-Four-Years-In-Entry-and-Linen-Sofa

Positioning the leather sofa parallel to the dining room offers a bit of separation of the open floor plan without a formal divide.

House-Tour-Four-Years-In-Living-into-Dining

Ugh, every time I see this light I remember how many times I smashed my head on that dang thing.  Why the previous owner placed an eight foot tall door in a room with eight foot ceilings, I’ll never know.  Not only does it look awkward, it didn’t allow for a proper header and wasn’t stable.  The bay window sagged over time, making it non functional.

Dining-Room-After-Move-In-April-30

After pulling the door out and installing it in the entry, we swapped the arrangement of window and door, extending the deck over to make a more usable arrangement both inside and out.  A large mission style dining set, centered on the window and door, fills the space.

House-Tour-Four-Years-In-Dining-Room

To further open the floor plan, we knocked out the majority of the wall between the dining and kitchen.  The twelve-foot wide door makes entertaining and daily living even more enjoyable.

House-Tour-Four-Years-In-Living-Room

Opening the wall also floods the north facing kitchen with natural light.  Dark oak cabinets, 80’s country blue wall paper, and an over sized flourescent light didn’t help this kitchen.  However, it was a large, open size.

New-House-Kitchen-April-13

Swapping the dated, broken cabinets for sleek white DIY ones really changes the look and function.  A full wall of white Carrara marble brings in natural tones and subtle texture variation.  Dark slate floors are used throughout the house, for continuity and, well, we love the material.

House-Tour-Four-Years-In-Kitchen-Island-Back

Two more bay windows that couldn’t open properly, yet another gaudy light, and heavy knock down texture on the ceilings were primary offenders.

New-House-Kitchen-from-Breakfast-Nook-April-13-2012

For the most part, the new layout is very similar to the original.  All drawer lowers keep everything organized and completely accessible.  As much as I adore white kitchens, I like the balance of warm wood tones, so we created a custom walnut island.  As with the slate floors, we’ve used white tongue and groove boards in designs around the house.  The ceiling here was textured, cracked, and had several holes from lighting.  Rather than painstakingly skim coating the ceiling and hoping it didn’t crack again, we put up our favorite material to hide the flaws.

House-Tour-Four-Years-In-Kitchen-Pantry

A wall of floor to ceiling cabinets made a main walkway even smaller, and made a not so fun Ring Around the Rosie game to get pantry staples out.

Family Room Before

After opening up the wall, we still had about seven feet of space off to the side.  For added function, we built a bar/hutch in this space.

House-Tour-Four-Years-In-Split-Sitting-Areas

Vases, extra dishes, and overstock liquor are stored below, leaving the upper for pretty dishes and a fully stocked bar.

House-Tour-Four-Years-In-Bar-Cabinet

At the back of the house is our family room, previously seen with a dirt covered moss rock fireplace, an unused nook, and broken windows.  For reference, the arched doorway to the right leads straight down the stairs.

New-House-Family-Room-April-13-2012

Covering the fireplace, adding a wood burning insert, and shelves in the nook, are all changes we love.  We also replaced the old, broken windows with energy-efficient functioning ones.  It’s nice to be able to open windows in here to get some air movement.

House-Tour-Four-Years-In-Family-Room-Toward-Fireplace

Another open layout, the family room backs up to the kitchen and breakfast nook.  Yet another arched divider that didn’t fit the style of the house.
New-House-First-Showing-Family-Room

Landing on the most useful, functional furniture arrangement in this room surrounded by walkways wasn’t easy.  After trial and error, testing, and rearranging, this layout has proven to work.  Sofa backing the room, large stump coffee table centered, with two modern chairs flanking the fireplace still leaves walk space.

House-Tour-Four-Years-In-Family-Room-into-Kitchen

House-Tour-Four-Years-In-Family-into-Kitchen-and-Dining

Bedrooms and bathrooms will come tomorrow, so stay tuned to see those changes.  To see the progression of these spaces over the years, check out the first year, second, and last year.

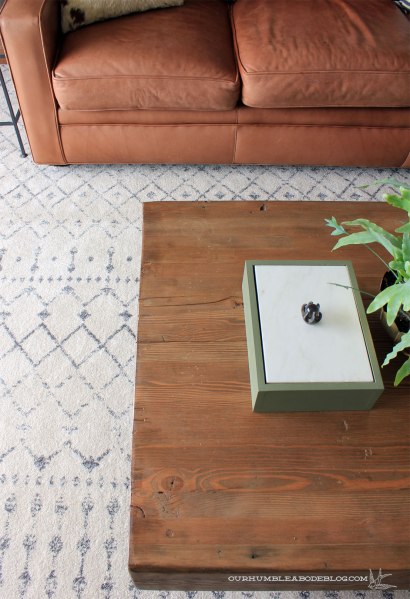
It hasn’t been an overnight transformation, but I’d say each room is at least 90% finished.  Most of the changes I want to make are simply waiting to find the right furniture or accessory to finish it off.  A larger rug for the living room.  Perhaps a different set of chairs around the breakfast table.  A bench at the foot of our bed, but nothing major.  Nope, the main level is feeling like home.  The basement now, that’s a different story.  Don’t even get me started on the pool house situation-haha.

Luck of the Irish

I may not have Irish heritage, but I undeniably love the color green.  As a kid, when coloring or painting, I didn’t consider my work done until I added a splash of green somewhere.  If you’re wondering, yes, I was a complete nerd who loved to draw, paint, build and decorate cardboard doll houses.  I remember making a yellow-backed floral wall paper by drawing on white printer paper.  It’s too bad I don’t have photos, because I’m sure it was just lovely-haha.

To me, green adds a vibrancy and lively element no other colors can.  Yes, yellow is bright and cheery, but it doesn’t add the right warmth.  Blues are beautiful and soothing, but can’t quite make the statement green can.  Green is so abundant in nature, whether light, fresh spring green, dark mid summer grass-green, or the muted tones found in fall and winter.  As a general green lover, I’ve incorporated some of each throughout my home and I urge you to do the same.

Some rooms have just a sprinkle (nothing too in your face) of green, such as our family room. In a mostly neutral space, nearly citron green pillows liven up the couch and add a jolt of color.

Sofa-Swap-Old-in-Family-Room-Detail

A brightly colored green and blue landscape painting perks up the mantle while the lumbar pillows pull the color down to the neutral chairs.  Just a few small green accessories like books, a small vase, and candles pepper the color around the rest of the room.

MCM-Chairs-Updated-in-Family-Room

Our kitchen counters are dark, nearly black green soapstone that still reads as a neutral.

Long-Narrow-Cutting-Board-in-Kitchen-Toward-Ovens

Small additions like towels, plants, dishes, even fruit are quick, zero commitment ways to add even more color.

Kitchen-Dish-Cabinet

Other rooms have a slightly bigger swath of green, like our living room.  Six sets of luscious grass-green velvet curtains flank the windows.

Parallel-Couch-Window-Seat-Arrangement-From-Stairs

Cover the curtains with your hand and you’ll notice just how much life and personality they bring to the room.  When in doubt, always default to house plants to get that bit of color without overwhelming a room.  Bonus, you don’t have to deal with picking paint colors or fabrics.

Horizontal-Railing-and-Living-Room

Speaking of paint, sometimes a quart can make the biggest impact.  At less than $20, what do you have to lose by giving it a try?  Our main bathroom rocks an olive-green vanity, which has so much more character than any neutral ever will.

Campaign-Mirror-in-Bathroom-Overall

Toss a few more green accessories, in this case, hand towels and a nearly ugly 70’s landscape painting, around the room to complete the look.

Main Bathroom Overall

According to the color wheel, green is a cool color, but it certainly adds warmth to any space.  A muddy sagey olive acts as an almost neutral backdrop in our guest bedroom.

Guest-Room-Makeover-Green-Walls-Upholstered-Headboard

Pairing with bright white it feels so fresh, clean, and simple.  But greens really shine next to warm wood tones, much like a tree trunk and leaves.

Green-Guest-Room-Dresser-Chair-and-Art

By far the most overtly green room in the house is the boys’ bedroom.  Back when I gave their room a makeover, I asked each of them what color walls they wanted.  One said green and the other said yellow.  We compromised with this lemongrass yellow-green.  It’s fun and happy, but is tempered by white, gray, and navy.

Boys-Bedroom-with-Large-Rug-from-Door

Our master suite, though mostly white and black, has green tucked here and there.  More grass-green velvet wraps the headboard for a touch of color against an otherwise white wall.

King-Bed-Frame-Finished-Overall

Opposite the bed, a few bright green plants and (soon to be framed) landscape painting flank a dresser, bringing color around the room in a simple, easy-going way.

Craigslist-Dresser-with-Emily-Jeffords-Art-by-Bathroom

Even our master bathroom has touches of green via plants and a very abstract landscape.

Abstract-Landscape-Painting-in-Bathroom-Version-2-with-Vanity

Though we’re not quite at the point of the basement remodel to paint and add accessories, I’m trying to narrow down green paint options to use down there in a few ways.  I think we all have a color we naturally gravitate toward, right?  What’s yours, and more importantly, how do you use it in your decor?

Building a Sleek Railing

A few weekends back, we took the plunge and replaced our stair railings.

Stair-Railing

It was our first venture, with a few small things to figure out, but overall went smoothly.  To get started, we of course had to remove the old set, loosening the bolts from the underside first.

Basement-Demo-Stair-Railing-Post-Base

With the flat side out, we determined our new post placement.  Since the old railing was too close to the front door trim, we shifted the posts over an inch.

Railing-Building-Old-Out

Ben cut the 4 by 4 inch post to size (38 inches above the floor with 11 inches below), set it in the hole, and cut another post in half length wise and to height for the wall side.  Neither were fastened in place so we could first attach the horizontal planks.  We purchased 2 by 6 boards, but ran the sides through the table saw to cut them down to 5 inches wide and take away the dimensional lumber look.  To save some time sanding, we also ran each plank through the planer for an ultra smooth finish.  Once all the boards were cut and prepped, we cut 4 inch spacers to make sure spacing between was even.

Railing-Building-Spacing

While I held the boards in place on the full post end, Ben worked on the half post side.  He screwed through the backside of the post, into each board three times to secure it in place without visible holes.  Then we shimmied it into place on the wall and fastened it to the wall.

Railing-Building-Wall-Edge

The full post end was only slightly different since we used longer screws.  Ben pre-drilled through the post, creating a recess for the screw head, then drove the screws into place while I kept the each board in place.

Railing-Building-End-Screws-Detail

Railing-Building-End-Detail

Working on the flat side was easy enough and went quickly, but the angled side was a bit tricky.  Again, removing the old was step number one.

Railing-Building-Angled-Side-Out

Another 38 inch tall 4 by 4 post was set into the hole at the top of the stairs.

Railing-Building-Top-Post-Installed

To keep the spacing between the boards even with the flat areas, the post at the bottom had to be taller since the angled cuts make the planks taller.  This post had to be notched out to cut around the stair wall before screwing it in at the base.

Railing-Building-Base-post

Then time for the straight meets angled cut to follow the stair angle.  Once the angles fit perfectly, Ben applied glue on the angle and drove screws in from the top and bottom to keep everything rigid and in place until the glue dried.

Railing-Building-Stair-Angle

Like the other side, Ben put two screws into each plank.

Railing-Building-End-Post

In that corner, where the stairs meet the small section terminated to the wall, we had to stagger the screws so they didn’t cross.  Since the wall section is shorter, one screw in the center held firmly.

Railing-Building-Sides

After everything was securely fastened on the upper sections, Ben drove 6 inch long screws through the posts and into the wall studs below for maximum rigidity.

For a seamless finish, I filled each screw hole, knot hole, and hairline crack with putty and sanded smooth.

Horizontal-Railing-Installed-at-Top

Caulking along the seams and walls was the last step before painting.

Horizontal-Railing-Straight-Section

When painting over raw wood like pine, sap bleed through can be an issue.  For greatest durability and stain blocking, I applied one coat of the same stain I used on our bedroom wall: Sherwin Williams Exterior Oil-Based Wood Primer.  It’s stinky, so I built a fire and opened the windows to air the room out.

Railing-Building-Primer

Knowing white will show any dirt, grubby hand marks, and well, everything else, I needed a paint that could withstand a good scrub.  After a chat with my favorite paint guy at our local Ace Hardware, he suggested Benjamin Moore’s Ben Exterior paint in the low lustre finish to avoid a glossy finish.  Three coats later and it’s a wrap.

Horizontal-Railing-and-Living-Room

With this checked off the to do list, we can start hanging sheet rock in the basement.

A Sleek Stair Railing

Back on closing day, nearly four years ago now, our living room had a lovely variety of honey toned oak.  Floors, doors, trim, and the railing.  The light fixtures, red accent wall, and arch over the railing were high points, too.

New-House-Dining-into-Living-Room April 13 2012

We’ve since added new trim, painted the doors and walls, replaced the lighting.  Basically changed everything except the floors (which will remain the same) and until recently, the railing.

Living-Room-Space-for-Window-Seat-3

With the basement completely gutted and free of drywall, we finally had access to the underside of the railings.

Basement-Demo-Stair-Railing-Post-Base

Over the weekend we removed the old oak railings and built a new, sleeker design.  Two years or so ago I started planning what would eventually replace the oak and thought a horizontal layout would look best.  A few months ago I spotted this railing by Milk and Honey Home and knew it would work for our home, too.

Horizontal-Railing-by-Milk-and-Honey-Home

To build our railing we used four by four posts and two by six boards for the rails.  It took a day to build and install, and even before primer and paint, it looked light years better.

Horizontal-Railing-Installed-from-Living-Room

One coat of primer and three coats of white paint later and here we are today:

Horizontal-Railing-with-Linen-Sofa

Be prepared for photo overload.

Horizontal-Railing-Toward-Closet-1

The simple design doesn’t attract unnecessary attention and is sturdier than the old design.

Horizontal-Railing-Straight-Side

Getting the straight section by the living room done was pretty straight forward, but the angled section was trickier.

Horizontal-Railing-from-Top-Toward-Door

I’ve got a post in the works covering the building process, so I’ll save the specifics for then.

Horizontal-Railing-Looking-Down

It’s much more modern and more in keeping with the straight lines of the house.

Horizontal-Railing-Top-Detail

Horizontal-Railing-Small-Straight-Section

I may regret my decision to paint it white after the millionth round of washing dirty hand prints off, but I love the way it blends with the tongue and groove wall.

Horizontal-Railing-Angled-Section

The post tops are simply a 45 degree angle and rise 2.5 inches above the top rails.

Horizontal-Railing-Angle-at-Entry

To give the boards a defined termination into the wall, we cut a post in half for a seamless look.

Horizontal-Railing-Half-Post-End

Every new change is so exciting to see when walking past, and this one has been a long time coming.

Horizontal-Railing-from-Family-Room

The way it brightens up the entry and living room is my favorite.

Horizontal-Railing-and-Living-Room

Once we’ve replaced the tile, our entry checklist will be complete.

Horizontal-Railing-from-Front-Door

And with the railing complete, we can continue work in the basement and should be ready for sheet rock soon.  Then the fun can begin!  I’m already gathering paint samples, measuring for furniture, and we’ve purchased a couch for the theater room.