Pillow Party

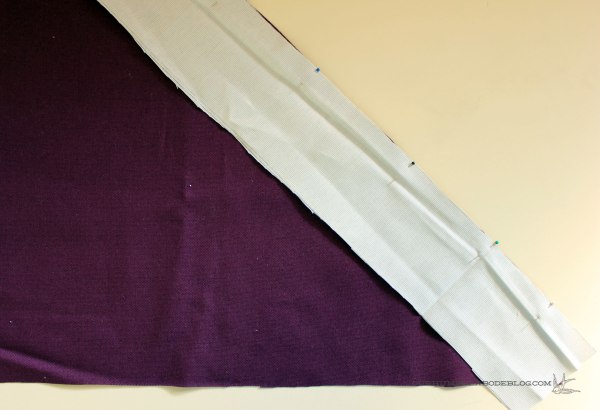
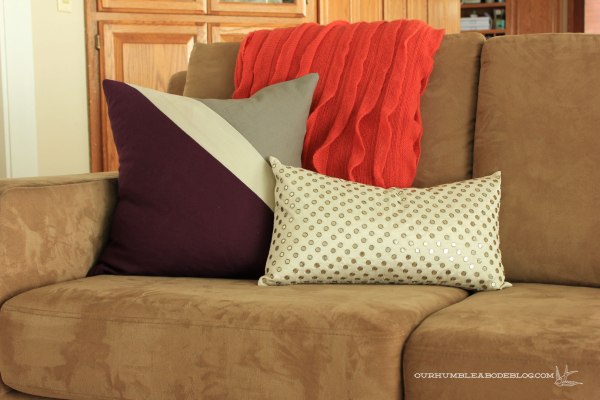
By now I’m guessing you’ve noticed my pillow obsession.  But it’s a crazy easy way to quickly change the feel of a room.  For this fall, I made (and still have a few in the works) new covers in jewel tones.  This diagonal cover was as easy as cutting an eggplant 19 inch square.  Then I used a yard stick to make a line across to cut along.

Diagonal-Color-Block-Pillow

And pinned a 3 inch strip of gray along.

Diagonal-Color-Block-Pillow-Pinned

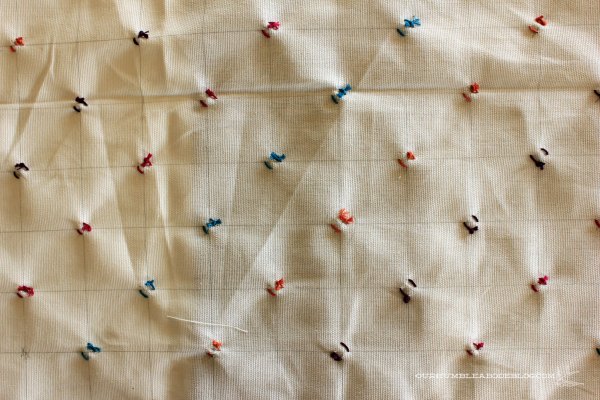
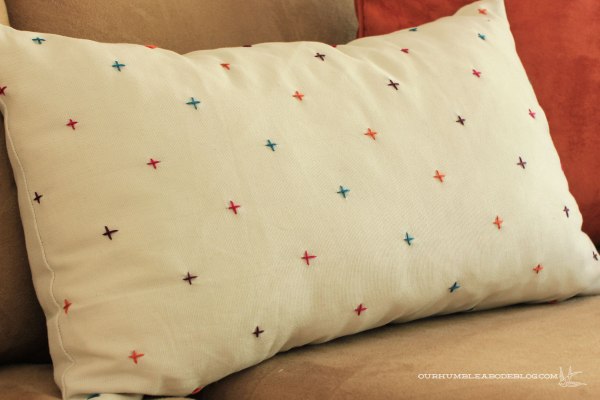
The corner is a darker gray piece.  To finish it off, the back is an eggplant envelope back.  Another pillow started with the same light gray cotton and I marked a grid on the back with a yard stick.  Using embroidery floss, I made small plus signs along the grid.  By keeping a 1 to 2 inch tail, then stitching the plus, I could easily tie the loose ends together.

Fall-Plus-Pillow-Inside-Stitching

It made a cute, simple design.

Embroidered-Plus-Pillow-Cover-Detail

Embroidered-Plus-Pillow-Cover

For a reversible cover, I used scraps of light gray, eggplant, and dark gray to make a striped envelope closure.

Embroidered-Plus-Pillow-Cover-Back

Oh, and the mirror pillow from Sears is awesome.

Diagonal-Color-Block-and-Mirror-Pillow

Thin gold threads hold the mirrors in place, making a great texture and shimmer.

Mirror-Pillow-Cover-DEtail

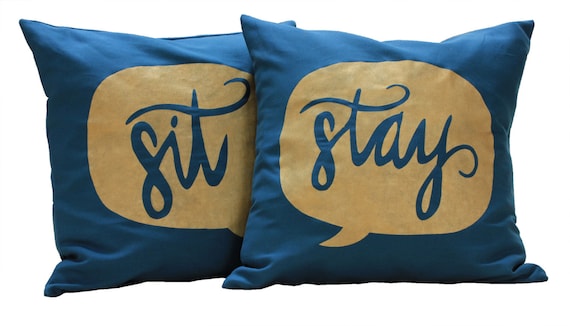
Also, I’ve added custom Sit and Stay pillow covers to the shop.

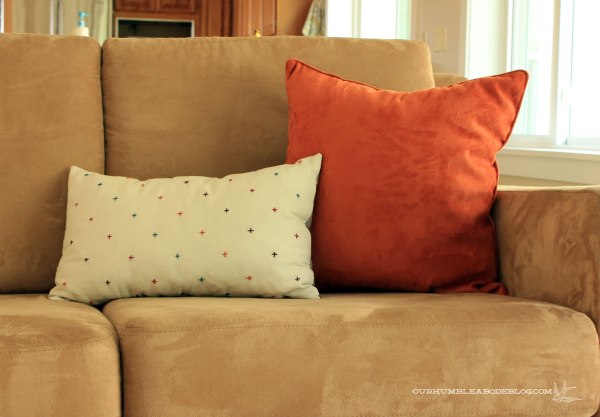
Now I’m going to finish my living room pillow covers.  What pillows are you loving this fall?  Target has a really, really fun selection that I’m trying my best to not take home with me.

Quick Quilt

So, I made a quilt.  And it didn’t take that long.  About 10 total hours, from cutting to using.  After trying and disliking a small patterned bedding, I searched the internet for a more simple, but still colorful quilt.  This Pia Wallen Cross Blanket is awesome, but also expensive.

Then I saw this Polly blanket.

Perfect colors to tie in with the elements of the guest room.  White like the trim, gray to match the doors, yellow for the walls, blue like the headboard and dresser, and green accents.  But I couldn’t find a price or a place in the US selling it.  Instead, I used this as inspiration to make my own fabric quilt.

Quilt-on-Guest-Bed

I bought a half yard of six different colored linen fabrics.  Light gray, dark gray, mustard, white, teal, moss, and used navy I bought for the headboard.  To maximize the fabric, I cut nine 6 by 16 rectangles of each color, keeping the left over ends.

Sewing-Quilt-Cut-Pieces

With all pieces cut, I started randomly arranging the colors, sewing the short ends together to make a strip.

Sewing-Quilt-Ironed-Strip

Then I ironed each strip before sewing two together.

Sewing-Quilt-Strips

I continued sewing two strips together, then sewed those strips to form the front.  Once I made the front large enough, I laid an ironed flat twin sheet (five bucks at Wal-Mart) on the floor right side up.  Then my patchwork piece on top, right side down.  For a little more weight and warmth, I added a layer of white flannel on top of my patched sheet.

Sewing-Quilt-Layers

Before sewing, I marked my lines, then stitched along all three sides and part of the bottom.  Basically, I treated it just like an over sized pillow cover.  Once I turned it right side out, I had and front, back, and inner liner with a small hole at the bottom.  I hand stitched it shut and called it done.

Patch-Quilt-on-Guest-Bed

Folded at the foot of the bed it adds pattern and color, and functions as a throw or a summer blanket for one person.  Handy Sammy and I are both super happy with the results.  Bonus, I’ve finally sewn a full quilt.  Every time before, I’ve made way too small pieces for my patience and skill level.  Turns out, making large pieces makes the process quicker.  Who woulda thunk it?  How about you, have you ever made a quilt?

Place Mats, Everybody

I realize the place mat turned pillow cover concept is nothing new.  Because place mats are perfect and almost ready for stuffing.  So, here’s my version involving a clearance pillow cover, nail scissors, Velcro  embroidery floss, and an old down alternative bed pillow.  I like to use a small pair of scissors to cut along the bottom seam, making an opening for the insert.

Place Mat Pillow and Cover Tutorial Supplies

As luck would have it, I had a down alternative pillow in the closet (I think it came with our duvet insert).  Even luckier, when cut in half, the dimensions perfectly fit my place mat.

Place Mat Pillow and Cover Tutorial Insert

With my pillow cut in half, I sewed the open ends to create two 18 by 13 inch inserts.  Whenever I make a pillow, I like to have an opening to remove the insert for easy washing and storing of the covers.  The easiest way to do this with a place mat is with the help of Velcro   Hand stitch on the inside, if possible along the existing stitching.

Place Mat Pillow and Cover Tutorial Open Velcro

Close it up and the Velcro is barely noticeable.

Place Mat Pillow and Cover Tutorial Closed Velcro

Especially along the bottom of the pillow.

Place Mat Pillow and Cover Tutorial on Bed

The little border and metallic gold feather are my favorite parts.  And all for $1.99 because I had the rest of the supplies in my stash.

Place Mat Pillow and Cover Tutorial Detail

When I want a change, I can pull out the insert, store the cover and make something new.

Winter Pillows

Each season, I try to sew new pillow covers to fit the time of year.  For the fall, I made an assortment of coral, tangerine, and yellow covers.  When winter rolls around I think of blues, deep greens, silver, and white.  Lucky for me, I bought a few yards of pretty blue fabrics over the summer.  These fabrics set the tone for the winter look.  Because I have to make everything more complicated than necessary, I set out to make a hexagon patch pillow cover, similar to fall’s triangle one.  To make it, I made a template in Photoshop, printed it to card stock, cut it out and traced it on scraps of linen/cotton blend fabric.

Hexagon Pillow Step 1

With my pieces cut, I pinned the pieces together to make a strip, alternating colors.

Hexagon Pillow Step 2

I wanted a small seam, so I stitched along the sides, keeping the edges of my presser foot and fabric aligned.

Hexagon Pillow Step 3

Easy enough, just a few straight lines.  But sewing the strips together was more complicated.  First, line up the strip, fold the right sides together, then pin one side only, like this:

Hexagon Pillow Step 4

Continue sewing each side, one at a time, working down the row.  Or skip sewing strips and add one piece at a time.  Check out this full tutorial to get a better idea of how to sew hexagons together.

Once I had a sheet of hexagons large enough to cover a pillow front, I cut pieces of silver satin for the back envelope closure.

Blue and Green Winter Pillows

For the stripe pillow, I simply cut out a 19 inch square (for my 18 inch insert) at an angle.  It also has a shiny silver satin back.

Blue and Green Winter Pillows Satin Back

Ben thought six pillows on the couch was overkill, so we’ve only got four.

Blue and Green Winter Pillows on Couch

Because the designs aren’t winter or Christmas specific, we can use the pillows year round or elsewhere in the house.

Do you rotate pillows with changing seasons or holidays?  What colors seem most wintery to you?

Pillow Palooza

Up until yesterday, we still had very summery weather.  I’m a little late, but I’ve started decorating for fall.  Usually I don’t go all out on seasonal decorating, but I like to switch up a few things.  I started with new fall colored pillows for the couch.  Thus, pillow palooza was born.

Red doesn’t often make an appearance in our house.  However, I can’t get enough coral lately.  Spurred by a towel I bought for the bathroom, I figured dark coral and gray could replace red nicely.

I happened to have half a yard of light gray duck cloth in my stash, so I cut it to an 18 inch square piece.  Wanting a simple design, I taped off two-inch wide random stripes.  Then I mixed up a batch of dark coral using apple red, orange, and a dose of pale pink.  Painting went quickly, covering in one coat.

Peeling off the tape is such a fun moment.  A few areas of bleed through, but nothing terrible.  Definitely fun color.

For something even more fall-ish, I had the idea to add a leaf design to a pillow.  Preferably, I would have used fabric for the leaves, but I had my heart set on metallic.  Sadly, our little fabric stores don’t carry much in the good-looking metallic department.  Again, I turned to craft paint, this time in a metallic copper finish.    Freehand leaves appear to fall and settle at the bottom.

Later, I went back and added a few metallic gold leaves, too.  Yellow is a great fall color, so I kept the fun Target pillow.

For the other side of the couch, I started dip dyed a piece of natural colored canvas in a tangerine dye bath.  Just a simple dip and wiggling to get an ombre-ish pillow.

To incorporate orange, yellow, and gray to temper the bright colors, I had my heart set on a triangle pattern pillow.  I cut a 7 inch equilateral triangle template from card stock, then traced it to scrap fabric left over from other projects.

Pinning the pieces together to create a line of triangles.

After completing the strips, I sewed them to each other.  Randomly placed colors made a fun mix.

Of course the yellow arrow pillow fit in, so it’s still around.

So that’s our fall-ified couch.  Nothing ground breaking, but I’m happy with a change.  Both the pillows and weather.

What have you been changing up?  New pillows?  A fall mantle?  How do you incorporate fall colors in your home?