Root for the Home Team

Have you seen the Home Team Pennant Pillow at School House Electric?

If you hadn’t already, you just did.  Isn’t it cute?  Essentially, it’s the pennant pillow version of a high school Letterman jacket.  Problem is, only NYC is available for purchase.  Seeing as I have no connection to NYC, I decided to make a much cheaper Montana version to represent our state.

Montana-Pennant-Pillow-Stitched-Lettering

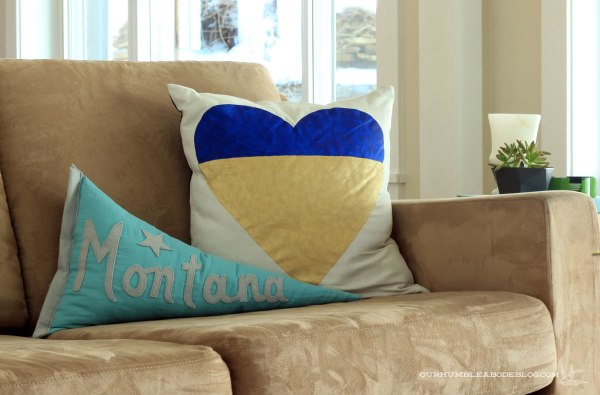
Using felt and cotton fabric I already had, I spent exactly zero dollars on this pillow.  To make it, I cut two 24 inch by 19 inch rectangles from my cotton.  Then marked the center on one side and connected the corners to make my triangle base.  For the letters, I free-handed the text.

Montana-Pennant-Pillow-Lettering

When I liked my design, I flipped it over and outlined it with a black marker.

Montana-Pennant-Pillow-Backward-Lettering

With my template ready, I layered the felt over and held it against the window to trace the design to the back of my felt.  I didn’t have fusible interface here (I like Wonder Under), but if I did, this would have been easier.  So, do as I say, not as I do.  Before tracing your lettering, iron Wonder Under to the back side of your felt, leaving the paper backing on.  Then trace your letters and cut out.  Peel the paper off and iron your freshly cut letters to your front triangle and you could be done.  Instead, I hand stitched my felt letters on, which took an episode of Hart of Dixie (no judging, please!) to finish.

Montana-Pennant-Pillow-Stitched-Lettering-Detail

With my letters sewn on, I placed my back triangle on top of my front piece, right sides together, and sewed the two long sides.  Polyfill stuffing  inside, then I sewed along the short side, sealing it all up.  For a decorative pennant look, I stitched another piece of felt along the short side, wrapping it around the back.  And boom, cute triangle pillow for the couch.

Fauxrarra Marble

Winter is still here in full force, which means I’ve been stuck in the house.  A lot.  So I’m forced to keep my self entertained, often involving a project.  Precisely why I’ve painted this table top for the third time in less than one year.  Third time’s the charm, right?

Faux-Marble-Table-Top-Toward-Fireplace

See, as I flipped through the new West Elm catalog, I kept imagining the Reeve Mid-Century Coffee Table in our house.

Then it dawned on me, I already have a similar clean lined, handsome wood, brass footed table.  The big difference?  It didn’t have the beautiful, sophisticated marble top.  Instead it had a bold chevron top.  At the time I painted the stripes, I loved the added pattern.  Now, I’m kind of over it.  Not over it enough to paint over it, oh no, that took too long to do.

Chevron-Table-Top-in-Family-Room

Ideally, I’d have a real marble slab, but I’m afraid the folding base design couldn’t handle the added weight.

Faux-Marble-Table-Top-in-Family-Room

But the other side, a minty green, was fair game.

New-Coffee-Table-in-Family-Room-Toward-Fireplace

I painted three coats of eggshell white latex on it and then started my faux marble paint treatment.

Using a few gray and black craft paints, I watered each color down.  I didn’t measure (and don’t have pictures) but I’d guess it was 1 part paint to 2 parts water.  Super runny and I barely mixed each color, which helped create a more natural variation.  A feather worked best to apply a thin, free-flowing line of watery paint.  Immediately after making the line, I used a 2 inch angled craft paint brush to stipple the paint.  Just after stippling, I followed up with a damp paper towel, blotting to blend the paint and soften the edges.

Faux-Marble-Table-Top-Vein-Detail

Some areas are much lighter and more blended.  A few other veins are darker with black patches.  If I didn’t like how one area looked, I used my damp cloth to wipe the paint away and start over.  Once I finished, I coated the top with satin Polycrylic for a protective finish.

Faux-Marble-Table-Top-Detail

The sides are painted to match.  Carrying the marble paint to the sides helps give a more realistic effect.

Faux-Marble-Table-Top-with-Legs

Maybe I just needed a change, but I’m enjoying the lighter, more subtle top.

Faux-Marble-Table-Top-2

I think it balances the base better and lets the interesting leg shape shine.

Faux-Marble-Table-Top-Toward-Windows

Faux-Marble-Table-Top-Toward-Entry

Not a bad result for a free project and 10 dollar base.  What coffee table tops do you like best?

Put it on a Pedestal

Sometimes, putting a completely ordinary item on a pedestal transforms it into a sculpture.  A shell, log slice, or in this case, a piece of driftwood.

Driftwood-Sculpture-on-Guest-Room-Dresser

I’ve had a love affair with driftwood for a while now.  This fall, I collected several pieces from my father-in-law’s ranch to make something.  I drilled several tea light holes in this large piece to create a centerpiece.  Usually it stays on the patio table, but I brought it in to take this picture.

Driftwood-Candle-Centerpiece

After seeing Dr. Vogel’s giant sculpture, I really wish I hadn’t drilled the candle holes in that piece.

Dr-Vogels-Driftwood-Sculpture

It could have looked really neat as a similar large sculpture.  Instead, I used a smaller piece from my collection along with a 1/4 inch oak dowel and a scrap of 2 by 4.

Driftwood-Sculpture-Supplies

After sanding the board, I measured 2 inches from each end and center on the wood before drilling holes.  Then, I set the driftwood on the board and made marks to line up with the holes.  With the holes drilled, I put the dowel in and made a mark where I wanted each cut.

Driftwood-Sculpture-Assembly-Ready

Wood glue securely holds the dowels in the holes, and then I painted the base white.  A little more glue in the driftwood and I’ve got a sweet little sculpture.

Driftwood-Sculpture-on-Guest-Room-Dresser-1

It’s interesting and different from all angles, which is really fun.

Driftwood-Sculpture-from-Top

I thought it would stay in the guest room, but I really like it on the shelf above the bar.

Driftwood-Sculpture-on-Shelf-in-Family-Room

It’s a reminder of a fun day spent with our family.  And adds a lighter object to break up the books and picture frames.

Driftwood-Sculpture-on-Shelf-Detail

I’d love to find another large piece to make an oversized sculpture.  Not sure where it’d go right now, but I’d find a place.  For items you can’t or don’t want to drill into, epoxy would work well, too.  Just be sure your base is heavier than your display item so it won’t tip.  Do you have anything on a similar pedestal?  What do you think of this easy way to display simple items?

Tangle of Triangle

Going stir crazy this winter, I’ve been looking for changes I can make to the living room.  It’s not terrible, but we have barely touched it.  I’d really love a new sofa, but I’m settling for new lamps right now.  I remember seeing the Isosceles lamps from Land of Nod (now unavailable) months ago, and loved the simple design.

So I recently made a version for about 12 dollars per lamp because I already had the white shades.

Isosceles-Table-Lamp-Finished-on-Table

At Home Depot, I bought 12 feet of 1/2 inch round wooden dowel for six bucks.  To make the bases, I cut 7 1/2 inch long pieces, with 60 degree angles to form each base triangle.  And another set at 3 1/2 inches to make the top equilateral triangle.

Isosceles-Table-Lamp-Base-Cuts

A little wood glue and tape to hold it in place until it dried did the trick.  To connect the triangles, I cut 15 inch long pieces at a 20 degree angle, though my cuts were slightly off.  But that’s okay, wood filler will make it look okay.  Ben helped my by shooting in pin nails while I held the pieces together to make this:

Isosceles-Table-Lamp-Assembled-and-Filled

The triangles face opposite directions, and the connectors swirl around, point to opposite point.

Isosceles-Table-Lamp-After-Filled-Joints

Fill in all gaps and corners, then let them dry.

Isosceles-Table-Lamp-Filled-Joint

Because I wanted slightly rounded corners, I used 50 grit sand paper to quickly take off the extra base triangle point.  Holding the sand paper at the same angle as the vertical while I worked made for a more seamless corner.  Then I followed up with 150 paper for a smooth finish.

Isosceles-Table-Lamp-Sanded-Joint

Then, to hold the lamp socket in place, I but two more triangles from 1/4 inch MDF.  The top looks normal, but to fit snugly without falling through, I sanded the bottom to fit the rounded shape.  Before putting the top in, I found the center and drilled a hole large enough for my threaded piece to fit through.

Isosceles-Table-Lamp-Triangle-Top-Pieces

More wood glue holds this top in place, giving the socket a resting place.

Isosceles-Table-Lamp-Top-Triangle-In

I bought two bottle lamp kits from Wal-Mart for $6.50 each, and used these pieces in addition to the wire.

Isosceles-Table-Lamp-Wiring-Pieces

To cover the threaded fitting, I bought a small chunk of brass tube to make a sleeve.  Once cut to size, I spray painted it white to match the lamps.

Isosceles-Table-Lamp-Cover-Tube

Then threaded the piece through the hole:

Isosceles-Table-Lamp-Wiring

And secured it with the small flat nut on the underside.

Isosceles-Table-Lamp-Wiring-Underside

After connecting the wires, I popped the shade on and voilà, a new lamp.  Like the Land of Nod lamp, the cord isn’t hidden, just tucked in the center and drapes along the back.

Isosceles-Table-Lamp-Finished-Cord-Detail

Isosceles-Table-Lamp-Finished

No more clinking of lamp chains from our old lights.  And the taller lamps give have a warm, even glow.  I tried lining the shades with gold fabric, but it blocked too much light, so I had to nix it.  All the gold paper I could find wasn’t long enough to fully wrap around the shade.

Isosceles-Table-Lamp-Finished-in-Living-Room

I’ve got a plan to update those cheapie end tables, too.  White marble remnant in the garage, prepare to be used.  And look how happy my fig looks!  It has already sprouted two new leaves and is working on a third.  Those tulips should bloom in a few weeks, too.  I’m so excited.  Loving all the green in the house during this dark, cold winter.  Anyway, back to the lamps.  If I were to make these again, I’d make the top triangle a little larger to have a wider spread.  But, I’m still happy with the result.

Plumbing Aisle Inspiration

While getting copper supplies for the bud vase, I wanted to make something with basic hardware store supplies.

Copper-Bud-Vase-Hanging-Side

What do you get when you pair 8 feet of 5/8 inch wooden dowel, 6 1/2 inch copper T connectors, 1 90 copper elbow, a two gallon bucket, glue, and spray paint?

Wood-and-Copper-Plant-Stand-Supplies

A cute (in my opinion, anyway) planter and stand.

Wood-and-Copper-Plant-Stand-by-Back-Door

That aloe plant is my oldest plant.  I’ve had it for three or four years (the only plant I’ve kept alive over a year) now and it desperately needed a larger pot.  It was looking like a male orca in captivity; confined and droopy.  While priming the bathroom drawers with Kilz primer, I noticed the small 2 gallon bucket would be the perfect size.  Which spurred, the hardware store plant stand.  If you want to know how I made my, read on.

Here’s my cut list:

Two at 1 5/8 inch long, for the base.

Four dowels cut at 2 3/4 inches, also base pieces.

Four at 3 inches, top pieces to hold the bucket in place.

and four more at 10 inches for legs, all cut with a chop saw.

I started with two 4 foot lengths of 5/8 inch dowel and 1/2 inch copper fittings.  The two short pieces (1 5/8) fit inside each side of the elbow.  Attach a T to each end like this:

Wood-and-Copper-Plant-Stand-Base-Start

The four 2 3/4 inch sticks go in each hole of the T connectors to make the base.

Wood-and-Copper-Plant-Stand-Base-Assembly

Add the four remaining Ts to the ends for the leg attachments.

Wood-and-Copper-Plant-Stand-Base-on-Bucket

After dry fitting everything, I rolled each dowel end in Liquid Nails to secure the pieces.

Wood-and-Copper-Plant-Stand-Base-and-Legs

And let if dry on a flat surface, with the three-inch pieces down.

Wood-and-Copper-Plant-Stand-Drying-on-Table

While the glue dried, I asked Ben to cut the top off the bucket.  I didn’t want the handle or ridges.  This bucket was thin enough he was able to cut through with a sharp utility knife.  To make the bucket look, well, less bucket-y, I gave it two coats of flat white spray paint.

Wood-and-Copper-Plant-Stand-in-Family-Room

Now, sir Aloe has a larger pot with room to grow.  And I really like the mix of shiny copper and wood.

Wood-and-Copper-Plant-Stand-Finished-Detail

A new Philodendron is keeping it company by our back patio door.

Wood-and-Copper-Plant-Stand-1

This could easily be modified by staining or painting the wooden legs, or making it entirely from copper.  Buy copper tubing and 8 copper caps for the legs and you’ve got a shiny, custom stand.  All from humble plumbing parts and hardware store basics.