Are We Keeping the Pool?

New-House-Pool-Room April 13 2012

That’s the second question people would ask right after asking when we’d start working on this space.  We knew the pool wasn’t in functioning condition when we bought the house, and hadn’t been for at least a couple of years.  The above photo showed the pool from the best angle, below, you can see the corner where the liner had started to pull away from the wall.

New-House-Pool-to-House-April-13-2012

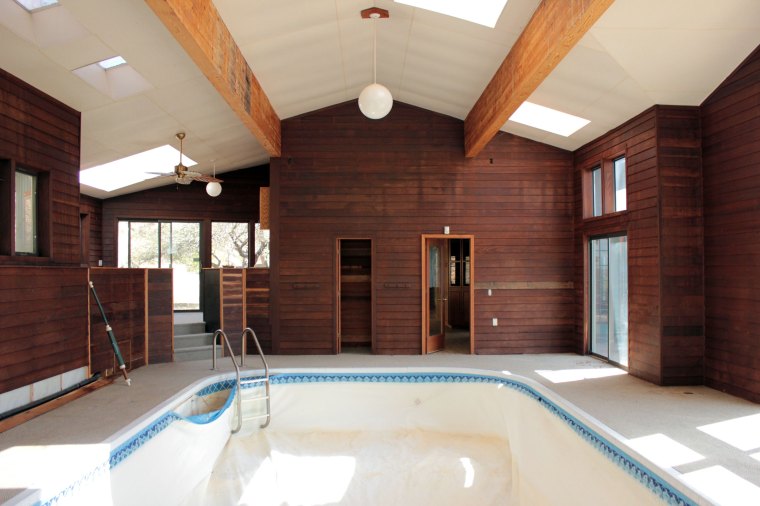
However, neither photo above showed the gross reality lurking just below the frame; several feet of stagnant water that had dripped in from the leaking roof filled the deep end.

New-House-Pool-Tearing-Liner

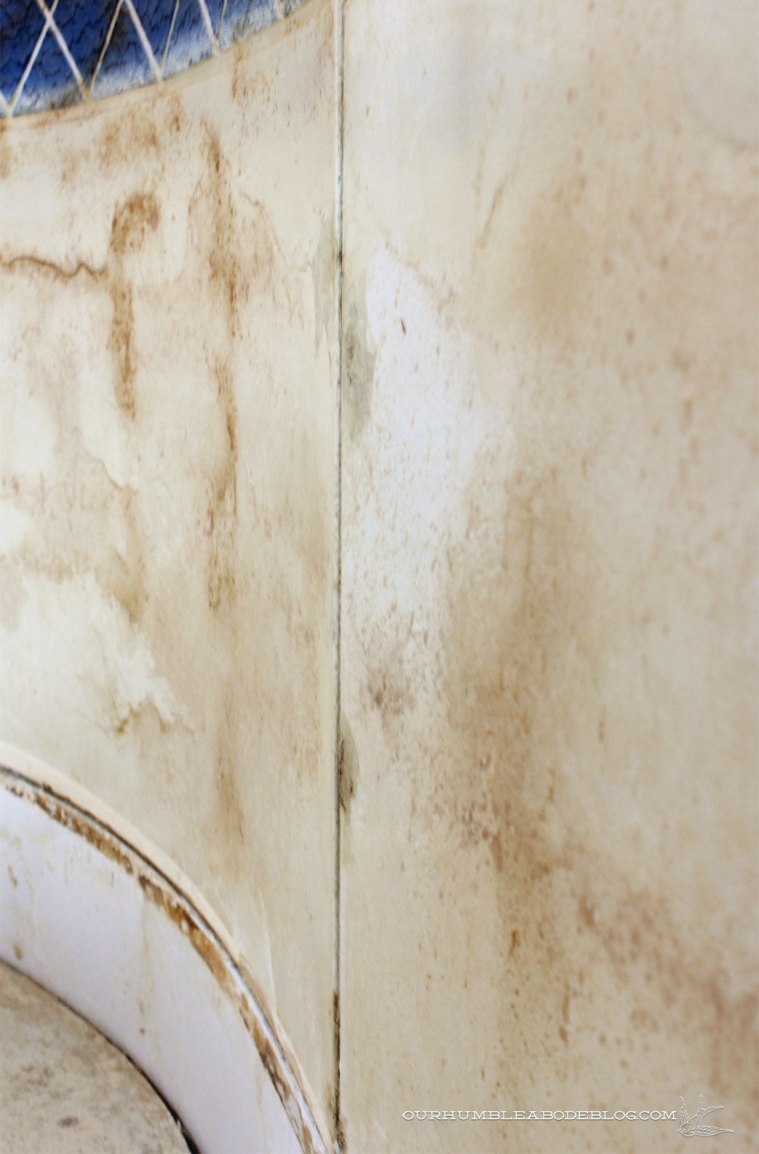
Most had been drained, but that moldy green line showed the previous level.  Be thankful you can’t see the giant bugs and dead mice.  The old liner had seen far better days, thus prompting a tear out removal.

Insulation-in-Pool-Room

The photo above, taken after removing the liner, better shows the condition of the pool structure.  Pools kind of fall into two categories, lined versus unlined.  This pool was designed to have a liner, but the original was a partial version and started two and a half feet from the top, leaving the rest exposed.

pool-condition-shallow-end

At the time of replacement, the previous owners chose a full liner, hence the band with screws along the top edge.  Based on the gaps between the upper panels, it’s safe to assume the structure settled, panels shifted, and were no longer water tight so a full liner was the best option.

pool-upper-lining

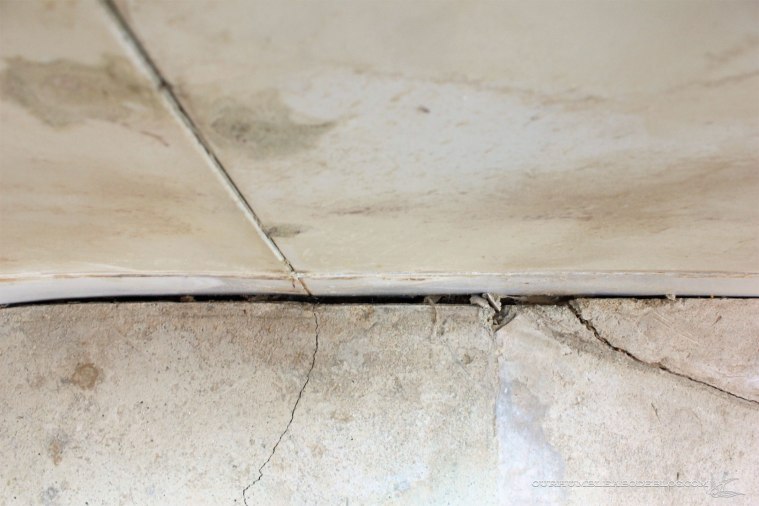
Not only are the side panels a problem, the base of the pool has gaps from the wall.

pool-condition-gap-at-side

So, are we actually keeping the pool?  It was always our intention to keep the pool, but that hasn’t stopped us from considering alternative uses.  Family and friends also like to toss out suggestions-a theater, home gym, etc.

Ultimately, after nearly five years of consideration, nothing has made more sense than a pool.  Yes, it clearly needs work to get it functioning, but we can justify it for future use.  We’re still figuring out our best route for use and longevity, but a full liner seems to be the best option at this point.  The rest of the room will get finished first-ceiling, walls, floors-to keep the pool clean and safe until work finishes.

Progress in the Pool House

One of the more unique, and infrequently shared, features of our house is the indoor pool.  Nearly five years ago, when we closed on this house, it looked like this:

Looking up, there was fiberglass sheeting on the ceiling, dark wood siding on the walls, and a leaking roof-due to old solar panels on the roof, dripped down.  Looking down, the floors were covered with outdoor grade carpet, covering the damaged tile below, and the pool liner was shot.  We saw potential, but because we didn’t need the pool, finishing it was lowest on the priority list.  That doesn’t mean changes haven’t been made along the way, though.

Before replacing the house siding, we first had to tackle landscaping work, which had been filled in too high, covering the wooden rim joist that rests on the concrete foundation.  Wanting to keep the future back deck all on the same level, we decided to take out the wet bar platform and lower the door and window.  Once the exterior work made it to the pool house, we replaced all the windows and doors.

Which brings us up to speed on past pool house progress, but this space has basically functioned as a personal warehouse of building supplies.  It feels like this space has 3,286 steps to get it done, so it’s bit by bit progress.  First order of business is replacing the ceiling.  Unlike all the other spaces we’ve worked on, it’s not quite that simple.pool-house-ceiling-scaffolding-from-belowHaving a ceiling peak of 15 feet, plus a 9 foot deep hole to work over, we needed scaffolding.  Rather than renting and spending the same or more money, we built a temporary structure to make working easier.  Step 1 of 3,286 complete.  Then, Ben tore off the old sheets, exposing the structure.  Step 2, check!pool-house-ceiling-taken-offThose exposed beams are such a cool structural element, but the leaking roof had streaked and stained both.  A thorough sanding brought them back to life.  Steps 3-9, done!pool-house-beam-sandingOnce the beams were finished, Ben started prep work to install the tongue and groove pine boards.  First, two by 4 boards were secured perpendicular to the trusses followed up by new light boxes to adequately light the entire room.  Steps 10 and 11.  Next, he cut pieces of rigid foam insulation to tuck between the boards for a higher R value and covered with a thin plastic sheeting-12 and 13 are done.pool-house-ceiling-insulation-and-plastic-sheetingBoard by board, we’ve been installing pine planks.  Let’s say that was steps 14 through 20.  Below, the center had just been finished, minus the insides of the skylights.pool-house-ceiling-center-finishedDue to the ceiling trusses dipping down and rising up unevenly, we decided to install the boards perpendicular to the beams.  This makes the unevenness far less noticeable, unlike a long run that accentuates any discrepancies.  It’s hard to see the ceiling from below with the scaffolding in the way, but it’s looking great already.pool-house-ceiling-center-detail
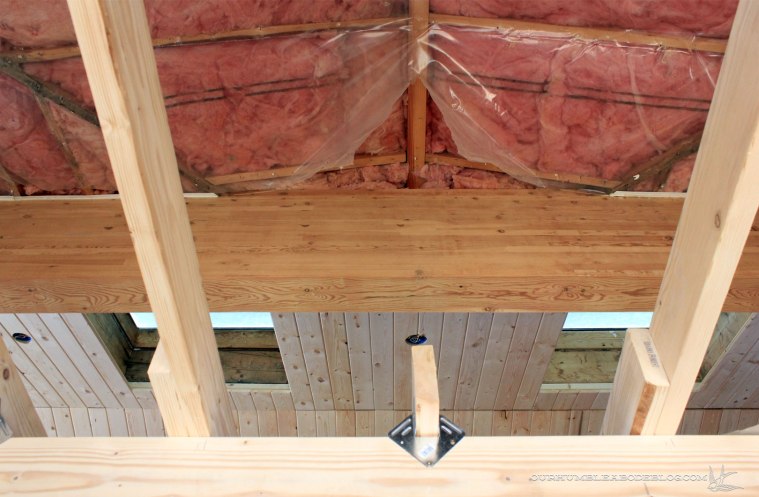
The strips on either side of the beams still need work, the skylights will get boxed in, and trim will go up to cover the gaps, so it’s not a quick process.  It is, however, 20 steps in the right direction.

Two Doors Down

As usual, summer is our time to tackle outdoor projects.  During the week, I add and keep up plants, build walkways, and pull weeds.  Weekends are Ben’s time to knock out the heavy lifting projects, like installing new windows, siding, and rebuilding the front deck while I help in any possible way.  So far, we’ve constructed a cover for the south-facing front deck, to make it usable and enjoyable in blazing heat and sunshine.  Before we can go any further with that, we have to replace the sliding doors.  The old sets are original to the house and barely function.  Sliding each door takes far more effort than it should, the screens are gone, and the panes are fogged up.

Pool-House-Center-Door-Before

When renovating, every step feels like a huge victory, so having easy to open, see through doors is a thrilling luxury.

Pool-House-Center-Door-Replaced

Two down, one to go.

Pool-House-Door-Replacing

Followed up by the rest of the pool house windows, that are waiting in the only looking/getting worse pool house.

Pool-House-Windows-to-Install

But, after windows, we can work on siding, then the interior.  And you know what that means?  The giant warehouse room filled with building supplies and tools can start looking better, perhaps even become usable.  What an original idea, no?

What’s the Deal?

Whether it’s family, friends, or readers, the most often asked question about our house is related to the most crazy feature: the pool house.  It’s a large room with a deep indoor pool.  Here’s the view from the house when we moved in:

New-House-Pool-Room April 13 2012

And looking back from the fountain seen above:

New-House-Pool-to-House-April-13-2012

Clearly, the main feature and purpose of this room is the pool.  But, if you look at the above photos, you’ll see a recessed hot tub and a raised wet bar area.  When we bought the place, the pool hadn’t functioned in several years.  In the 10 or so years the previous owner had been here, the hot tub had never worked.  Instead, the pool had very disgusting water lingering and festering.  We sucked out the remaining water and ripped out the sun bleached and damaged pool liner.

New-House-Pool-Tearing-Liner

Before we could landscape and build our single level deck, we had to knock out the platform:

Half-Demoed-Pool-House-Wet-Bar

To be able to cut out the concrete

Pool-House-Wet-Bar-Window-To-Lower

and lower the door and window:

Pool-House-Door-and-Window-from-Inside

One thing always seems to lead to another.  Or requires something to be done before the next can happen.  All of that to say the pool house isn’t looking nice these days.  See what I mean?

Pool-House-from-Kitchen-Aug-2014

Essentially, we use the space as our personal warehouse.  Those stacks are rigid insulation that we’re using to wrap the house.  On the floor we’ve got siding and exterior trim.  You can see the saw horses where I prepaint the trim white.

Pool-House-Front-Aug-2014

When we replaced the cedar shake roof, the plastic wrap around the skylights came loose.  So that dangles down in a really graceful way.  Ha.

Pool-House-Side-Aug-2014

As stunning as it currently is, this isn’t our permanent plan for this space.  Before we can get to any of the pretty parts, we have to remove the plastic ceiling panels and the dark stained siding.  Then, we’ll wrap everything in two layers of the rigid insulation panels to hold in heat during the winter.

Here’s what we’ve discussed for the finishes in the room.  On the ceiling, we want to use tongue and groove wood.  Whether we leave it natural, stain, or paint it is still up in the air.  For the walls, we’re leaning toward the same lap siding, but painting it a lighter neutral.  A section of the back wall is two feet deeper than the rest.  We’ve thrown out the idea of creating a rust steel accent wall there, to help tie the exterior in.  Those giant beams will get a good sanding and clear coat.  I really like the original lights, so those will stay.

Pool-House-Back-Wall-Aug-2014

In place of the recessed hot tub, we’ll cover the hole, tile over it, and put in a stand alone tub.  They’re so much more efficient and accessing the plumbing is a necessity.

Pool-House-Hot-Tub-Area-Aug-2014

I mentioned tile, and we’re really hoping to use a natural material.  Perhaps the same slate we used in the master bathroom because we love it so much.  It’s not slippery or slick, and looks amazing.  Most of the doors and windows are fogged up, which means the seals are broken and need replacing.

Pool-House-Bath-and-House-Aug-2014

Over in this corner, we’ll add a kick ass kitchenette.

Pool-House-Back-Door-Aug-2014

Once we remodel the kitchen, the sink and some of the granite will get reused in here.  We thought the old range would live in here, too.  Until fate changed that plan.  Almost two years ago, we found a barely used 48 inch range on Craigslist for a song.  Initially, we thought we’d use it in the kitchen, but decided we’d rather have double wall ovens and a cooktop.  So, the steal of a deal range will allow us to bake out here in the summer, without heating up the house in the process.

Pool-House-Kitchen-Aug-2014

As for the pool itself, we do plan to fix it.  It might need some new plumbing work, and certainly needs a new liner.  Most of these plans aren’t a priority.  We’ll have to change out the doors and windows soon-ish.  Some kitchen work will probably happen when we work on the main kitchen.  Other than that, we’ll just have to see when things happen.  For now, it’s an extremely convenient place to store everything we need for larger projects.

You Didn’t Have to Cut Me Off

Sorry, Gotye, but we wanted to.  Had to.  Did.  Cut concrete, that is.  For the basement windows to pass egress in the basement bedrooms at our first house, Ben hired a concrete cutting company.  When we decided to cut this concrete, we knew who to call.  A $300-400 bid wasn’t bad at all, so we made our appointment and got started a week later.  The process was interesting, and not only to the boys.  First, a metal guide gets bolted to the concrete.

Then the giant saw gets set in the track, hooked up to hoses, and starts cutting.

Following the guide, the saw moves on its own.  The guy, Pete, adjusted it along the way and changed directions until it cut completely through.

Once the bottom was cut, he switched the guides and cut the sides.  A nice shove and the concrete fell to the ground.

Over the weekend Ben and Sammy framed out the opening for a sliding door and double hung window.

Having installed a door and several windows made this easier and they had the new window and door in before the evening.

It’s a little more finished looking than last time, right?

And certainly different than what we started with.

Now the sliding doors are at the same height.

No more climbing up three steps to get to the wet bar, then down three more to get to the patio.  The back yard is looking worse than ever, but that means we’re one step closer to rebuilding.  Just a little more excavating, cutting down a tree, and waiting for spring to get started on our plans.  Speaking of plans, I figured it was time to share the ideas we’ve been tossing around.

(not to scale, just to give a picture)

Oye, that’s a lot to take in.  Let me explain.  Because our house is built on rock, there’s no way we could drill a well to water grass.  We’re far too cheap to pay for city water for green grass.  And Montana is too dry (especially this year) to keep grass green.  So, a large concrete patio should minimize dirt/dust in the house while giving us a space to relax.    Centered on the family room sliding door will be a pergola.  I’m thinking something simple and more modern than traditional.  Perhaps we’ll have an outdoor dining table under or we could go more toward an outdoor living room.  We’ll see where we land.  The rock stairs to no where will stay.

Some of the sandstone boulders we dug out will be used as a natural retaining wall.  But we carved out a larger area for a waterfall feature and a gas fire pit.

I’m thinking something rectangular like this bordering on the patio with moveable bench seating for maximum enjoyment.

A small stream will meander down the hillside to a waterfall with hidden storage pond below.  Hidden meaning we’ll use holding tanks to recirculate and keep an open pond from looking gross/filled with rocks deposited by little boys.

In the surrounding areas, we’ll add crushed limestone to further cut down on the dirt.  Drought resistant plants are on our list to add life and greenery.  Because the back yard connects to the driveway, a wooden walking path, or boardwalk, will connect the patio to a set of stairs down to the driveway.

Of course this is all subject to change as we gather inspiration, search out materials, and take measurements.

Yep, we’re officially crazy, but it should be totally awesome when we’re done.  My pergola dreams will be fulfilled.  What do you think?  What’s your dream for an outdoor space?  Are you already planning your spring landscape duties?