Box Cushion Tutorial

Quite often, I have a hard time passing up a good deal.  Even though I didn’t need another set of chairs, the shape, style, lines, and potential these lovelies had made it impossible for me to pass up.  As if I needed more encouragement to just get the dang chairs, the $4.99 price tag did me in.

Five-Dollar-Chair-Before

Clearly, their better days were behind with dings, stains, missing cushions and atrocious fabric.  With a dozen or more full refinishing projects under my belt, I knew the wood would come right back to life with a thorough sand and new stain color.  What I hadn’t done before was sew box cushions.

MCM-Chairs-Updated-in-Family-Room

Measuring and math are seriously the worst in my opinion, and sewing precise covers almost made me lose my marbles.  To get started, I dug three yards of a heavy small herringbone patterned upholstery fabric from my stash.  Let me tell you, that was the most stressful part, knowing I had only three yards, without a possibility of getting more fabric since I’ve had this for a few years.  So, I carefully measured each section of my cushions and marked it on the fabric, leaving as little waste as possible.

Box-Cushion-Panel-Layout

The outer black shows the cut lines, while the inner gray shows where I’ll actually stitch.  For every piece, I added 1 inch to my measurement, leaving me with a 1/2 inch seam allowance on all sides.  This is just a little wiggle room to work.

As the chairs originally were, a stretched, worn out vinyl web was the support for the seat cushion.  This system offered zero support and sagged like a weeping willow.  Not going to work, so I decided a plywood base would offer the lacking support, but could easily be wrapped with fabric for a seamless look.

Starting with the seat cushion, I measured from front to back and side to side and cut out one 21 inch deep by 20.5 inch wide top panel for each chair.  The foam was only 3 inches thick, but I cut 5 inch pieces to wrap the sides, leaving extra to staple to the wooden base.  One option to make the side wrap is to cut one long, skinny strip to go around all sides.  With my patterned fabric, even a small, subtle pattern, I wanted to keep the design going the same direction.  When I cut the left and right panels, I cut in line with the design to match the top piece.

Once my pieces were marked and cut, I broke out the sewing machine.  Warning, don’t do exactly as I have pictured here.  This was my first round and while it worked, I did make one small adjustment to my method for the remaining three cushions.  First, pin everything right sides together, but don’t sew a single stitch.

Box-Cushion-Seat-Sides-Pinned

Pretend that right side hadn’t already been sewn and there are only pins in place, because that stitched area adjusted my corner seam.  See how it doesn’t meet up?  Do as I say and not as I show!

Box-Cushion-Seat-Corners-Pinned

On my remaining three covers, I pinned all the pieces together before stitching anything.

Box-Cushion-Corners-Pinned

Typically, the side pieces would be stitched together first to create that single long, skinny wrap ‘belt’ piece.  I found it was easier to sew the side panels to the top section first, staying an inch or so away from the corner.  Then, I stitched the short box corners, going end to end and reversing to lock in the stitching.

Box-Cushion-Sewing-Corners

With the sides sewn to the front and the box corners stitched, this is when the corners meet.  I found it easiest to first pin the pieces together like this:

Box-Cushion-Corner-Pinned

Then to flatten out the seam for a tight corner.

Box-Cushion-Corner-Pinned-Flaps

To close the gap, line up the needle where the corner stitching (the brown thread in the above photo) left off.  Start sewing, reverse to lock it in, then continue until the corner where you’ll need to turn.  Leave the needle down, then pivot to continue until you’ve overlapped the side stitching, reverse and one corner is complete.

Box-Cushion-Stitching-Corner

After sewing two base cushions, I set the foam on my wood base, then covered the top with the sewn box.  I followed the same upholstery process at that point, pulling tightly and making sure the seams fall in place.

Box-Cushion-Upholstered-Seat

To create double-sided, removable covers with a zipper, the process isn’t much different, just a few small changes.  First, rather than cutting four side panels, cut five: left, front, right, top of zipper, and bottom of zipper.  For the ease of it, I cut my zipper sections the same width, leaving extra to cut off before stitching it in place.  Secondly, the sides will be the thickness of the foam plus the seam allowance on either side.  For a two-inch cushion with a 1/2 inch seam allowance, you’ll need to cut a three-inch wide piece.

To create the zipper panel, start by marking where your zipper starts and stops on each piece, centering the zipper on the width.  Then, at a half-inch allowance, sew right sides together on a short stitch (between a 1 and 2) for the areas at the first end, until you hit the mark.  Without removing the fabric or lifting the presser foot, change the stitch length to the longest stitch possible and cruise along until you hit the other zipper end mark.  Change back to the original close stitch and finish down to the end.  Always reverse a few stitches at a starting a stop point of close stitches to create a ‘knot’ and lock everything in place.

Box-Cushion-Zipper-Panels

Iron the seam flat before sewing the zipper in place for a smooth finished piece.  Center the zipper face down on the underside of that sewn strip and stitch into place as usual.

Box-Cushion-Zipper-End-Inside

Once the zipper is in place, turn the panel over and carefully cut out the long stitch in front of the zipper.  This creates a tiny pocket/flap to hide the zipper under.

Box-Cushion-Zipper-Opened-Detail

But the ends are tightly sewn shut still, thanks to the shorter stitch.

Box-Cushion-Zipper-Opened

Trim off an excess on the sides of the zipper, making it match the width of the other side sections.

Box-Cushion-Finished-Zipper

Then, follow the first steps, sewing sides to the top, followed by the corners until you’re ready for the back panel.  Open the zipper-this is crucial, or you won’t be able to turn the cover right side out.  Pin the back piece in place and carefully stitch along, working slowly around the corners.

Box-Cushion-Back-Pinned-On

Before turning right side out, snip away any bulky areas, but still leave enough fabric so it won’t tear with use.  If you’re feeling up to it, iron all the seams for really straight, tight seams and corners and then stuff the foam in.  Give yourself a big pat on the back and your favorite treat (chocolate, wine, beer, a nap!) for not giving up/throwing it in the trash/creating something that is a pain in the butt.

Helpful tips:

  1.  Use the longest stitch for the first corners, just to make sure it all lines up and looks good.  If it doesn’t, it’s easy to pull out and try again.  If it does look good, go back over that stitching with a shorter stitch to secure everything in place.
  2. If you’re cutting foam, wait to cut until the covers are sewn.  It’s better to have a tighter fit than to find out you have to stitch with a wider seam allowance to shrink the covers down.  I left my foam an inch wider and taller than my back cushions for a fuller look.
  3. Have extra needles on hand.  I broke one, then had to wait until morning to get extras and it was stupidly annoying to me.

As daunting as the covers seemed, after the first one, I had worked out the kinks and felt much more confident in what I was doing.

MCM-Chairs-Updated-Top-Cushions

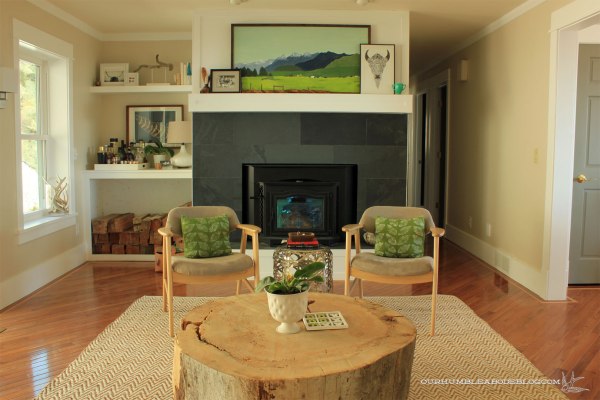
The subtle pattern of the fabric is noticeable up close, but looks like a nice neutral from across the room.

MCM-Chairs-Updated-Fabric-Detail

If, okay, more likely when I feel up to it, I still need to iron the seams for a straighter, clean fit.  Hashtag OCD problems-ha!

MCM-Chairs-Updated-Back-Cushion-Detail

Honestly, sewing the covers went easier with each one.  It seems like a lot of steps and work, but once you get the hang of it, it’s really not so bad.  As long as you have extra needles.  And a good seam ripper.  Have you entered the Minted giveaway yet?

Another $5 Chair Pair

Around a year and a half ago, while searching for thrifted treasures in need of some love, I found a pair of chairs, each priced at only five bucks.  Of course, at that price, the chairs weren’t perfect.  Far from it, in fact with torn orange vinyl seats and dark stained wood.  Basically, all 70’s glory.

ReStore-Chairs-by-Fireplace-Before

After a few hours of sanding, several yards of fabric, and elbow grease, the chairs were much more sturdy and neutral.

Update 70's Chairs

Rewind two weeks ago and I had a similar experience, stumbling on a pair of mid-century chairs in need of help, for a mere five dollars each.

Five-Dollar-Chair-Before

The size and shape are exactly what I wanted, offering a more relaxed, reclined seat.  The wood wasn’t in terrible (or excellent) condition, but each came with only bottom cushions that had been quickly recovered in a two-tone damask fabric.  After removing the outer fabric, I found the original mustard fabric lurking beneath.  Ugly, but in good shape.

Five-Dollar-Chair-Before-Back

Five-Dollar-Chair-Before-Detail

Following my usual refinishing process, I backed out the screws, disassembled the chairs, and started sanding with 220 grit paper.  Sanding is a little tedious and time-consuming, but in my opinion, the easiest and most effective way to get a clean slate.  Paint strippers leave behind a residue that’s tough to clean off and gums up sanding pads after.  For hard to reach, detailed, or delicate areas, strippers are okay, but for all flat parts, stick with sanding.  Whew, got out the pent-up feelings on paint strippers and now I’m carrying on.

With the similar style wood and linen sofa in the neighboring living room, I wanted the new chairs to coördinate.  A coat of Special Walnut stain warmed up the wood beautifully, followed with a teak oil protective coat.  As long as the sanding process can seem, that was the easy part.  I took my first crack at sewing box cushions.  I’m pleased to report, after a few trials, moments of frusteration, and a broken sewing needle, the box cushions didn’t get the best of me.  Full tutorial for the cushion covers coming at you soon.  We now have beautiful, updated chairs in the family room.

MCM-Chairs-Updated-from-Top-of-Stairs-Detail

Even though I liked the previous chairs, the upright, smaller seat was comfortable, but not inviting or especially conducive to relaxing.  This low-slung style and deep base are comfy and stylish.

MCM-Chairs-Updated-from-Top-of-Stairs

Just look at the old versus the new.

West-Elm-Rug-In-Family-Room-by-Fireplace

MCM-Chairs-Updated-in-Family-Room

A slightly darker wood tone offers a better contrast against the stump turned coffee table, too.

MCM-Chairs-Updated-by-Fireplace

Applying a lighter toned and thinner stain also lets the pretty grain shine through.  Before, it wasn’t obvious.

Five-Dollar-Chair-Before-Side

Now, look at that great detail!

MCM-Chairs-Updated-by-Fireplace-Side

For a small dose of my favorite color, I used leftover fabric from our headboard to create lumbar pillows to jazz up the neutral fabric.

MCM-Chairs-Updated-by-Fireplace-2

Because I’m a fabric hoarder, I mean lover, I was able to use an upholstery fabric I already had.  Reusing the base cushion foam, sturdy metal zippers, and stain I had on hand means the only purchase made (besides the chairs themselves) was two-inch foam to create the back cushions.  Total monetary investment per chair: a whopping $14.  Total time invested: countless hours.  Outcome: priceless, and worth it.

Window Seat Planning: Step 2

In every plan we create for a new project or built-in, there are many options, with changes, tweaks, and revisions along the way.  It’s fun to think and/or draw up different ideas and other possibilities, even if they aren’t used in the end.  Planning the living room window seat is no different; I’ve drawn up several designs of seat and shelf combos, all with variations on measurements.  I’ll share more about the evolution later, including my drawings to show the process.

Depending on the window seat plan and dimensions, the furniture arrangement needs change, too.  Initially, I was torn between a 24 inch and 30 inch seat depth.  Twenty four inches isn’t a tiny seat, but it also isn’t the wide, curl up and relax oversized area a 30 inch deep seat would be.  Adding another 6 inches would cramp a furniture plan with the couch directly in front of the tv, fortunately, we have other options.

Living-Room-Arrangement-Before-Window-Seat

Sometimes, a simple furniture reconfiguring can open a world of possibilities.  To leave adequate walking room between the furniture and soon to be built-in, I placed the leather sofa and the smaller linen couch parallel to each other, but perpendicular to the window and tv.

Parallel-Couch-Window-Seat-Arrangement-From-Stairs

This allows for the deeper built-in, while adding emphasis to the window wall and the views beyond.  The chair is our stand in for a window seat, but at 36 inches, we know a built-in that deep won’t work.  A thirty inch depth seems to be the Goldilocks of the seat, not too narrow or too wide.

Parallel-Couch-Window-Seat-Arrangement-Toward-Dining

Way back when we first looked at this house and considered buying it, the views were one of the top selling points.  Creating a beautiful, but still comfortable, livable, room to play up the views is priority for this built-in.  Up until now, with the sofa squarely in front of the tv, the views haven’t been the focus, rather the tv.

Parallel-Couch-Window-Seat-Arrangement

We’ve lived with this arrangement since Monday, and sure, the old sofa placement was more comfortable for tv/movie watching.  With basement plans in the works and a remodel nearing, we’ll have room to create a designated theater space in the darker basement.  At that point, I think this living area would be a secondary tv space, in which case, the tv doesn’t have to be the main functional focal point.

Parallel-Couch-Window-Seat-Arrangement-Toward-Stairs

Now, the layout pulls double duty, with focal points on either end of the room, with furniture allowing viewing in either direction.

Parallel-Couch-Window-Seat-Arrangement-Toward-Window

Parallel-Couch-Window-Seat-Arrangement-Toward-TV

As plans are discussed and elements change, the window seat evolves, getting more functional and beautiful with each revision.

King Bed Build Plan

When you’re on a budget and have something specific in mind, DIY is such a good option, allowing customization and a lower price point than most store options.  That’s how our king sized bed came to be, and cost less than $200 for every last supply.

King-Bed-Frame-Finished-Overall

Fortunately, this wasn’t our first bed building experience-we made a captains bed for our smaller bedroom at our last house and a bed for each of the boys about two years ago.

Boys-Bedroom-with-Large-Rug-from-Closet

In fact, the process for creating our bed was very similar to the steps we used to make a set of twin beds.  First, we cut a 4 by 4 post into 16 inch lengths, then running the sides through the table saw to create a 3 1/4 inch square, just to take the rounded edges off, looking less like dimensional lumber.  With a sander, I angled the tops of each post an eighth of an inch, just to ease the seam.  Here’s a normal post next to a finished one for comparison.

Building-Bed-Frame-Posts

To securely fasten the side rails into the posts, we measured 1 1/2 inches and 6 1/2 inches down from the top of the post.  For the head and foot rails, we measured 2 inches and 6 inches down.  Staggering the screws is a very important step because the screws are going in perpendicular and you don’t want them to hit.  It’s easiest to place the post in the corner and mark 3/4 of an inch in from the edge where the rail will go in.  Pre drill holes through the post, keeping the drill as plumb as possible to avoid the screws going in wonky.

Building-Bed-Frame-Post-Drilling

For a beefier, well proportioned bed we used 2 by 10 boards for the rails, with a half strip of 2 by 4 nailed along the base.  Again, we ran each through the table saw to cut away the rounded corner.

Building-Bed-Frame-Side-Rail

Large beds are difficult to maneuver, getting around corners and through doors, so we built each side to come apart easily.  For even easier disassembly/moving, Ben attached spacers to the side rails, leaving enough room for a vertical 2 by 4 between each.  These keep the mattress cross supports in place without nails, meaning the supports are removable without tools!

Building-Bed-Frame-Side-Spacing

Along the head and foot rails, we secured a 2 by 4, to give the OSB a ledge to rest on, keeping it flush with rest of the cross supports.

Building-Bed-Frame-End-Rail

Below, the rails are ready for the corner posts.

Building-Bed-Frame-Corner-Above

Building-Bed-Frame-Corners

On a level surface, lay all the pieces out upside down, which keeps the tops of the rails and posts flush.  Then drive a 6 inch long screw through the post and into each rail.

Building-Bed-Frame-Post-Detail

While still in the garage, we assembled the bed to make sure everything fit, then took the side rails apart, leaving the legs attached to the head and foot sections before staining.

Building-Bed-Frame-Assembled-in-Garage

Our finishing cap that covers the posts and rails is also a 2 by 4, but planed down to a 1 inch thickness and cut to match the post width of 3 1/4 inches.

Building-Bed-Frame-Post-and-Cap

Mitered corners on the foot end, but a square-cut at the head end to tuck under the headboard.

King-Bed-Frame-Finished-Corner-Detail

Once stained, oiled, and dry, we hauled the pieces up and put it back together, just like Humpty Dumpty.  In go the cross supports, spaced 16 inches on center.  Ben builds everything to allow a large pachyderm to be able to use it, so no creaking, squeaking, or wobble going on here.

Building-Bed-Frame-in-Room

Then the OSB sheeting.

Building-Bed-Frame-OSB

The headboard is a sheet of OSB cut two inches narrower than the frame, then the edges are thickened up with a half strip of 2 by 4.  I wrapped batting, then the velvet over, stapling to the underside of the 2 by 4 edge.  Once the upholstery was done, we nailed a 1 inch wide wood strip around the sides to finish it off.

King-Bed-Frame-Finished-Headboard-Detail

Two by six sections run vertically, screwing into the back side of the head rail to attach the headboard.  Overall, the bed took us about 6 or 8 hours to build and finish from scratch.  And in those hours, we saved roughly 1600 dollars, which is far more than my hourly pay rate of nothing.

A Bed Frame Fit for a King

Well, it took three years, but our room now boasts a legitimate, 100% finished bed frame and headboard.  I veered away from the original plan for a white painted bed, opting for a stain with a linseed oil finish.  If perhaps down the road we prefer a painted bed, it’s much easier to go from stained to painted than the other way around.

King-Bed-Frame-Finished-in-Bedroom

We followed a similar style to the Sierra bed from Crate and Barrel, replacing the angled wood headboard for a colorful upholstered head.

Because the bed sits directly beneath the window, I worried about the green velvet fading with sun exposure.  To prevent uneven coloring, I pitched the idea to Ben of wrapping the headboard with a wood band.

King-Bed-Frame-Finished-Headboard-Detail

King-Bed-Frame-Finished-Headboard-Detail-2

The headboard frame is the same width and thickness as the border around the bed base.

King-Bed-Frame-Finished-Left-Side

King-Bed-Frame-Finished-Corner-Detail

With the wider frame edge, we extended the headboard to the edges, leaving three inches exposed on either side.

King-Bed-Frame-Finished-Left-Side-Nightstand

King-Bed-Frame-Finished-2

Adding that dose of color to our otherwise neutral room is exactly what I was looking for.

King-Bed-Frame-Finished-1


Colorful, but not obnoxiously so and looks great against the white wall.

King-Bed-Frame-Finished-Overall

I’m working on the building plans and step by step process to share soon.  Meanwhile, I’m brainstorming bench options for the base of our bed.  With all the wood in here now, I’m leaning toward a metal base with an upholstered top.