Beam-ing with Joy

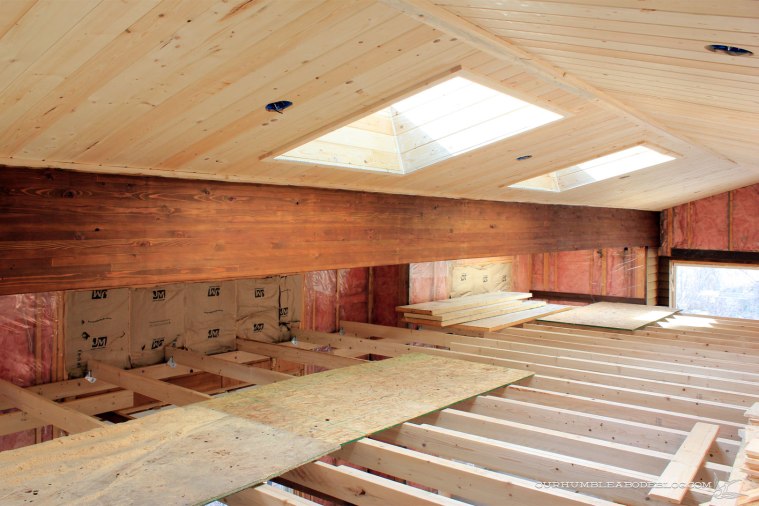
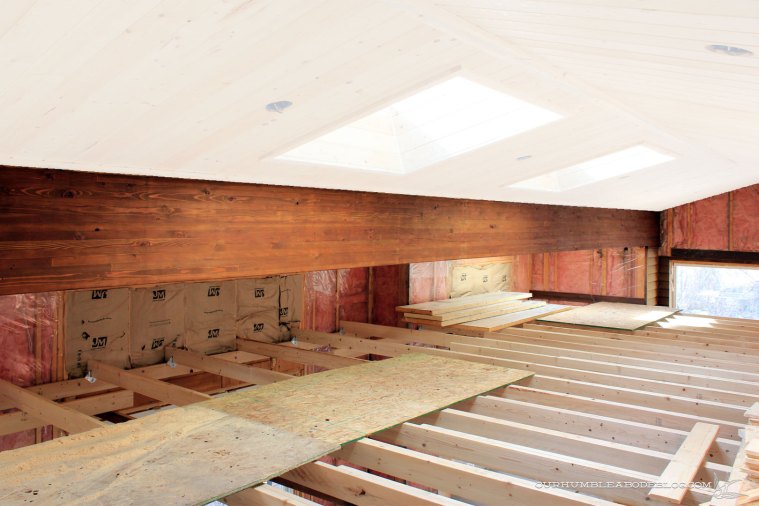
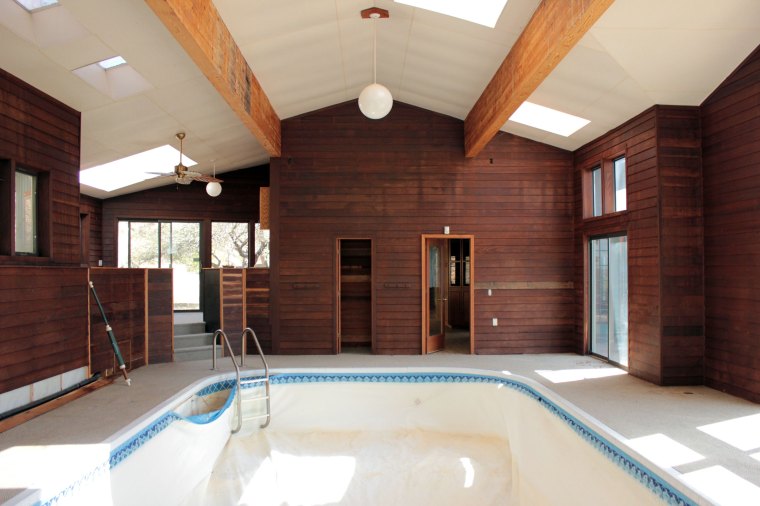
When we last left off with the pool  house ceiling install, it looked like this:

pool-house-ceiling-center-finished

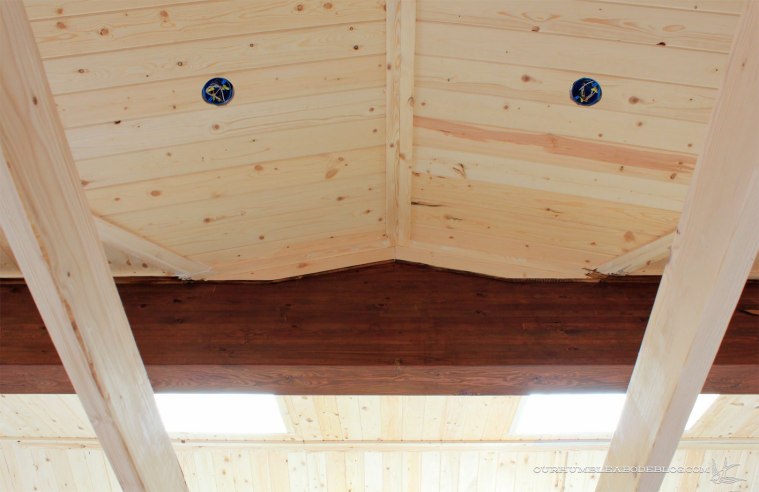
Since then, we’ve installed the rest of the tongue and groove on the ceiling, with three skylights left to trim out.  It’s thrilling to be at this stage, because it means we’re that much closer to taking the scaffolding down.  After discussing the merits of painting versus staining, we’ve decided to paint the ceiling white, while staining the beams.

New-House-Pool-Room April 13 2012

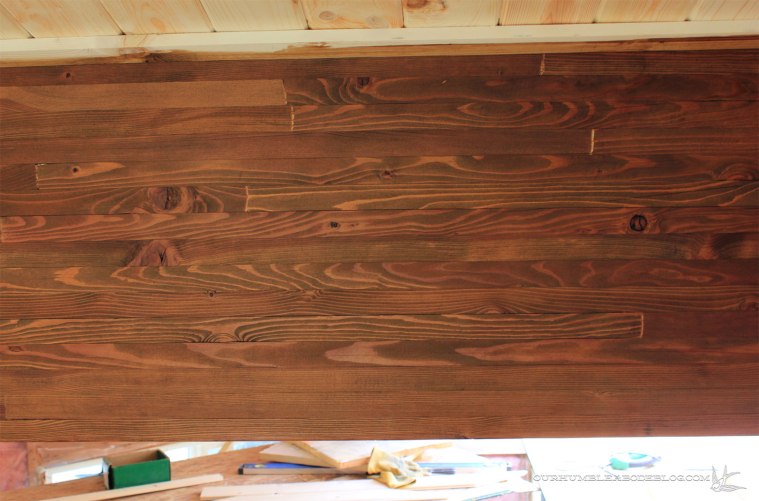
Those two beams are an architectural element that we love and want to emphasize, and the stain will stand out best against the white backdrop.  With the decision to paint solidified, we knew we could go darker and more dramatic on the beam color without weighing down the entire room.

pool-house-beam-detail

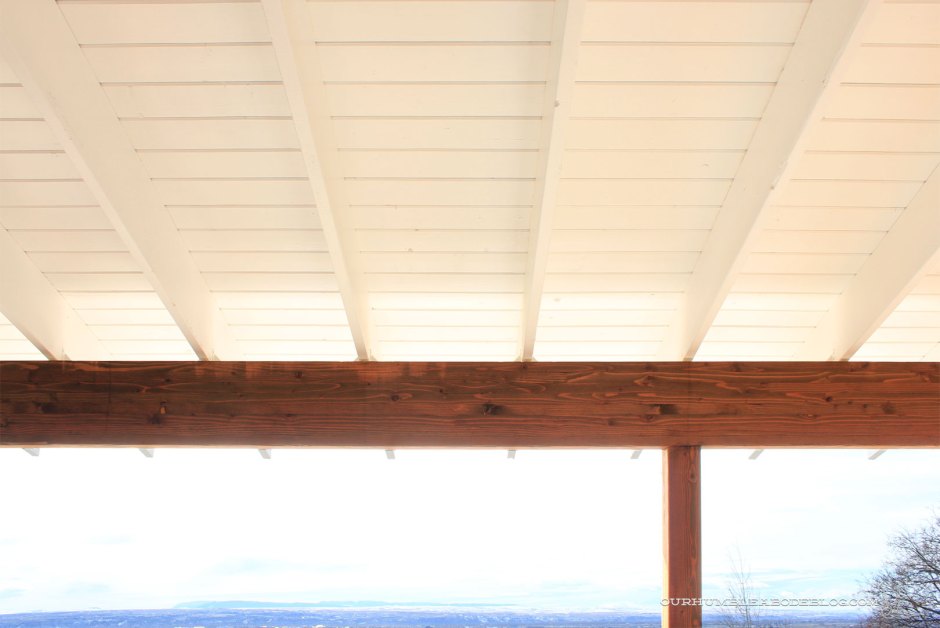
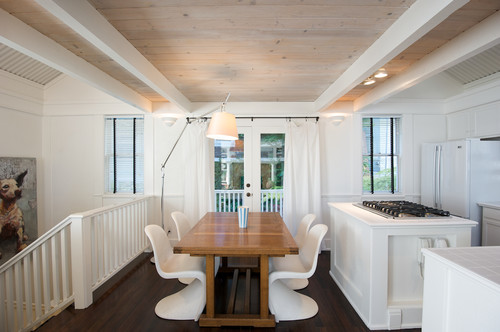
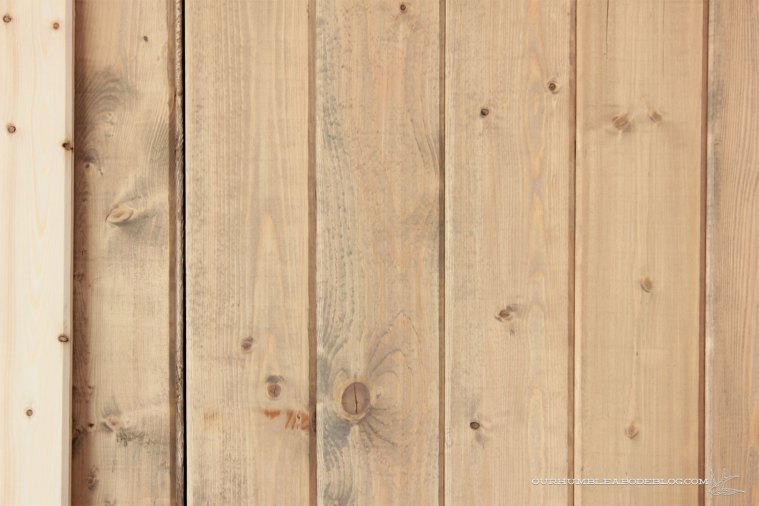
When possible, we like to use the same or similar elements throughout our home for a cohesive look and feel.  Along the entire pool house front is our recently rebuilt large covered deck:

Front-Deck-from-Road

Like the pool house, we used tongue and groove boards to add subtle texture to the ceiling.

deck-painted-ceiling-detail

Painting that ceiling white was such an easy choice, because it visually heightens the ceiling, preventing the space from feeling claustrophobic.

Front-Deck-Lounge-Area-Overall

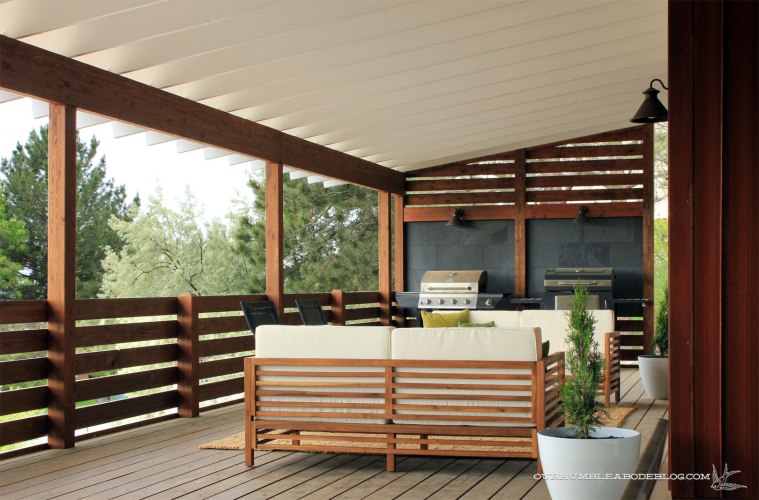
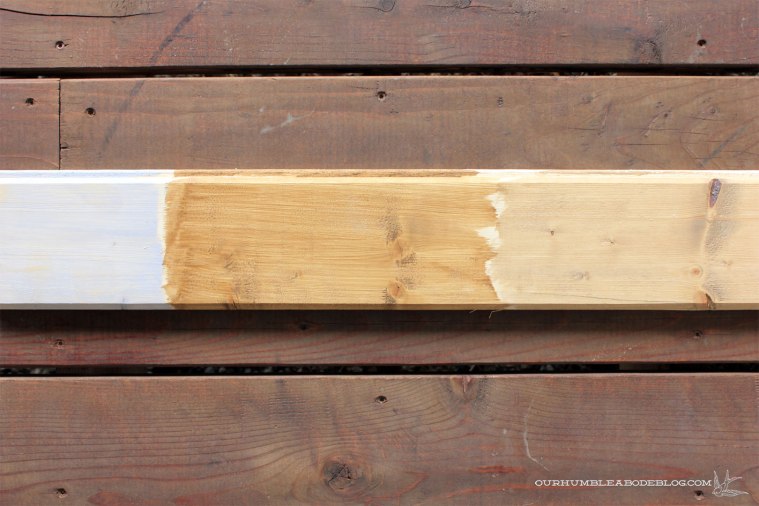
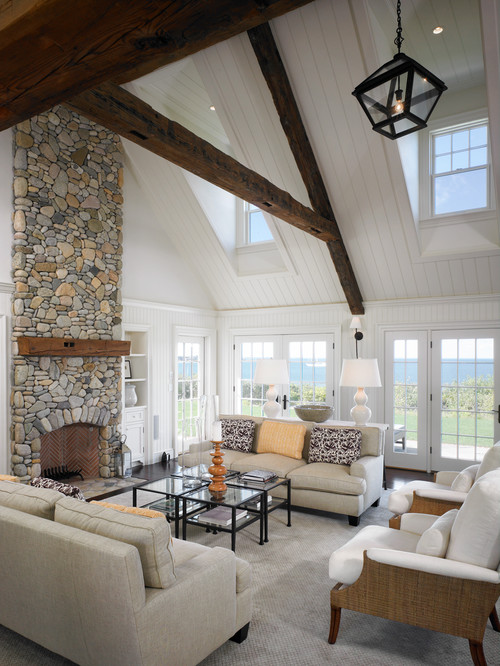
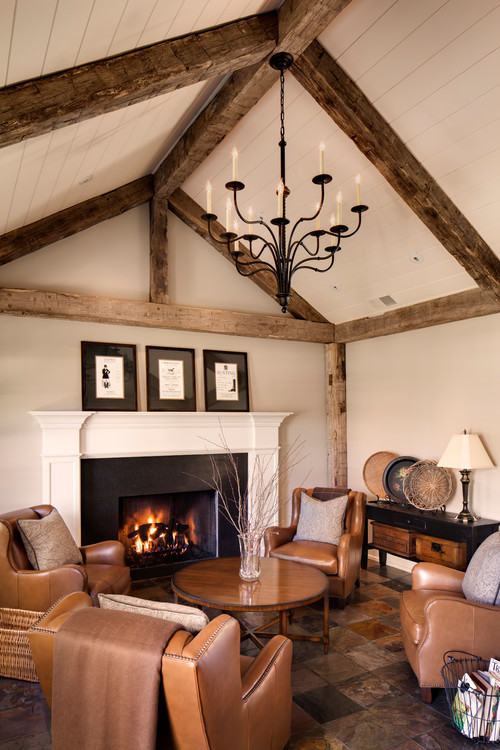
Similar to the pool house, the front of the deck also features a stained beam.  Ben and I both love the look of the dark beam against the white ceiling, so we’ve decided to carry that same look inside.

deck-beam-with-painted-ceiling

Using the same deck colors will allow a seamless flow from inside to out, but it also made my stain selection painless.  As an added bonus, we had leftover stain so this weekend we knocked out the process in about three hours.

pool-house-beams-stained

Finally, those beams have gotten the attention they’ve always deserved.

pool-house-beam-stained-with-skylights

Once the ceiling goes white, the majority of the room will be light and bright, punctuated by contrasting pieces.

pool-house-beam-stained-with-white-ceiling

Another benefit of painting the ceiling is that the recessed lights will further recede, rather than the white ring standing out against a stained ceiling.

pool-house-beam-stained-from-below

Unfortunately, we’re still looking at the ceiling through scaffolding bits, so it’s not a complete picture just yet.


To Stain or Not to Stain…

As we near the end of the tongue and groove pool house ceiling install, I’m trying to pin down the exact finish.  When new and protected, pine looks bright, but over time, with exposure to sunlight, it darkens and yellows.

pool-house-pine-ceiling-peak

That’s never been a wood tone I like, so stain is necessary to over ride those natural undertones.  As is the case with all of our material selections for this space, we want an interior look but need exterior grade finishes due to the splashing and possibility of humidity.

I started searching for an exterior oil based color that had a bit of both brown and gray, but wasn’t too dark.  Something along the lines of this:

Architecture and Interior Design

Sherwin Williams applied two store samples to a board as a starting point.  On the left is Weathered Gray, the center is Banyan Brown.

stain-samples-on-pine-board

Weathered Gray was entirely too gray and read very cold, with blue undertones.  Banyan Brown was darker and still too yellow.  Neither were what I wanted, so I checked out Lowe’s and Home Depot.  Lowe’s had an Olympic color, Madrone, that kind of fit the bill.  Compared to the other two samples, shown on the right above, it was more of a blend.  To get a more accurate idea of the color, I selected a variety of scrap pieces to stain, creating a large sample.

stained-pine-sample-boards

Yes, it was better, but still looked a bit too yellow.  I wasn’t sold and neither was Ben, even when I held the pieces up against the ceiling and he viewed from below.

All along, my fall back option was to paint the planks white, while staining the beams.  It’s a simple and classic look, something especially crucial in this situation as this ceiling is completely inaccessible without scaffolding.  We also have painted tongue and groove throughout our home, so we know we like it.  Images like the following have only reaffirmed my belief.

Chappaquiddick Island
Carramore Lane
1800s Farmhouse Remodel

Photo by Bartelt

Most elements planned for this room will be simple and neutral, carrying the slate floors from the kitchen around the pool deck.  A shot of wood tone via the beams will add a tremendous amount of warmth and interest, without the feeling of a lower ceiling.  Add the flood of natural light through the windows, doors, and skylights and I’m picturing a private year-round oasis.

Are We Keeping the Pool?

New-House-Pool-Room April 13 2012

That’s the second question people would ask right after asking when we’d start working on this space.  We knew the pool wasn’t in functioning condition when we bought the house, and hadn’t been for at least a couple of years.  The above photo showed the pool from the best angle, below, you can see the corner where the liner had started to pull away from the wall.

New-House-Pool-to-House-April-13-2012

However, neither photo above showed the gross reality lurking just below the frame; several feet of stagnant water that had dripped in from the leaking roof filled the deep end.

New-House-Pool-Tearing-Liner

Most had been drained, but that moldy green line showed the previous level.  Be thankful you can’t see the giant bugs and dead mice.  The old liner had seen far better days, thus prompting a tear out removal.

Insulation-in-Pool-Room

The photo above, taken after removing the liner, better shows the condition of the pool structure.  Pools kind of fall into two categories, lined versus unlined.  This pool was designed to have a liner, but the original was a partial version and started two and a half feet from the top, leaving the rest exposed.

pool-condition-shallow-end

At the time of replacement, the previous owners chose a full liner, hence the band with screws along the top edge.  Based on the gaps between the upper panels, it’s safe to assume the structure settled, panels shifted, and were no longer water tight so a full liner was the best option.

pool-upper-lining

Not only are the side panels a problem, the base of the pool has gaps from the wall.

pool-condition-gap-at-side

So, are we actually keeping the pool?  It was always our intention to keep the pool, but that hasn’t stopped us from considering alternative uses.  Family and friends also like to toss out suggestions-a theater, home gym, etc.

Ultimately, after nearly five years of consideration, nothing has made more sense than a pool.  Yes, it clearly needs work to get it functioning, but we can justify it for future use.  We’re still figuring out our best route for use and longevity, but a full liner seems to be the best option at this point.  The rest of the room will get finished first-ceiling, walls, floors-to keep the pool clean and safe until work finishes.

Progress in the Pool House

One of the more unique, and infrequently shared, features of our house is the indoor pool.  Nearly five years ago, when we closed on this house, it looked like this:

Looking up, there was fiberglass sheeting on the ceiling, dark wood siding on the walls, and a leaking roof-due to old solar panels on the roof, dripped down.  Looking down, the floors were covered with outdoor grade carpet, covering the damaged tile below, and the pool liner was shot.  We saw potential, but because we didn’t need the pool, finishing it was lowest on the priority list.  That doesn’t mean changes haven’t been made along the way, though.

Before replacing the house siding, we first had to tackle landscaping work, which had been filled in too high, covering the wooden rim joist that rests on the concrete foundation.  Wanting to keep the future back deck all on the same level, we decided to take out the wet bar platform and lower the door and window.  Once the exterior work made it to the pool house, we replaced all the windows and doors.

Which brings us up to speed on past pool house progress, but this space has basically functioned as a personal warehouse of building supplies.  It feels like this space has 3,286 steps to get it done, so it’s bit by bit progress.  First order of business is replacing the ceiling.  Unlike all the other spaces we’ve worked on, it’s not quite that simple.pool-house-ceiling-scaffolding-from-belowHaving a ceiling peak of 15 feet, plus a 9 foot deep hole to work over, we needed scaffolding.  Rather than renting and spending the same or more money, we built a temporary structure to make working easier.  Step 1 of 3,286 complete.  Then, Ben tore off the old sheets, exposing the structure.  Step 2, check!pool-house-ceiling-taken-off
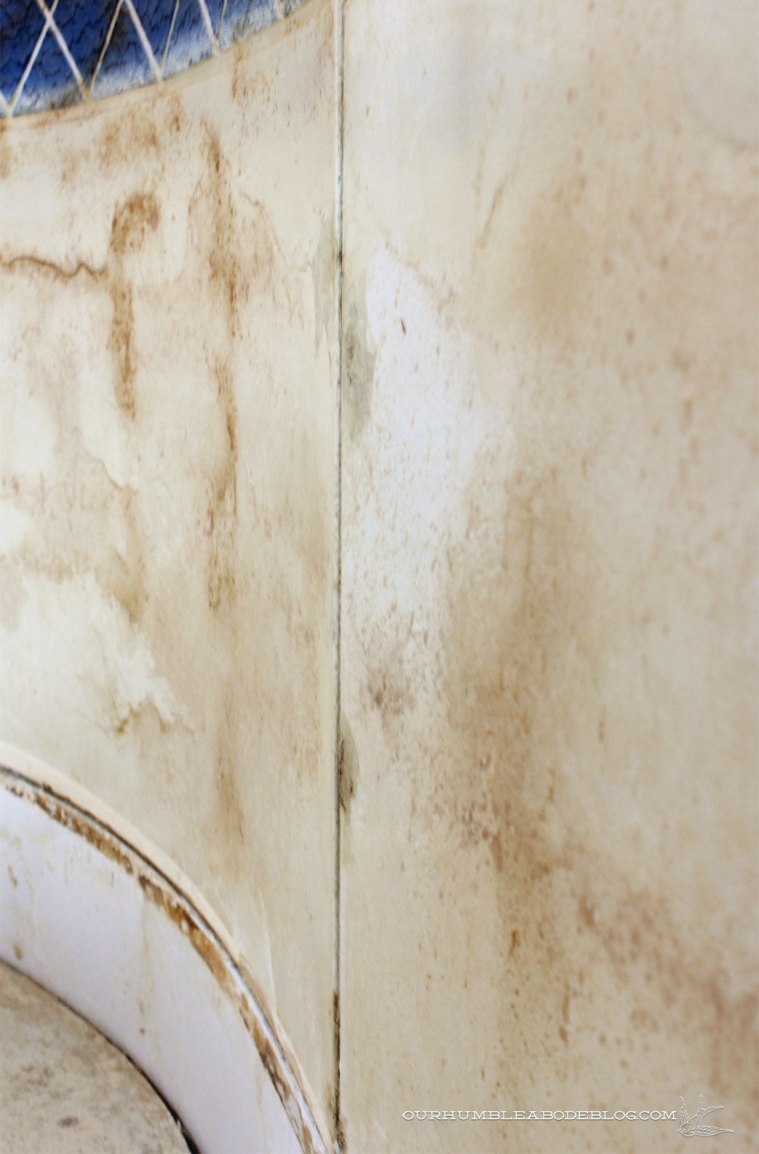
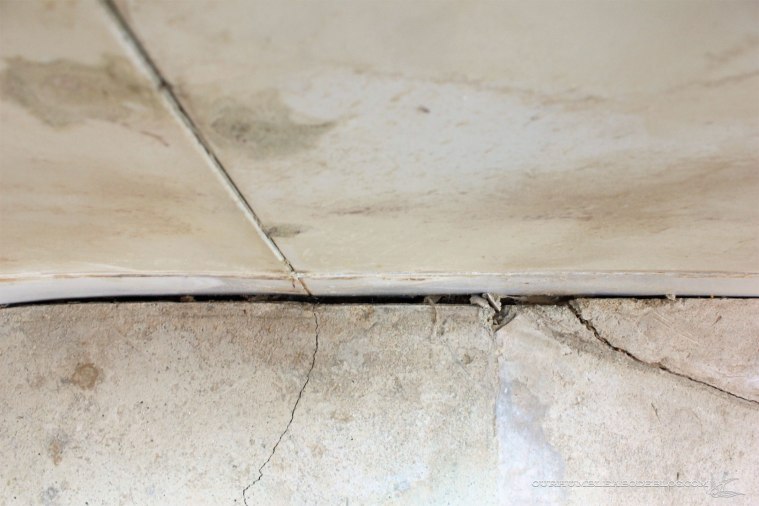
Those exposed beams are such a cool structural element, but the leaking roof had streaked and stained both.  A thorough sanding brought them back to life.  Steps 3-9, done!pool-house-beam-sandingOnce the beams were finished, Ben started prep work to install the tongue and groove pine boards.  First, two by 4 boards were secured perpendicular to the trusses followed up by new light boxes to adequately light the entire room.  Steps 10 and 11.  Next, he cut pieces of rigid foam insulation to tuck between the boards for a higher R value and covered with a thin plastic sheeting-12 and 13 are done.pool-house-ceiling-insulation-and-plastic-sheetingBoard by board, we’ve been installing pine planks.  Let’s say that was steps 14 through 20.  Below, the center had just been finished, minus the insides of the skylights.pool-house-ceiling-center-finishedDue to the ceiling trusses dipping down and rising up unevenly, we decided to install the boards perpendicular to the beams.  This makes the unevenness far less noticeable, unlike a long run that accentuates any discrepancies.  It’s hard to see the ceiling from below with the scaffolding in the way, but it’s looking great already.pool-house-ceiling-center-detail
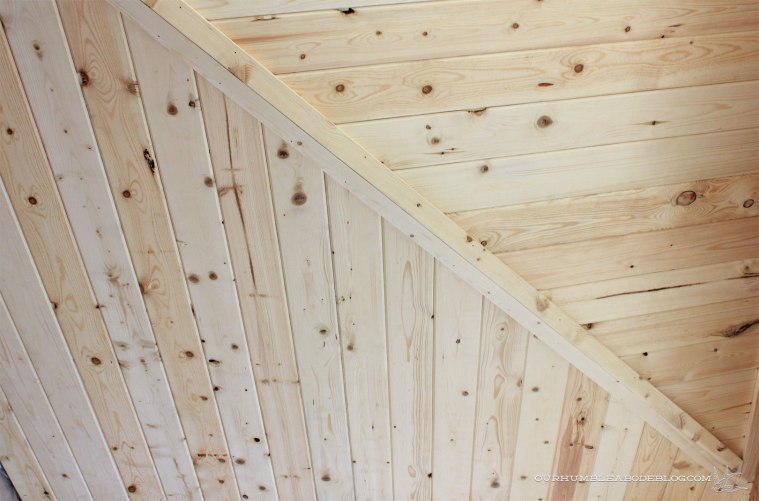
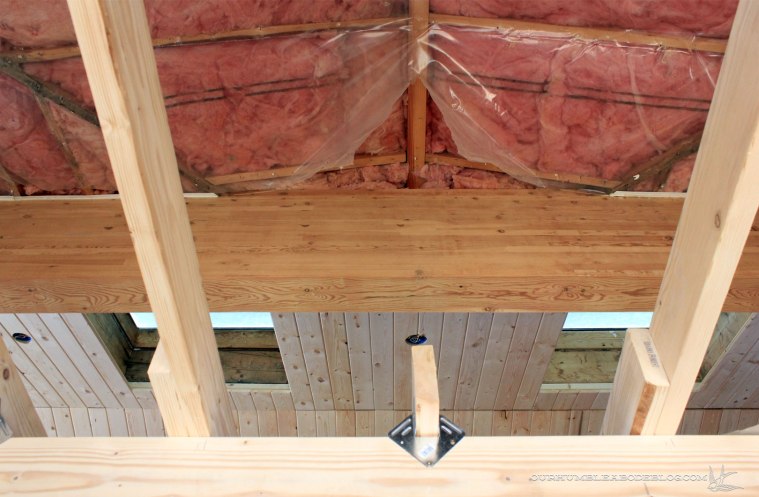
The strips on either side of the beams still need work, the skylights will get boxed in, and trim will go up to cover the gaps, so it’s not a quick process.  It is, however, 20 steps in the right direction.

Easy Bathroom Accessories

Utilitarian spaces like kitchens, bathrooms, and laundry rooms are always easier to accessorize than living/bedroom areas, simply because you’re aiming for function.  But function doesn’t have to equal ugly.  To finish off bathrooms, I select items that serve a purpose, are still pleasing to the eye, but aren’t always found in the bath section.  If you’re looking to add character, here are my favorite additions.

  • Cute towels and hooks:  Go crazy and pick a fun pattern and/or color because towels are so easy to swap out.  Near the shower, single label hooks hold peppy striped Turkish towels for a dose of fun.
  • basement-bathroom-finished-from-door-straightFramed mirrors:  I always ditch the builder standard plate-glass mirror in favor of a framed one.  Pretty mirrors are everywhere, so don’t settle for boring!  Our main bathroom sports a vintage campaign style mirror that came with a dresser set.

Campaign-Mirror-Hung-in-Bathroom

Our master bath has a unique round metal framed mirror to offset the rigid lines throughout the room.

Master-Bathroom-Vanity-for-BHG

Another vintage wooden mirror, that came with our bedroom dresser, is a welcome warm addition to the cool neutrals of the basement bathroom.

basement-bathroom-finished-vanity-from-door

Also, to get great, flattering lighting, use sconces instead of overhead lights.  Fewer shadows are cast because the sconces light from each side.

  • Add vertical storage shelves:  Short on floor space?  Go up!  In our main bathroom, we removed a wide vanity to add a smaller vanity plus a floor to ceiling shelf stack.  At 16 inches wide, it doesn’t eat up much of our floor plan, but does offer a great deal of storage.

Main Bathroom Shelving

By widening the basement shower, we narrowed the space between it and the door.  Rather than letting that space go to waste, four floating shelves fill the void, putting it to good use.

basement-bathroom-finished-from-door

  • Glass storage:  Especially in bathrooms that guests often use, I like keeping essentials in plain sight.  No one wants to rummage through cabinets to find cotton balls or soap.  Cylindrical jars keep band aids, soap, cotton balls and cotton swabs handy on a shelf in the main bathroom.

Store Toiletries in Sight

A triple stacked glass container on our master bathroom counter is used daily.

Master Bathroom Toilet

Four black lidded canisters fill a basement bathroom shelf, but keep those items out of limited drawer space.

basement-bathroom-finished-shelves

  • Art, preferably without eyes:  Almost anything goes here, but I always feel strange adding art with eyes.  With moisture concerns, I avoid using anything too expensive or precious.  Vintage, almost ugly oil paintings are great.

House-Tour-Four-Years-In-Main-Bath-from-Door

Or you can think outside the box and hang something different, like vintage arrows.

Cedar-Tub-Shelf-in-BathroomSimple Instagram photos add a bit of color, too.

basement-bathroom-finished-toilet-area

Near the toilet, an added outlet (on the same circuit as a GFI outlet, so it’s grounded) is a great spot for a little night light, or perhaps a fancy heated toilet seat.

For easy clean up, I prefer relatively clutterless counters.  Even so, I love to add something pretty, like a small plant or picture frame along with a drinking glass and soap.

stainless-steel-counters-in-bathroom

basement-bathroom-finished-vanity

  • Trays:  To keep drawers and cabinets free for toiletries, cleaning supplies, etc., I corral toilet paper in a wooden tray or basket.

House-Tour-Four-Years-In-Main-Bath-VanityAgain, keeping necessities in sight avoids awkward searching or running out.

basement-bathroom-finished-vanity-vertical

  • Upgrade shampoo, conditioner, and soap bottles:  I know my OCD is showing here, but I really love how sleek and fancy real soap pumps make a space feel.

House-Upgrades-Rain-Shower

Also handy when you shop at Costco and don’t want to keep a giant bottle in the shower.

basement-bathroom-finished-shelves-and-shower

  • Extra towels:  Have extra space?  Free up room in the linen closet by keeping towels in the bathroom.  A great accessory, but guests can easily help themselves.

basement-bathroom-shelves-finished

Of course stylish garbage cans and shower curtains never hurt.