I Like to Move It, Move It

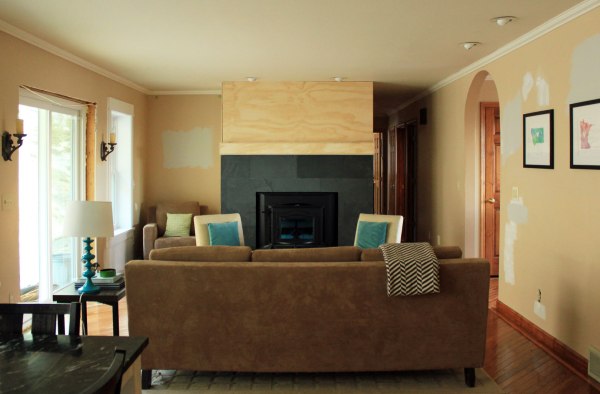
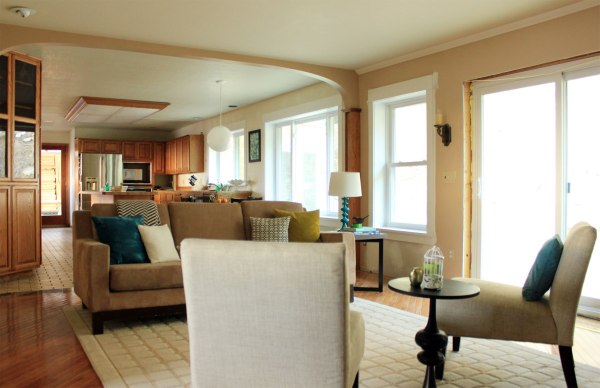
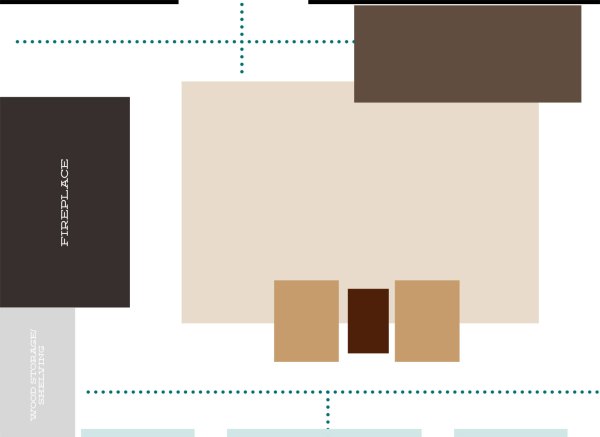
Furniture, that is.  Winter has settled in and we’re using (and loving!) the new fireplace.  Because of this, I had an urge to rearrange the family room furniture.  To make the fireplace more of a focal point.  This room has been difficult for me to arrange.  One wall has a door and two windows, another a door to the living room and stairs, a fireplace on the third and then an opening to the kitchen.  Here’s the arrangement we started with.

Current-Living-Room-Arrangement-Drawing

The black lines at the top are the walls in the room with a door leading to the stairs.  Couch facing the fireplace, chairs and a table perpendicular to the couch and fireplace.  Big open space in the middle.  Initially, I really had my heart set on moving the couch, which keeping the group centered on the fireplace, like this:

Family Room Arrangement Option 1

I tried it a few nights ago (moving furniture by myself while Ben was at work), but our sofa is three feet deep, so it took up much of the walkway (the blue dotted lines).  Right away, I knew it wouldn’t work.  But the fireplace isn’t centered on the room.  We’ve got about a foot more space by the windows (the blue boxes at the bottom).  Perhaps the couch would fit better there?

Family Room Arrangement Option 2

So I pivoted the couch over there.  It wasn’t terrible, but it had a few problems.  Little space between, not enough for a coffee table.  The walk space behind the chairs was small, which Ben hated.

Family-Room-Test-Arrangement

But my biggest reason for nixing this arrangement: it made a long, narrow (narrow when factoring in walking paths) room feel, well, longer and narrower.  Oh, and then there’s this oddly open floor space in the breakfast nook that was only accentuated by the placement.

Family-Room-Test-Arrangement-Floor-Space

Back to the drawing board.  It seems the best place for the couch was the original position.  How about moving the chair and table group opposite the couch, in front of the fireplace?

Family Room Arrangement Option 4

Um, not my favorite.

Rearranged Family Room Straight Chairs

I like the lightness of the chairs in front of the fireplace, but I don’t like the hard lines and how closed off it made the fireplace feel.

Rearranged Family Room Straight Chairs 2

Maybe setting the chairs at an angle, with a round table between?

Family Room Arrangement Option 3

Ahh, that opened up the fireplace nicely.

Rearranged Family Room Angled Chairs

So far, this is my favorite layout, for a few reasons.  One, the couch separates the family room from the breakfast nook and kitchen.

Rearranged Family Room Angled Chairs from Hall

Secondly, the group is still centered on the fireplace, while making it a focal point.  And we’ve still got room for a coffee table.

Rearranged Family Room Angled Chairs 2

Last, it keeps walkways open, keeping traffic a-flowin’.

Rearranged Family Room Into HallI just moved the furniture to this arrangement this morning, so Ben hasn’t seen it yet.  We’ll see what he thinks, because he’s oddly picky about furniture placement.  Heck, if he had his way, the room would look more like this:

Family-Room-Arrangement-Ben's-option

Couch pushed up against the only wall.  Not my idea of an inviting and functional room.

Now that I’ve spewed, um, shared, the layout options, I want to hear your thoughts.  Which grouping did you like best?  Or maybe you’ve got an idea for a different layout?  Do you have a tricky room to arrange?


Side-Splitting Skinny Dipping

Sometimes, projects we tackle are big.  Others are little and not worthy of an individual blog post.  Today, you get a two for one.  One part side-splitting, one part skinny dipping.  One of our map cut out frames took a spill while I was in Minnesota.  Somehow (Ben still isn’t giving full details) the frame fell, but he caught it before the glass shattered.

But he didn’t catch the frame before the right corner hit the floor, splitting and denting the joint.

After living with the broken frame on my desktop for a month and a half, I finally got annoyed enough to fix it.  I dug around in the garage to find the staple gun and staples.  That’s all it took to fix the frame.  So, I took out the metal pieces that held the frame together before.

And put five staples in the corner.  Sure, it looks like Frankenstein’s monster, but it works.

Then I sprayed the dented corner with a little white paint.

Good as new(ish) back up on the wall, thus concluding today’s side-splitting segment.

Now to the skinny dipping segment.  I’ve wanted to dip furniture legs for a while now.  I love the look and the bit of fun dipped legs add.  While making our bed one morning, I realized the boring white Ikea Lindved tables we’re using as night stands could use some fun.

Using a ruler, I measured five inches on each leg, made a mark with a pencil, and taped off each leg.

Outside, I gave each leg a coat of gold spray paint.

Ten minutes later, I gave the legs another coat and left the tables to dry.  Outside, I loved how the legs looked.  But when I brought them inside, not so much.

The gold paint blended in with the wood floors.  Boo.  But, I had a can of silver spray paint left over from another project.  Why not try it?  After taping off the legs and spraying the legs a few time, I’m much happier with the results.

More fun than the boring white tables, but still simple.  Who knows, when we decide on a color scheme for the room, I might change it up again.  Perhaps a fun teal?  Or kelly green?  I don’t know, but the possibilities are endless.

How do you fix picture frames?  Does it take you a month and a half to get around to a simple fix?  Maybe you’ve dip painted furniture legs?

Climbing a Dusty Mountain

Not long ago, we had a ketchup and mustard look on our unfinished entertainment center.

After my bathroom painting marathon, I decided to knock out the entertainment center so we didn’t think of hot dogs.  While I painted, Ben added the face trim, side detail, and crown molding.

Of course painting isn’t that easy.  Oh no, first I had to fill every nail hole, wait for the filler to dry, then sand it smooth.  And then the priming phase.

Man was I ready to start painting.  Originally Ben and I had agreed on a white entertainment center with a colorful backing.  So I tested out my options inside the cabinets he built and liked Ben Moore’s Yosemite yellow.  But then we started talking it over and decided white wasn’t the direction we wanted to take.  Why the sudden change of heart?  Well, Ben pointed out how much light the front window lets in, which also means a lot of glare.  Bright white might cause a lot of eye strain when we’re relaxing in front of the tv at night.  White is a safe choice, and maybe too safe.  Let’s try a darker color, like gray.  But I didn’t want a sea of gray, so it had to be different enough from the wall color.  I picked out two Ben Moore colors, Kendall Charcoal and Amherst Gray.

Kendall Charcoal was a great deep gray, but too blue for our liking.  Amherst Gray was too light.  While at Home Depot shopping for some other supplies, we walked to the paint department and looked at more swatches.  I pulled out a Behr color that I’ve liked for years, Squirrel.  About six years ago, I painted our master bedroom this color, but Ben said it felt like a battleship.  Since then, he has come around to more modern designs, and doesn’t hate all gray paint.  But we quickly agreed Squirrel was too light.  That’s an easy fix, we just chose the color below, Dusty Mountain.  Without hesitation, we bought a gallon of eggshell paint and headed home.

In the pictures above, you can see we bought the paint before I was ready to paint.  After finishing the prep and priming, I started with the color.

Love at first sight.  Especially paired with the reddish Bubinga top.  Yum.

Ben came home, saw this and proclaimed his love, too.

I think the green undertones are lovely and reminiscent of an expensive library.  Just picture this color on crazy tall shelves with a brass bar for the sliding wooden ladder.

{image via}

But I couldn’t let go of wanting a splash of color.  Using the yellow left over from the cabinets, I tested it on the backs.

I love the idea, but the contrast was too much for tv watching.

Ben suggested I paint the back Wood Smoke like the walls.  Instead, I took the easy way out and painted it Dusty Mountain.

Ahh, that’s better.  Ugly speakers blend in with this more.  We’ll build doors for the side cabinets, but the yellow will be a fun surprise inside.

If we had cabinet grade plywood, we could have built the drawers.  Sadly, Home Depot doesn’t have any in stock because it’s seasonal.  Ummm, what?  Hopefully they get it in, because we can’t make the fronts until the drawers are installed.  I’m telling you, our plans are always contingent on something else.

Progress is progress, and I’m happy.

So, what do you think of the color?  Are you into darker, saturated colors, too?  Or are you more of a light and airy person?  Do you and your significant other agree on colors easily?

It Started With a Four Year Old

Last night, V and I had an impromptu wallpaper removal party.  And he sent me the invite.  Over the past few days, V had been slowly working on peeling wallpaper from the small area under my desk.  Once he got that off the wall, he turned his attention to the small area by the breakfast nook window.  Because I’m a good mom hate the wallpaper, I joined him.

Ben thought we were crazy, but didn’t object.  Fortunately, it peeled off easily.  Well, the design part peeled off easily.  The paper split, leaving the glued paper on the walls.  In many places, full sheets of the patterned parts came off quickly.  And in about an hour, we had all the ugly blue paper off the walls in the kitchen and office.


I’m happy to see the kitchen lighter and brighter, but I know it’ll be a complete pain to tear off the glued paper parts.

Lucky for me, I can work on this when I’m in the mood.  Hmmm, how often is one in the mood to remove wallpaper?  I guess we’ll find out.

For now, we’ve got a mock Tuscan look going on.

But I guess the crazy blue wallpaper wasn’t all bad.  Now the crazy things the previous owner did are completely obvious.  Like these five(!) nails randomly above the kitchen window.

And three more above the breakfast nook window, because, you know, everything is better in odd numbers.

My office has a few issues, too.

Like a wall full of pin holes.  Seriously, a little cork would have been better than this:

Gah, I love wallpaper…NOT!  Well, at least I’ve got time to work on it.  Anyone know an easy way to get the paper off without further damaging the walls?  Raise your hand if you want to come over and help.  Ah ha, I see you in the back.  Come on, I’ll feed you and provide the booze after.

Simple Solution: Brokeback…

Couch.  Betcha thought I was going to say mountain.  Well, I didn’t.  Oh wait, I did.  Gah.  Back to the point.  Probably a year or so ago, the supports of our sectional broke.  Only because we moved it to get the rug under did we decide to fix it.  It only took two pieces of scrap 2 by 4 and screws, too.  I don’t make it a habit to deconstruct furniture, so I was surprised to find this is all that held our butts up each night.

Seriously, that’s a few scraps of wood, some string, foam, and fabric.  But the real problem were the pieces of 1/2 inch plywood, which should be attached, thus keeping the springs against the seat.  Instead, these pieces that should be flush come apart.  Every time someone sat on the couch, these pieces sagged, making an uncomfortable Lost watching perch.

For a quick, durable fix, Ben measured the depth of the couch and cut a scrap of 2 by 4 (left over from the garage wall he had just torn out).  Then he screwed into the plywood and the 2 by 4 on the other side.  Now we shouldn’t have problems, and if we do, I think a new couch is in order.

What took us so long to, in the words of my favorite redneck, git ‘er done?  What have you done that’s been a problem for a while?  Fixed any couches?  Maybe you’re shocked at how little furniture is actually made of?