Pool House Kitchen Plans

If you’ve been following for a while, you already know we’ve been chipping away at the pool house, which happens to be the biggest room in this house.  What started as a leaky, water stained dated room is slowly starting to come together.

New-House-Pool-to-House-April-13-2012

This year, we ripped out the old fiberglass ceiling sheeting and painstakingly installed individual tongue and groove pine planks.

pool-house-beams-stained

To create the light, bright atmosphere we’re after, we then stained the large beams and painted the ceiling white.

Pool-House-Ceiling-Overall-2

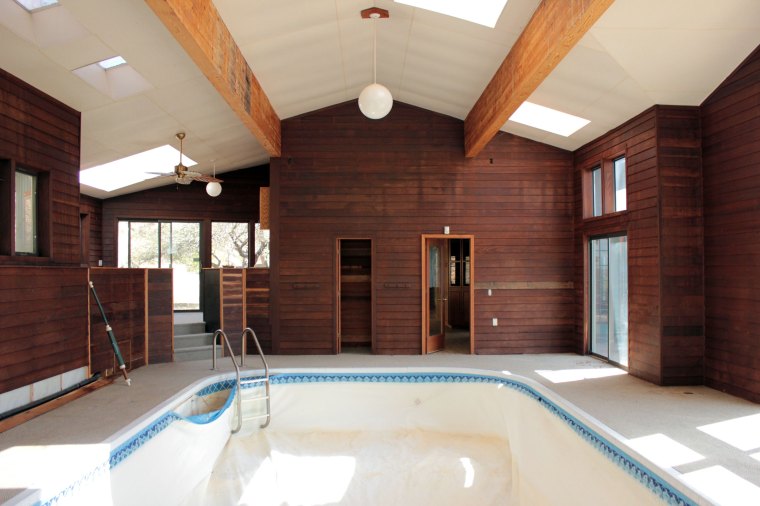
While already a huge improvement, the rest of the room still needs serious TLC, but today I’m focusing on the plan for this little offshoot area.   What was a wet bar, separated from the main room by three steps, will become a small kitchen.

New-House-Wet-Bar-April-13-2012

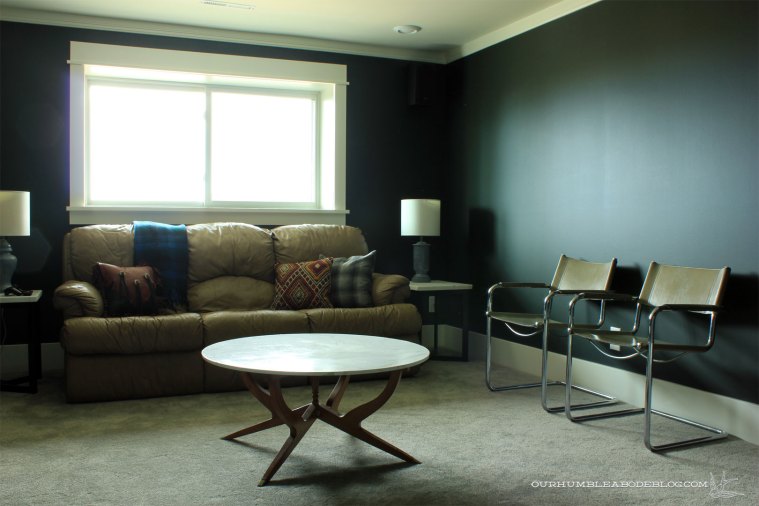
Work started in this spot four or so years back, when we discovered the raised platform was completely unnecessary.

Half-Demoed-Pool-House-Wet-Bar

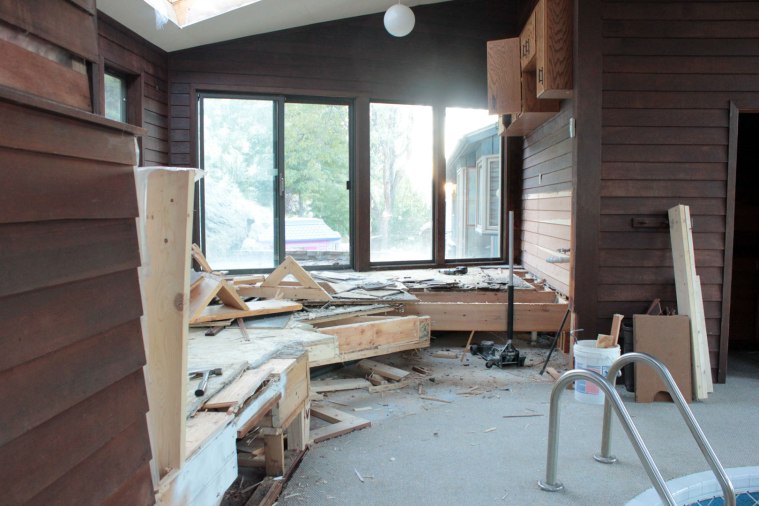
For better flow, we demolished the platform, then lowered the door and window to create a seamless transition from inside to out.

Pool-House-Wet-Bar-Window-To-Lower

Pool-House-Door-and-Window-from-Inside

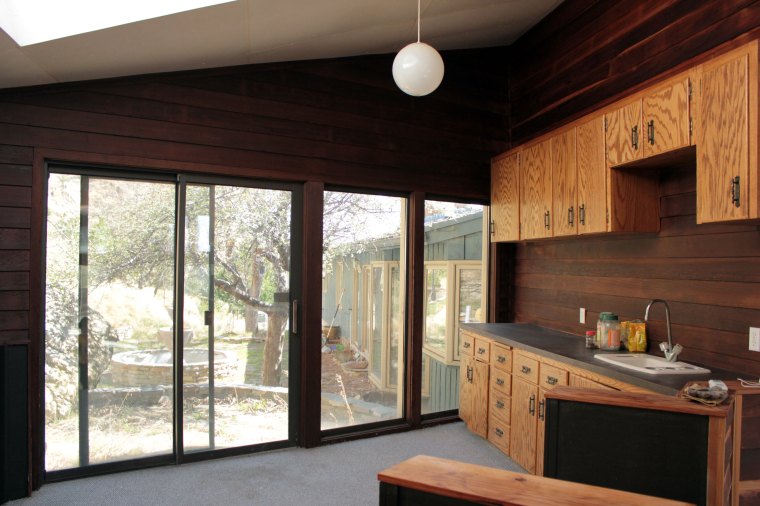
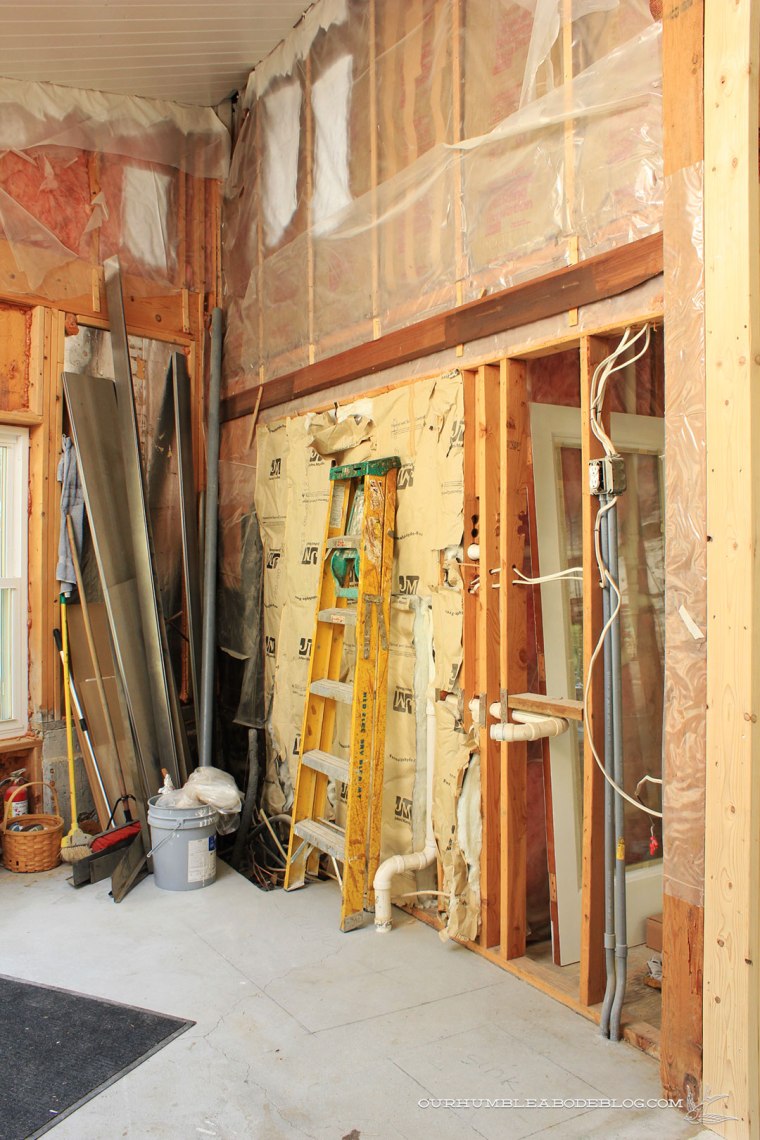
Today, it looks like this, with the back deck directly through that door:

Pool-House-Kitchen-and-Seating-Areas

Those floating white boxes represent the future range and sink.  We’ll have to reroute the drain pipe that drops into the concrete to be able to center the range on the wall.

Pool-House-Kitchen-Side

Something kind of like this:

Pool-House-Stove-Side

Or maybe this is a better visual:

Pool-House-Kitchen-With-One-Shelf

Before our kitchen remodel, but after we had already purchased the cook top and double ovens, Ben found a 48 inch DCS range with tall backguard on Craigslist for $1,500.  Normal retail price is around $7,000 plus around $800 for the backguard.  Before this amazing find, we planned to add a 30 inch range, which would have cost around $1,500 so this was a huge score.

Pool-House-Kitchen-Two-Shelves-Without-Backsplash

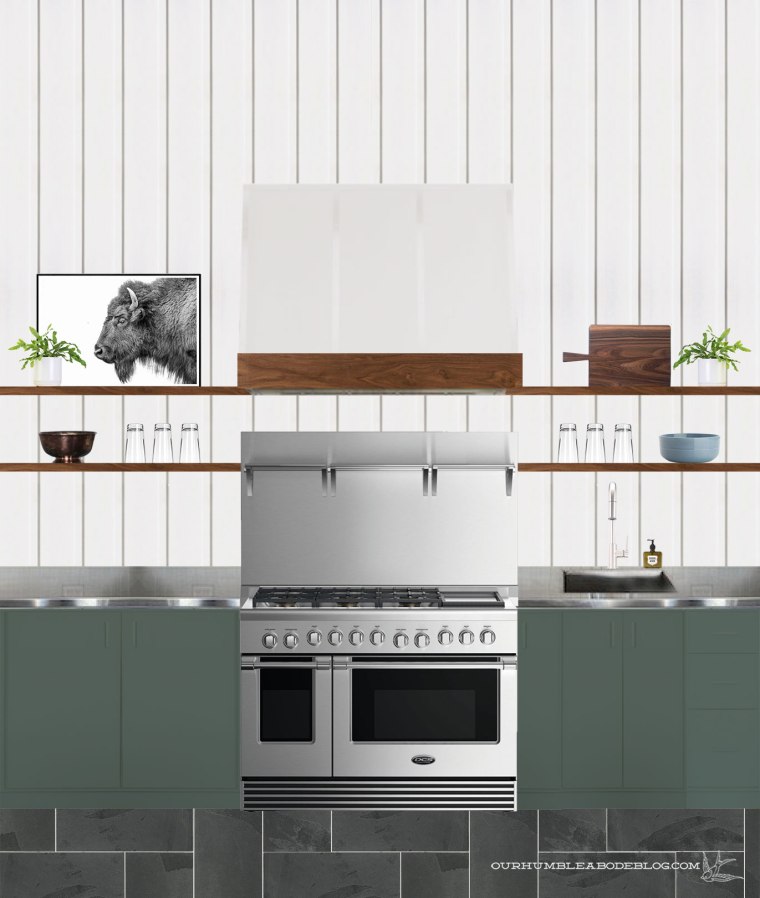
We’ll center the range, with a custom-built vent hood cover and an open shelf or two above.  Seeing as we’ve loved the stainless steel counters in our master bath and laundry room, we’re going that route again here.  A small bar sink will go off to the right, but we’re debating whether or not to add a stainless steel back splash from the counter to the shelf.

Pool-House-Kitchen-Two-Shelves-with-Backsplash

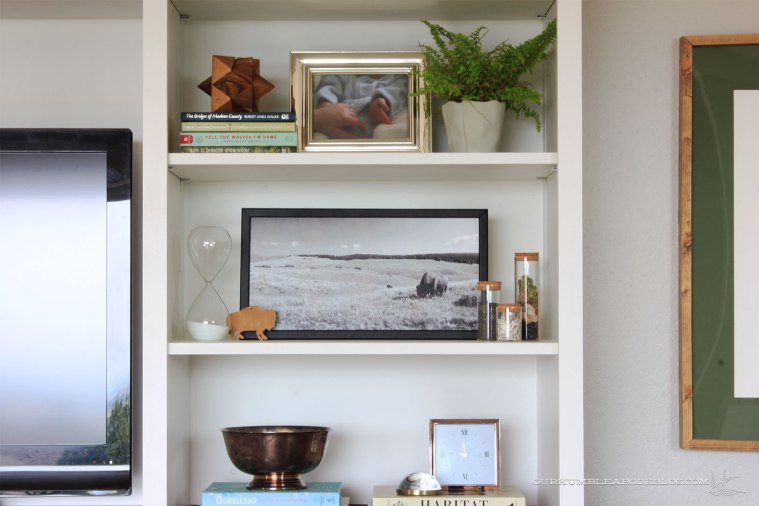
Range    .    Faucet    .    Tile    .    Bison Print    .    Serving Bowl    .    Drinking Glasses    .    Hand Soap    .    Cabinet Color

Over on the other side is an angled wall, with a five foot wide window in each section.

Pool-House-Seating-Areas

The plan includes building benches below, with hinged tops for pool toy, floatie, etc., storage inside.  A pair of sconces will flank the window, with a table and chairs for a little place to hang out or eat a snack.

Pool-House-Bench-Area

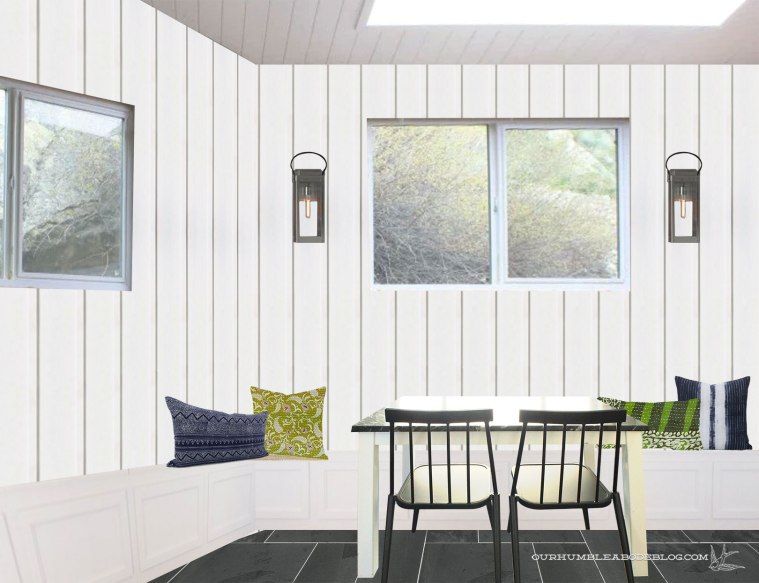
Union Square Sconces    .    Batik Pillow    .    Indigo Lumbar Pillow    .    Windsor Chairs

Just this weekend, we stocked up on our sheeting to cover the walls, hoping we can start hanging it soon!  Where do you fall on the one or two shelves?  How about the stainless back splash?

P.S. For more pool house progress and plans, check out the overall design board as well as the bathroom plan of attack.

Pool-House-Bathroom-Vanity

Large Art for Under $20

One of my goals this year is to get more pictures off our computer, phones, and memory cards and onto walls, frames, or into books.  I’ve already ordered three photo books through Shutterfly, but we also needed large art for the basement theater room.

Theater-Room-Stage-1-Overall

While in Yellowstone, I took around 1,000 photos and loved the simplicity of this shot of Ben and the boys on the boardwalk at the Grand Prismatic Spring.

Theater-Room-Engineer-Print-Starting-Point

It was a cool day, so we saw mostly steam.  While not the best for viewing the amazing thermal features, it did create a dramatic, but simple background.  However, with the crowds of people, I couldn’t get a shot with just my three favorite men.  Luckily, Photoshop and I are pretty friendly and a few simple edits took care of my problem.

How-to-Edit-a-Photo-for-Printing

Above is a gif of my editing process.  If you’re planning to turn a photo into wall art, here are a few tips for the best results.

First, edit out any distractions.  Solid backgrounds work best, whether literally solid or a mass of trees, water, or anything else that doesn’t have a noticeable repeat.  To edit out the distractions, in this case, other people, select an area as close to the object as possible, then copy and paste.  Move the layer over, covering the object and select the eraser tool.  Lower the hardness to 0 and raise the brush size to give a soft, fuzzy edge.  Erase all around, then repeat with any other problem areas.  In my case, after editing, I preferred a composition with the three guys over to the right, rather than centered on the frame.  I copy and pasted them into position, erasing around the new layer to soften the overlay.  Then covered their original placement.

Theater-Room-Engineer-Print-Walking-Detail

Secondly, if your plan includes turning the photo from color to black and white, follow these simple steps.  Start by turning to black and white, and click the auto adjust button.  From there, you can adjust the color values to your liking.  It is also helpful to auto adjust the Levels and Curves to enhance the depth.  If too harsh, lower the opacity until it looks best.

Finally, when printing, save the file as a .pdf and print at your favorite location.  To adequately fill the wall space, I had my file printed as a three by four-foot black and white engineer print at FedEx Office for nine dollars.  Usually the biggest expense isn’t printing, but framing such a large piece.

Theater-Room-Engineer-Print-Wood-Detail

To save loads of money, head to your nearest lumber department.  Home Depot carries 1/4 inch thick by 2 inch wide by 48 inch long poplar strips for only $2.61 each.  I bought two, and gave each strip a coat of Minwax Special Walnut stain.  Allow to dry, then break out the staple gun loaded with 1/4 inch staples.  Lay the paper face down and tuck the wood under the top slightly.  Use masking tape to keep the paper from shifting, and staple occasionally to secure the paper to the board.

Theater-Room-Engineer-Print-Attaching

I added full strip of tape over the staples for added security.  To hang, I used a 40% off coupon to pick up a roll of leather cord from Hobby Lobby.  Tie a knot in each end and staple just above to prevent the cord from falling out.

Theater-Room-Engineer-Print-Back-Detail

Attach the other poplar board to the bottom and hang on a nail.  Nearly instant, large wall art that didn’t cost an arm or a leg.

Theater-Room-Engineer-Print-Overall

In fact, assuming you already have a tiny bit of paint or stain, staples, and tape, grand total is under twenty bucks!

Theater-Room-Engineer-Print-Side-Detail

That’s cheap enough to justify creating a rotating gallery, swapping whenever you have a new favorite photo.

Theater-Room-Engineer-Print-Hanging

Now, dig through those gazillion photos on your computer and pick at least one to hang on your wall.

Theater-Room-Engineer-Print-Art

P.S. Shutterfly is offering 50% off plus free shipping on orders over $39 through September 5th, so order now!

The Pièce de Résistance

For the last five years, I’ve never felt like our living room was complete.  The elephant in the room, the entertainment center, was never fully finished.  More than anything, it had become a piece I became increasingly unhappy with the look and function.

living-room-rug-toward-kitchen

With a lull between projects, I begged and pleaded with Ben, stating all my grievances and presenting a plan to rectify said problems.

Entertainment-Center-Plan

After hammering out all the details, he relented, probably just to shut me up once and for all.  We made a trip to the lumber store, gathered all the necessary supplies, and dug right in.

Entertainment-Center-Complete

What we have now is exactly what I wished for, with flexibility in mind.

Entertainment-Center-Complete-Overall

A combination of six drawers and one large center cabinet can store a variety of items, including all. the. electronics.

Entertainment-Center-Lower-Complete

Upper shelf bays have adjustable tracks to accommodate anything.  Even the wider center shelves are held in place with pegs, but to keep it as sleek as possible, we didn’t drill extra holes at this time.

Entertainment-Center-Complete-Top

Allowing the appropriate time for the paint to cure is always my biggest struggle.  Loading these shelves with all our favorite treasures put a huge smile on my face.

Complete-Entertainment-Center-Styled-Toward-Kitchen

So happy in fact, that I can ignore the unpainted adjoining walls…for now.  I’ll paint those, we’ll hang the tv, and also make a stand to better display the stick.

Complete-Entertainment-Center-Styled-1

Walking the fine line between curated and cluttered can be hard, so I started my styling endeavor by gathering my favorite items to display.  Our boys’ tiny inked footprints, travel time capsules, photos, and other found objects.

Complete-Entertainment-Center-Styled-with-Leather-Sofa

For every item placed, I made sure to have a pair or something similar.

Complete-Entertainment-Center-Styled-with-Linen-Sofa

Symmetrically styling the shelves feels more thoughtful and less unrestrained.

Complete-Entertainment-Center-Styled-Left-Side

A black and white photograph taken near the area Ben grew up previously hung in our bedroom entrance.  It’s a favorite of mine, never receiving adequate attention where it lived before.  I plucked it off the wall and it fit perfectly on a shelf; it’s the perfect anchor piece, filling it, while a few corked jars filled with finds from our journeys round out the grouping.

Complete-Entertainment-Center-Styled-Right-Side-Detail

But, I had only one, which didn’t work with my symmetrical styling, so I whipped out a quick DIY art.  My goal this year is to get more photos off my hard drive and into view, so I scrolled through photos from our recent Yellowstone trip and opened several in Photoshop.  Before landing on ‘the one’ I converted the files to black and white to determine which looked best.  With the bison selected, I cropped in different ways to make an interesting composition.  Once happy, I saved the file to a USB drive, went to FedEx Office and printed it as a basic 11 by 17 piece.  While out, I popped into Lowe’s to get an 8 foot section of corner molding to create a small frame.  Mitered corners, a touch of glue, overnight in clamps, bada bing, bada boom, picture frame.  Three more jars, an hourglass and small wooden bison complete this side.

Complete-Entertainment-Center-Styled-into-Kitchen

Though Ben agreed to do away with two of the five front speakers, we still had three to work into the new design.

Complete-Entertainment-Center-Styled-Toward-Entry

By selecting three matching speakers, one set in each bay, tucked close to the ceiling, they draw as little attention as possible.

Complete-Entertainment-Center-Styled-from-Side

Even with the same overall dimensions, version 2.0 boasts much more storage potential, equipped for future needs.  A version 3.0 shouldn’t be necessary.

House Inspiration is Everywhere!

Last week, we took a family trip to Yellowstone and Grand Teton National Parks.  Known for the natural beauty, of course, but as house obsessed DIYers, of course we found the buildings pretty interesting, too.  Like the Old Faithful Inn, located right in front of Old Faithful Geyser.

The Old Faithful Inn, built in 1903-1904, is the largest log structure in the world.

Built in 1903-1904, this is the largest log structure in the world.  The windows are beautiful and the craftsmanship is stunning.

Old-Faithful-Lodge-Detail-in-Yellowstone-National-Park

Poppy red double front doors with metal straps, rivets, and unique hardware just add to the charm.

Old-Faithful-Lodge-Front-Door-in-Yellowstone-National-Park

Soaring ceilings in the main lobby reveal the exposed timber supports and stairs.

Old-Faithful-Lodge-Entry-in-Yellowstone-National-Park

Heck, the public bathrooms are amazing, too.  Look at the gorgeous marble sinks, tilting mirrors, and stunning old tile.

Old-Faithful-Inn-in-Yellowstone-National-Park-Bathroom-Sinks

How about solid marble stall dividers, they’ve got twenty.  I can’t verify that number, just thought of the Little Mermaid song.

Old-Faithful-Inn-in-Yellowstone-National-Park-Bathroom-Stalls

Summer months are the peak season for tourism in Yellowstone, and battling the crowds to see nature felt quite strange.  Taking a day to go south, through Grand Teton National Park and into Jackson was a refreshing experience.  Jackson had plenty of architectural eye candy.   Most unique award goes to Vertical Harvest.

Vertical-Harvest-in-Jackson-Hole-Wyoming

Located on a 1/10 acre lot just off a parking garage, this unique hydroponic greenhouse features rotating beds, lit by pink solar lights.

Vertical-Market-Parking-Garage-Jackson-Hole-Wyoming

After several days of camping food, we decided to have a real lunch at Snake River Brewing.  A front lawn dotted with Adirondack chairs and corn hole boards is fun and welcoming.

Snake-River-Brewing-in-Jackson-Hole-Wyoming-Exterior

I adore the mix of plants, Karl Foerster, coneflower, catmint, coreopsis, and more mingle together in a prairie garden type of way.

Snake-River-Brewing-Plants-in-Jackson-Hole-Wyoming

Inside, unique hand painted tiles line the walls, adding to the funky vibe.

Snake-River-Brewing-Tile-Detail

When I think of Wyoming, modern architecture isn’t what pops in my mind.  But modern buildings abound, like the Jackson Hole Center for the Arts.  Many of the buildings marry modern and rustic in a way that feels fresh and interesting.

Art-Center-Front-in-Jackson-Hole-Wyoming

Art-Center-Back-in-Jackson-Hole-Wyoming

Of course, we had to stop at Jackson Square to get pictures of the iconic elk antler arches.

Elk-Antler-Arch-in-Jackson-Wyoming.jpg

Elk-Antler-Arch-Detail-in-Jackson-Hole-Wyoming

Near our parking spot, this modern home caught my interest.  The warm wood tones, black windows, metal details and even the poppy red garage door had me smitten.

Modern-House-in-Jackson-Hole-Wyoming

Just back inside Grand Teton was the prettiest visitor center I’ve ever seen.

Grand-Teton-Visitor-Center-in-Wyoming

A large glass bay perfectly frames the amazing mountain view, with etched metal strips in line with each mountain.

Grand-Teton-Visitor-Center-View

As pretty and interesting as Yellowstone is, the laid back vibe and amazing scenery of Grand Teton and Jackson really captured my heart.  Before we even left the Tetons, I told Ben we need to come back, skipping Yellowstone and spending quality time here instead.  If you’re considering a vacation to the general area, certainly allot time to poke around.

Fixing Past Errors

When we sold our first house to move into this house, we were beyond excited to get started on projects.  Our priorities were the getting a functioning shower in the main bathroom in addition to an entertainment center.  Coming from our previous house with built-in storage, we didn’t have furniture to handle the task.  This bookshelf situation didn’t offer the storage we needed.

Living-Room-Bookshelf-Entertainment-Center-After-Move-In-April-30

We set out to build a nine foot wide unit to store all.the.toys as well as all.the.electronics.  A television, receiver, PlayStation (that doubles as our dvd player) and 7.1 surround sound speakers.  We came up with this:

Lingering-To-Do-Entertainment-Center-Doors

Sure it held everything, but we realized over the years it wasn’t working as well as it could.  Our, okay, mostly my, list of complaints grew.

Entertainment-Center-Problems-Before

All drawers work wonderfully in kitchens, but electronics aren’t made to be stored in drawers.  The lack of closed cabinets meant the ugly stuff was piled on the upper shelves.  Of the 9 open shelves, 7 held speakers or other electronics, with cords snaking up and down.  Initially, the plan included building fabric or metal insert doors to hide everything, but never became a priority.

Nine drawers provide oodles of storage, but certain people in this house under the age of 12 treated it as a dumping ground for anything and everything.  Having lived in this house for only a few months meant we didn’t know exactly how we would use this space and we allowed room for a larger tv.  But the final nail in the proverbial coffin was when Ben said he hated the way the cheap drawer glides functioned, or didn’t.

Armed with our list of wants and changes, we’ve decided to tackle this project while high summer temps are slowing pool house progress.  I drew up a plan that allowed for more flexibility, with a mixture of open and closed storage, cabinets, drawers, and shelving.

Entertainment-Center-Plan

Oddly, as our boys have gotten bigger, their toys have become smaller; longer attention spans also equal fewer toys.  Duplos and building blocks are Legos, which are now stored in their under stairs play space.  Six slightly narrower drawers are available to store toys, books, and miscellaneous junk, while a wide center cabinet holds electronics and board games.

Entertainment-Center-Plan-Storage

Determining all the sizes is the most difficult part of the planning process, including measuring everything that can possibly go in this unit.  A combination of fixed shelves offer rigidity, but adjustable shelves offer flexibility for storing/displaying items.

Entertainment-Center-Plan-Measurements

The old entertainment center is the first thing in 11 years we’ve ever built and removed, so I think we’re doing okay.  That old burgundy color comes back, woof.

Entertainment-Center-Building-After-Day-1

After two building days, we have the main elements in place.  Clearly we still have some work to do, like facing the uppers, cutting the remaining shelves, and building/installing the doors and drawer fronts.

Entertainment-Center-Building-After-Day-2

Poplar sided drawers with soft close Blum drawer glides are sturdy and so smooth.

Entertainment-Center-Drawer-Bay-Detail

A four-foot wide middle cabinet houses the ugly electronics, including the gigantic subwoofer, with plenty of room to store board games.

Entertainment-Center-Middle-Cabinet-Section

Looks like I’ll have plenty of painting in my future, but it’ll be so worth it to have more functional and pretty storage.  Have you ever added anything to your home, thinking it’ll be perfect, only to realize later it wasn’t?  I usually think about things for ages before doing any building, so it isn’t often this happens to us.