Progress in the Pool House

One of the more unique, and infrequently shared, features of our house is the indoor pool.  Nearly five years ago, when we closed on this house, it looked like this:

Looking up, there was fiberglass sheeting on the ceiling, dark wood siding on the walls, and a leaking roof-due to old solar panels on the roof, dripped down.  Looking down, the floors were covered with outdoor grade carpet, covering the damaged tile below, and the pool liner was shot.  We saw potential, but because we didn’t need the pool, finishing it was lowest on the priority list.  That doesn’t mean changes haven’t been made along the way, though.

Before replacing the house siding, we first had to tackle landscaping work, which had been filled in too high, covering the wooden rim joist that rests on the concrete foundation.  Wanting to keep the future back deck all on the same level, we decided to take out the wet bar platform and lower the door and window.  Once the exterior work made it to the pool house, we replaced all the windows and doors.

Which brings us up to speed on past pool house progress, but this space has basically functioned as a personal warehouse of building supplies.  It feels like this space has 3,286 steps to get it done, so it’s bit by bit progress.  First order of business is replacing the ceiling.  Unlike all the other spaces we’ve worked on, it’s not quite that simple.pool-house-ceiling-scaffolding-from-belowHaving a ceiling peak of 15 feet, plus a 9 foot deep hole to work over, we needed scaffolding.  Rather than renting and spending the same or more money, we built a temporary structure to make working easier.  Step 1 of 3,286 complete.  Then, Ben tore off the old sheets, exposing the structure.  Step 2, check!pool-house-ceiling-taken-offThose exposed beams are such a cool structural element, but the leaking roof had streaked and stained both.  A thorough sanding brought them back to life.  Steps 3-9, done!pool-house-beam-sandingOnce the beams were finished, Ben started prep work to install the tongue and groove pine boards.  First, two by 4 boards were secured perpendicular to the trusses followed up by new light boxes to adequately light the entire room.  Steps 10 and 11.  Next, he cut pieces of rigid foam insulation to tuck between the boards for a higher R value and covered with a thin plastic sheeting-12 and 13 are done.pool-house-ceiling-insulation-and-plastic-sheetingBoard by board, we’ve been installing pine planks.  Let’s say that was steps 14 through 20.  Below, the center had just been finished, minus the insides of the skylights.pool-house-ceiling-center-finishedDue to the ceiling trusses dipping down and rising up unevenly, we decided to install the boards perpendicular to the beams.  This makes the unevenness far less noticeable, unlike a long run that accentuates any discrepancies.  It’s hard to see the ceiling from below with the scaffolding in the way, but it’s looking great already.pool-house-ceiling-center-detail
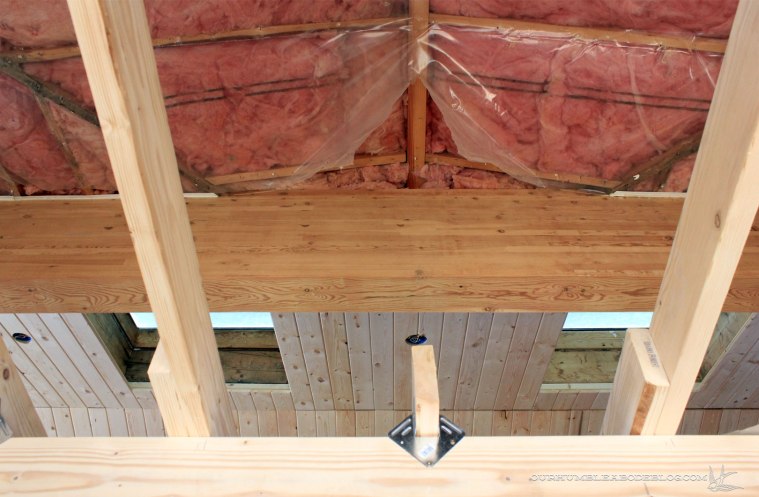
The strips on either side of the beams still need work, the skylights will get boxed in, and trim will go up to cover the gaps, so it’s not a quick process.  It is, however, 20 steps in the right direction.

How to Hang an Artwork Grid

Okay, okay, I know this seems like a really easy and lame topic to cover.  Hanging a gallery wall is easier, once the layout has been determined because the layout is usually more loose.

Green-Guest-Room-Dresser-Chair-and-Art

A grid however, takes precision or it looks wonky and bad. It’s especially difficult when you have cheap frames (intentional choice because these are low and could get knocked down) with uneven hook placement.  After nearly five years of living in this house, I finally landed on art for this stretch of wall between the fireplace and guest bedroom door.

pressed-leaves-grid-finished-down-hall

Placing art is was tricky because the thermostat is off centered width wise, but also kind of low.  Also, there’s a covered junction from an old sconce, both of which I wanted to minimize.  To determine my spacing, I measured the thermostat and found five inches to work.  Then, I measured the width of the wall and marked it with a piece of tape, along with two more pieces, each 2.5 inches on either side.  Measuring from the ceiling, I hung the top row of frames without much difficulty.

pressed-leaves-hanging-top-row

But, the second row was more ticklish because each frame had to line up within the row, but also the frame above.  Each frame hook was just slightly off from the others, so I labeled the backs with numbers so I couldn’t mix up.

pressed-leaves-measuring-hook

I left the top frame up,  measured five inches from the bottom and placed another piece of tape.  Then, measure the hook distance down and mark on more tape.  Using masking tape handy keeps the walls free of tons of marks.

pressed-leaves-measuring-to-hang

I found the easiest way to align the frames vertically is with a small level. First, make sure the upper frame is plumb, then mark a piece of tape with a line.  Use this line to mark the distance to the nail hole.

pressed-leaves-marking-second-row

From here, it’s easy to do the rest, just pop a nail in and make sure they’re all level.

pressed-leaves-hanging-level

Ugh, they’re already a little crooked, but I swear they’re actually even.  Oh, if you’re having a hard time figuring out easy and cheap art, look no further than your houseplants and yard.

pressed-leaves-grid-finished

I pressed these between paper under heavy books, then backed the frames with cheap newsprint paper before framing.  For a more realistic touch, I just might add ‘labels’ to the bottom corner.

pressed-leaves-grid-finished-up-hall

The thermostat is still visible, of course, but it feels a tad more disguised because the art catches more attention.

A Look at Last Year

2016 was another busy year for us, chock full of projects.  As usual, some are bigger than others, but much of this year included tearing our basement down to the studs for a complete rebuild.  What started as a paper plan and vision in our heads, along with a lot of physical labor, has become five freshly finished and functional rooms.

The Mud Nook:

Previously this was an unfinished, under stair storage area with a door at the end.

New-House-Garage-Entry

To eliminate an annoying door swing and give the garage entrance storage, we took 18 inches from the stair storage to put in a bench, shoe cubbies, and tons of hooks.  It has come in so handy over this snowy winter, allowing all the snow pants, coats, hats, gloves, and boots to dry while keeping them off the floor.

Basement-Mud-Nook-with-Hooks

The Laundry Room:

Before remodeling, the laundry room worked, and had a good amount of storage, but didn’t completely suit our needs.

To pack as much function into this 8 by 9 room as possible, we stacked the washer and dryer, added an upright freezer, a kitchen sink, and open shelving.  And that’s just the left side!  Across, we added two drawer stacks, including pull out drying racks, a folding counter and cabinets above, as well as a tall cabinet to hold the ironing board and vacuum.


Along with taking 18 inches from the under stair storage, we also straightened out the angled doorway, gaining a longer mud nook.  By doing so, we created a deep closet with shelves at the back and hanging rods toward the front.  There’s still access under the stairs through the closet, which is a hidden play space for our boys.

Theater Room:

Though technically considered a bedroom, the larger of the two spaces is being used as a theater room.  In the second and  third photos below, the painted door was a small closet.

In order to access this room, we removed the small closet to connect it to the hallway on the other side.  At the back of the long room, we added a wall to create a closet behind, hence the door to the right of the tv.  Oh, we also have blackout curtains now to get the room really dark.

Basement Bathroom:

The 70’s called, and they wanted the bathroom back, so we happily gave up the yellow fixtures and orange countertops.  And the glue covered floors, which had stinky pet stained carpet before.

New-House-Basement-Bathroom-April-13-2012

We ripped out the narrow shower stall, replacing it with a wider marble clad enclosure, slate floors, and a custom vanity.

Horizontal Stair Railing and Slate Floor:

While the basement ceiling was open and we had access to the stair railing, we jumped at the chance to swap out the very traditional, orange oak rail and banister.

Living-Room-Space-for-Window-Seat-3

The simple railing blends in nicely with the tongue and groove wall and is a neutral background for the living room.  Slate floors finally replace the super traditional stained cream marble with inlaid tile rug.

Deck Makeover:

Technically, we finished the deck the summer of 2015, but it wasn’t until May of 2016 that we actually found furniture for it and started getting use out of it.  This was a complete tear down, resulting in months of working on digging post holes, setting posts, building a roof, laying new deck boards, attaching a modern rail, and staining.

We now have a cozy place to enjoy our view, grill, and relax.

Garden Update:

Yet again, the majority of work here had been done before 2016, but as the plants continue to grow, it’s fun to look back at the beginning stages of creating our backdoor oasis.

Back-Garden-and-Deck-from-Side-Stairs

Seeing these pictures really make me miss all of the life and color that are outside, but I’m so excited to get back out there come spring.


To see more of the progress we’ve made since buying this house, check out our Four Year Home Tour, parts one, two, and three.

We’ve already started on one of this year’s big projects, and I can’t wait to share more soon!