Two Year Check Up

This month marks two years of living at this house.  Like last year, I’m taking you on a room by room tour to show you the changes.  Here’s the plain entry the day we closed:

New-House-Entry April 13 2012

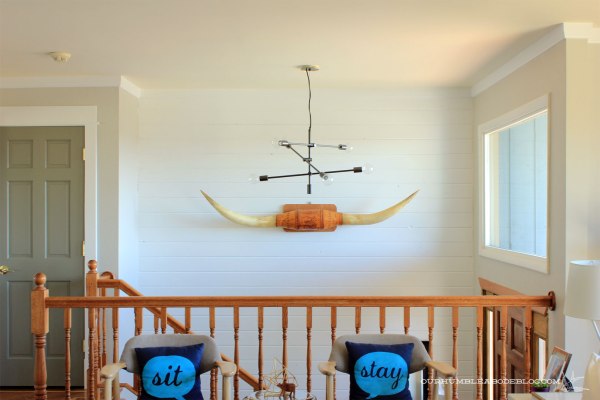
Recently, we installed a tongue and groove accent wall, new front door and window, modern light, giant Longhorns and cute art.

Button-Picture-in-Entry-Top-Stairs

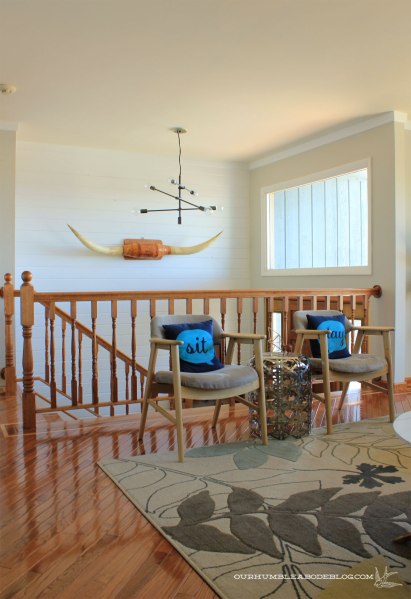
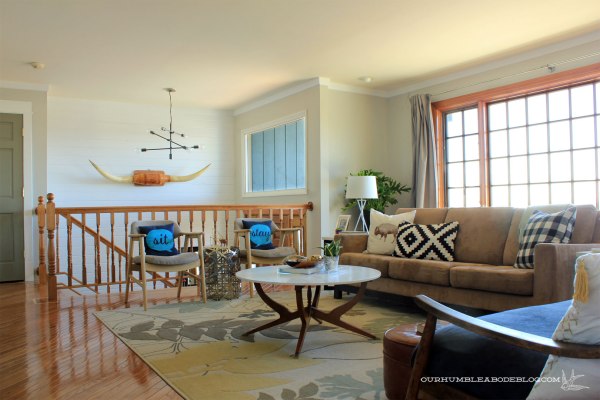
We now have a bright, light filled happy space we’re not ashamed of.  Especially because this is the first impression.  We still have to replace the uneven, stained tile and railing, but this space is nearly complete.  The living room had great potential, but it felt too traditional for us.

New-House-Living-and-Dining-April-13-2012

Much of this room is still subject to change, but it’s functional and more ‘us.’  Painted light gray walls modernize it, while still feeling warm.

Living-Room-into-Dining-Two-Years-Later Coffee table plans are in the works, and I want to find a new rug and chairs.  Art, too.

New-House-Dining-into-Living-Room April 13 2012

But the modern twist on a rustic/Western style is coming together.  The newly finished sofa is perfect in here.

Living-into-Entry-Two-Years-Later

Hopefully a leather sofa will replace this one, but it serves the purpose until then.

Living-Room-Sofa-Two-Years-Later

Our dining room has seen some progress, but it’s not looking so hot these days.  Though it really didn’t look to great when we bought this place either.

Dining-Room-After-Move-In-April-30 A window replaced the door, and we’ve got one sheetrock-less wall while we deal with electrical changes.

Dining-Room-Two-Years-Later One of the least changed rooms is the kitchen.  Maybe this winter we’ll have some updates to tackle.

New-House-Kitchen-from-Breakfast-Nook-April-13-2012

Aside from removing wallpaper and painting, no action going on in here.

Kitchen-Two-Years-Later

In the adjacent family room, we’ve refaced the fireplace, added an insert, built shelves for a little nookpainted the walls a soft beige.

New-House-Family-Room-from-Pool-April-13-2012

This room is one of my favorite places to relax and enjoy the back yard views and wildlife.

Family-Room-from-Kitchen-Two-Years-Later

Our first remodel here, the main bathroom, was a full tear out.  Though it was one of the most recently updated spaces, the dark, showerless layout didn’t work for our two young boys or guests.

New-House-Main-Bathroom April 13 2012

Replacing the tub with a tub/shower, it now functions for kids and adults.

Main-Bathroom-Finished-Vanity

Across the hall, the small guest room was very dark.  North facing, small window, and a wall of 70’s oak shelving sucked the light and life out.

New-House-First-Showing-Guest-Room

A new egress window lets in more light while the white shelves and happy yellow walls add cheer.

Guest-Room-Two-Years-Later

A beige box of boring wasn’t really a happy place for two little boys.

New-House-Boys-Bedroom-April-13-2012

After asking for their suggestions, I scraped off the popcorn ceiling, painted the walls a pear green, and filled the room with color and kid friendly decor.

Boys-Bedroom-Two-Years-Later

The master was completely opposite from the boys’ room starting point with obnoxiously bright blue walls.

New-House-Master-Bedroom-Front-April-13-2012

So far, I’ve only painted over the shocking blue.  Soon, we’ll get new windows.

Master-Bedroom-Two-Years-Later


The biggest interior project from the past 365 days is the master bathroom remodel.  It was a dated yellow and red room of yuck.

New-House-Master-Bathroom-Toilet-April-13-2012

Now, its our updated sanctuary complete with a walnut vanity, clawfoot tub, and pretty slate and marble tile.

Master-Bathroom-Two-Years-Later

A few big inside changes, but our landscaping saw the most attention last year.  I’ll get to that in another post.  We’ve been adding plants and greenery!

Sometimes, progress feels like it moves slower than a turtle, even though we’re most often working on something.  It’s nice to look back to see just how much we really have done; to be reminded of our excitement at closing.  And look back at the ugly and plain space we inherited.

Natural Linen and Special Walnut

That ugly, dirty, orange thrifted sofa isn’t so ugly anymore.  Over the past week, I’ve given it a makeover and new life.

Thrifted-Vintage-Orange-Sofa-Front

I started by removing the cushioned section from the wooden frame.  The back middle leg was loose, so I glued the plugs and clamped it overnight.  Then I started pulling away the dated fabric.

Thrifted-Vintage-Sofa-Pieces

When tackling an upholstery project, I like to take pictures of pieces as I go.  If I get stuck or can’t remember how things went together, I have pictures to go by.

Thrifted-Vintage-Orange-Sofa-Arm-Underside

Back sections always go on last, so it’s the first to come off.

Thrifted-Vintage-Orange-Sofa-Back-Removed

Followed up with the arms.

Thrifted-Vintage-Orange-Sofa-Arm-Exposed

See all that nasty stuff that was stuck in the crack?  Eeew.  I also found old gum on the under side of the frame.

Thrifted-Vintage-Orange-Sofa-Arm

When I pulled the fabric off, I saw the arms were barely padded.  Underneath matching solid oak arms.  I opted to leave the arms open because I liked the look better.  A few screws, accessible from the underside hold the arms to the main frame.  I’ll skip the refinishing steps, because I didn’t really follow the rules.  Also, my hands were busy, so I couldn’t take photos.    Basically I sanded the entire frame with 220 grit paper until I was down to bare wood.  To give a rich finish, I applied one coat of Minwax Special Walnut stain, followed up with two layers of Teak Oil.

Thrifted-Vintage-Sofa-Overall-After

As for fabric, I fell for a natural linen.  I’ve never had linen upholstery, so I’m hoping this hold up.  If it doesn’t, I’m only out the cost of fabric and my time.  Because my fabric has a little more stretch than thicker upholstery fabrics, I decided not to sew box cushions for the back and seat.  This way, if the fabric stretches or looks saggy, I can give it a stretch without it looking strange.

Thrifted-Vintage-Sofa-in-Living-Room-After

I also replaced the old worn out seat foam with a 3 inch high density foam for extra padding.

Thrifted-Vintage-Sofa-End-After

Leaving the arms open is my favorite change.  With little padding, the arms weren’t soft and comfortable, so this is just a better looking version.   That’s one of the super Western and manly leather pillows Ben made, too.

Thrifted-Vintage-Sofa-Arm-Side-After


Simple lines on the back are my second favorite thing about this sofa.

Thrifted-Vintage-Sofa-Back-Overall-After

To keep it simple, I stapled a strip along the top for the fabric to fold over.

Thrifted-Vintage-Sofa-Back-Top-After

On the sides, I had to improvise.  I couldn’t find a tack strip to stuff the fabric into.  And nail heads looked too cluttered.  Instead I stapled along the top of the fabric, then made strips to hide the staples.

Thrifted-Vintage-Sofa-Back-Corner-After

Sleek and simple with a slightly rustic look.  The crazy oak grain is fun and the linen compliments it without drawing attention.

Thrifted-Vintage-Sofa-Back-After

Also, I’m not sure what main couch will stay in this room so I want a go with anything neutral.  Ben wants leather and I most like the look of the camel toned Foxtrot from Flexsteel.

Wouldn’t the camel and linen look great together?  Problem is, local stores don’t have this in stock.  We don’t know if it’s comfortable, if we like the look in person, or a price.  Clearly we still have some research to do before we can make a solid decision.

The Rachael

Nope, not referring to the popular 90’s Jennifer Aniston hair style that took the country by storm.  Meet our new sofa, Rachael by Flexsteel.  She’s slim, clean lined, and slightly vintage styled to play nicely with the MCM bench.

Flexsteel-Rachael-Sofa-in-Living-Room

We sold the old three-piece sectional and put that money toward the new girl.  With nine button tufts along the back, there’s just enough interest on the tight back.

Flexsteel-Rachael-Sofa-in-Living-Room-Toward-Dining

The fabric color, Earth, leans more beige in bright light, but gray in overcast conditions.

Flexsteel-Rachael-Sofa-in-Living-Room-Back-Detail

Ben really wanted leather, but I think this tweed like textured fabric adds a lot of comfort and warmth.  I paired with a faux cow hide pillow for a dash of Western flare.

Flexsteel-Rachael-Sofa-in-Living-Room-Arm-Detail

Flexsteel offers a lifetime warranty on the frame, springs, and cushions, which should hold up to the four Y chromosome people in this house.

Flexsteel-Rachael-Sofa-in-Living-Room-Toward-Entry

Now to find chairs to place perpendicular to the couch.  I’d love to add something leather here, assuming we find something we agree on.  Much easier said than done.

While we were at the furniture store, we noticed another Flexsteel brand sofa, the Dana, in the clearance section.  Priced at $600, we took Frank from American Picker’s trick and bundled to save over three hundred dollars, including a fabric warranty plan on the Rachael.

Flexsteel-Dana-Sofa-in-Family-Room-Toward-Kitchen

The fabric is slightly darker and more on the gray side, but a real upgrade from our old couch.

Flexsteel-Dana-Sofa-in-Family-Room

Slightly rolled arms are more traditional in style than I usually like, but still small enough to fit the space.

Flexsteel-Dana-Sofa-in-Family-Room-Arm-Detail

Taller legs on both couches make vacuuming under a breeze, too.  So far, I’m pleased with the new additions.  Fingers crossed we can say that years from now.

Goodness Gray-cious

My quest to repaint the entry, living, and dining rooms took a lot longer than I expected.  First painting the new crown and waiting for it to thoroughly dry.  Next, a last coat on the tongue and groove wall.

Finished-T-and-G-Plank-Entry-Wall-with-Horns

Followed up with a first coat of paint on the walls.  Then tackling the ceiling where my shoulder and neck started cramping.  I ran out of wall paint and went back to get a third gallon, but we had issues matching the color, so the walls are slightly different from my original color.  But, now these dingy peach walls:

MCM-Sofa-in-Living-Room

Are no more.  Totally worth the days of plowing through.  Instead we’ve got fresh light gray walls to bounce the light around.  Make no mistake, the room is still one thousand miles from done, but much improved.

Living-Room-Painted-Oyster-Pearl

And hey, we’ve got a solid color.  No more patched sheet rock or paint swatches.

Dining-Room-Painted-Oyster-Pearl

Unfortunately, I can’t say they’ll stay that way forever.  The too tall French door will become a standard window and the bay window a sliding door.  After replacing the windows, we’ll update the window trim to match the rest of the house.  If I nail down my stair railing plan soon enough, we might be able to replace it soon, too.  Say it with me, no more orange stained oak!

Living-Room-Painted-Oyster-Pearl-with-Stairs

For now, I’m just happy to have baseboard (and the entertainment center toe kick!) and blank walls.

Living-Room-Painted-Oyster-Pearl-Black-Chair

This was unfinished far, far too long.

Herringbone-Plant-Pot-and-Thrifted-Chair-Overall

Whenever I paint, I pull out every nail, patch it, and then start anew.  Which is why I have only a few frames on the walls.  Still deciding on the rest.

Living-Room-Painted-Oyster-Pearl-Window

Even so, I’m not desperate to slap things up in an attempt to hide something ugly on the walls.

Living-Room-Painted-Oyster-Pearl-Behind-Sofa

And that’s the power of paint.  Or love, as Huey Lewis might say.  Sweet, sweet victory.  Even if I will have to do it all over again after windows.

Hung Up on Horns

I’ve still got one coat of paint to finish the ceiling, but the rest of the entry, living, and dining room painting is done.  It’s amazing how much lighter and brighter everything looks.  Especially the entry.  Boy has it come a long way over the last month or so.  We started with this beige box of ugliness:

Entry-Problems-and-Plans

And now we’ve got a modernized, slightly rustic, light space.

Finished-T-and-G-Plank-Entry-Wall-with-Horns

Peachy beige walls looked sad and dingy, especially against my vintage Longhorns.

West-Elm-Mobile-Light-in-Entry-from-Dining

To create a light backdrop with warm texture (not the heavy knock down), Ben hung tongue and groove pine planks.

Tongue-and-Groove-Entry-Wall-Install

Installing simple crown moulding throughout the room for a crisp edge helped finish off the top of the accent wall.

Tongue-and-Groove-Entry-Wall-from-Living-Room

And giving it three good coats of white paint to finish it off for a neutral backdrop.

Sofa-and-Chairs-in-Living-Room-Toward-Stairs

Along with the freshly painted light gray walls, the room feels clean and fresh.

Finished-T-and-G-Plank-Entry-Wall-with-Horns-Detail

Not only does the tongue and groove cover the giant wall of knock down, it also acts as a huge stud wall.  Planks nailed into studs every 16 inches are completely secure, and the boards can easily hold the weight of art.

Finished-T-and-G-Plank-Entry-Wall-with-Railing


Don’t the horns and light fixture contrast nicely now?

Finished-T-and-G-Plank-Entry-Wall-from-Front-Door

Once our new windows come in, hopefully next week, we’ll replace the door and window.

Finished-T-and-G-Plank-Entry-Wall-with-Console

Usually a fully white wall feels sterile and cold to me, but the knots and grooves keep it interesting.

Finished-T-and-G-Plank-Entry-Wall-in-Living-Room

I’ve never had an accent wall, but I have to say I love it.  Seeing the horns and light against it just makes me giddy.  My parents will be here soon, and I’m excited for my mom to see her horns proudly displayed.