A Look at Last Year

2016 was another busy year for us, chock full of projects.  As usual, some are bigger than others, but much of this year included tearing our basement down to the studs for a complete rebuild.  What started as a paper plan and vision in our heads, along with a lot of physical labor, has become five freshly finished and functional rooms.

The Mud Nook:

Previously this was an unfinished, under stair storage area with a door at the end.

New-House-Garage-Entry

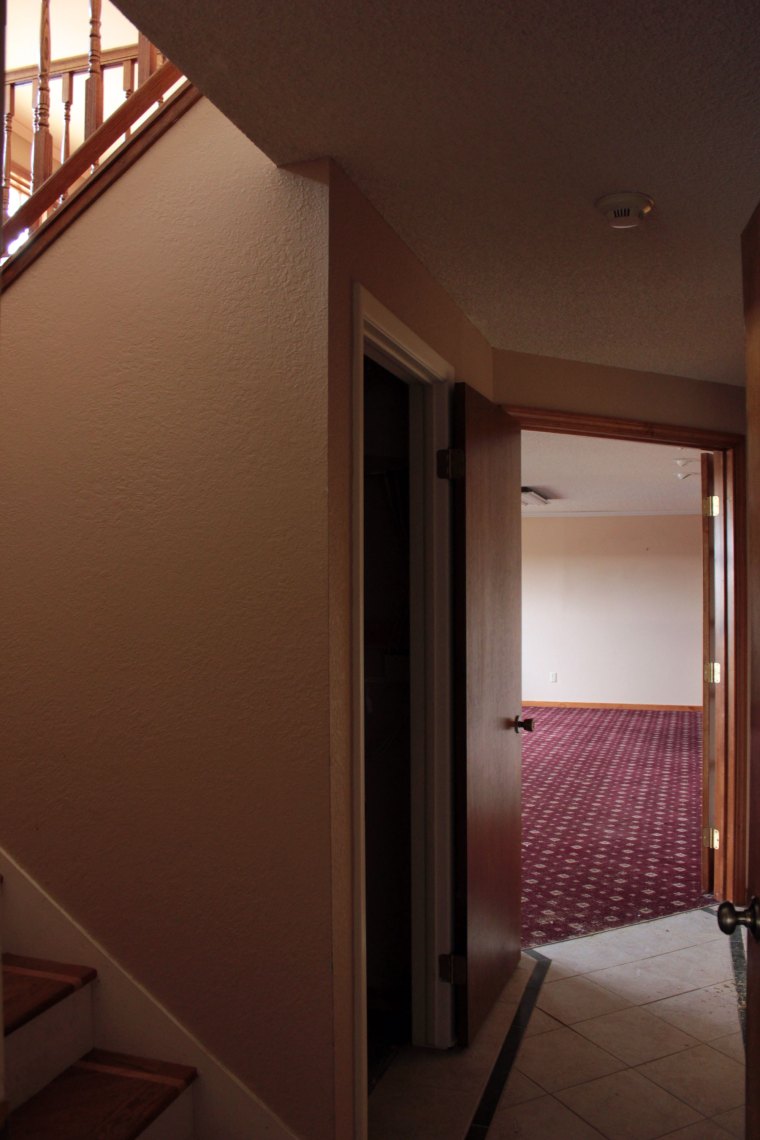
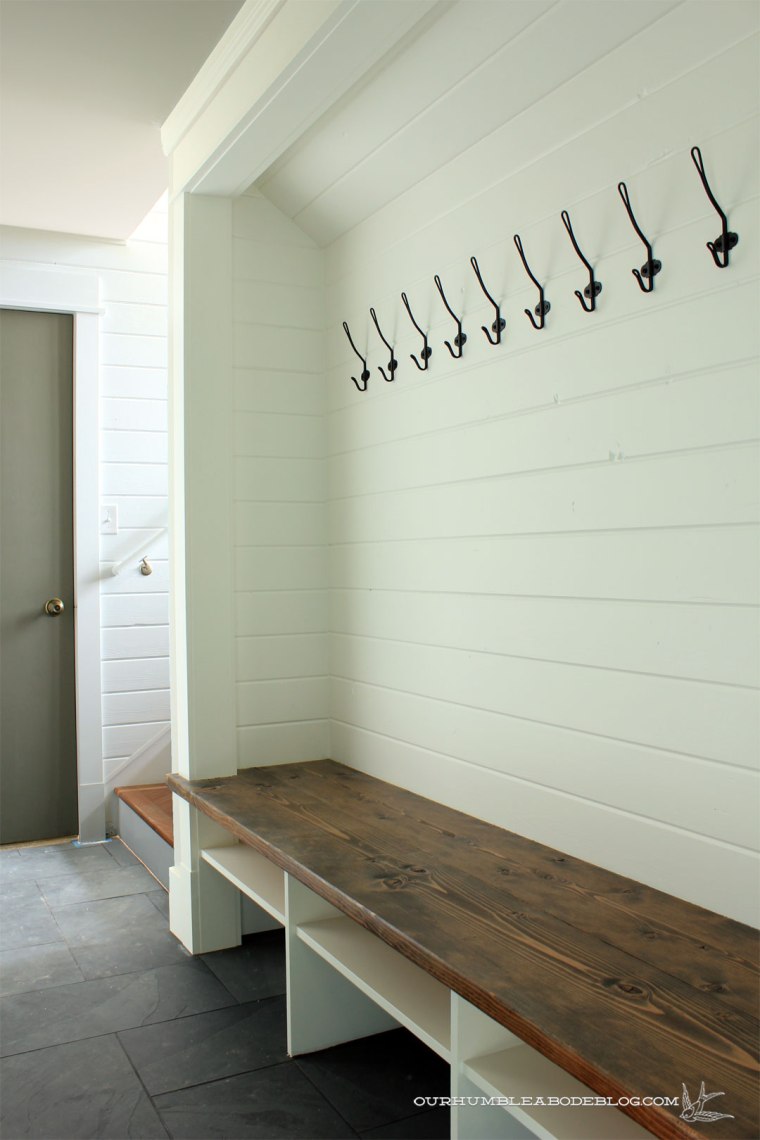
To eliminate an annoying door swing and give the garage entrance storage, we took 18 inches from the stair storage to put in a bench, shoe cubbies, and tons of hooks.  It has come in so handy over this snowy winter, allowing all the snow pants, coats, hats, gloves, and boots to dry while keeping them off the floor.

Basement-Mud-Nook-with-Hooks

The Laundry Room:

Before remodeling, the laundry room worked, and had a good amount of storage, but didn’t completely suit our needs.

To pack as much function into this 8 by 9 room as possible, we stacked the washer and dryer, added an upright freezer, a kitchen sink, and open shelving.  And that’s just the left side!  Across, we added two drawer stacks, including pull out drying racks, a folding counter and cabinets above, as well as a tall cabinet to hold the ironing board and vacuum.


Along with taking 18 inches from the under stair storage, we also straightened out the angled doorway, gaining a longer mud nook.  By doing so, we created a deep closet with shelves at the back and hanging rods toward the front.  There’s still access under the stairs through the closet, which is a hidden play space for our boys.

Theater Room:

Though technically considered a bedroom, the larger of the two spaces is being used as a theater room.  In the second and  third photos below, the painted door was a small closet.

In order to access this room, we removed the small closet to connect it to the hallway on the other side.  At the back of the long room, we added a wall to create a closet behind, hence the door to the right of the tv.  Oh, we also have blackout curtains now to get the room really dark.

Basement Bathroom:

The 70’s called, and they wanted the bathroom back, so we happily gave up the yellow fixtures and orange countertops.  And the glue covered floors, which had stinky pet stained carpet before.

New-House-Basement-Bathroom-April-13-2012

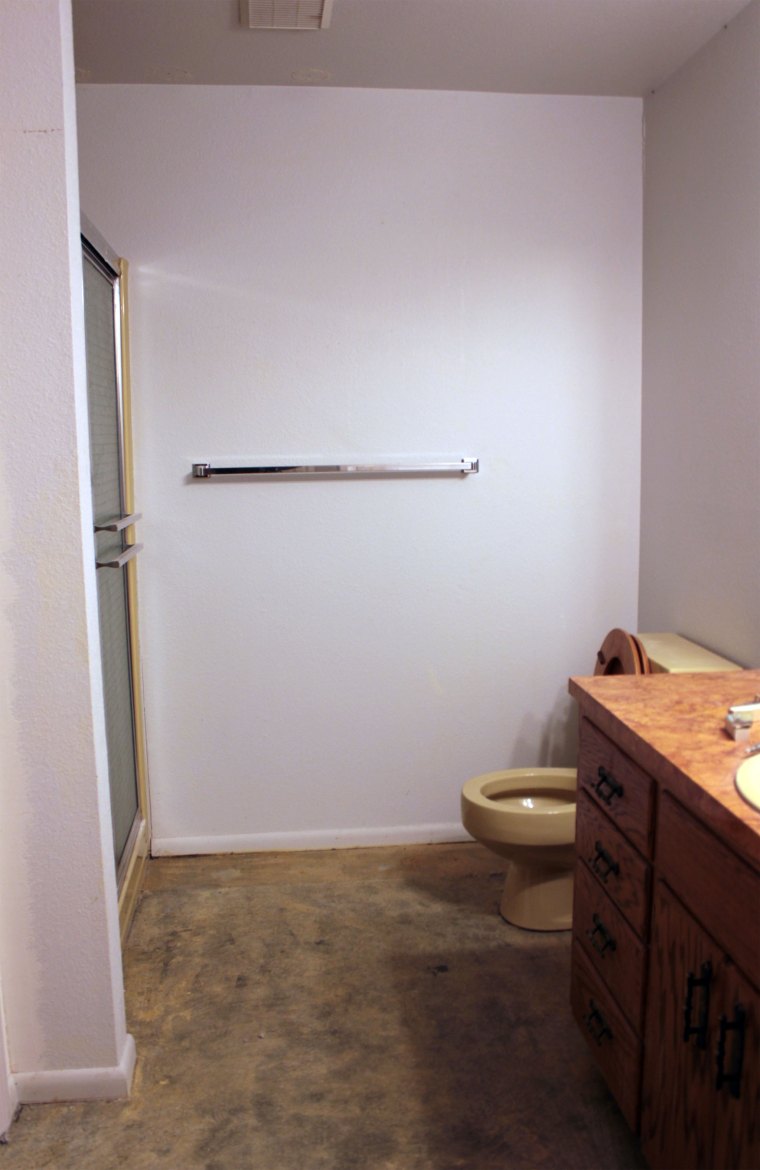
We ripped out the narrow shower stall, replacing it with a wider marble clad enclosure, slate floors, and a custom vanity.

Horizontal Stair Railing and Slate Floor:

While the basement ceiling was open and we had access to the stair railing, we jumped at the chance to swap out the very traditional, orange oak rail and banister.

Living-Room-Space-for-Window-Seat-3

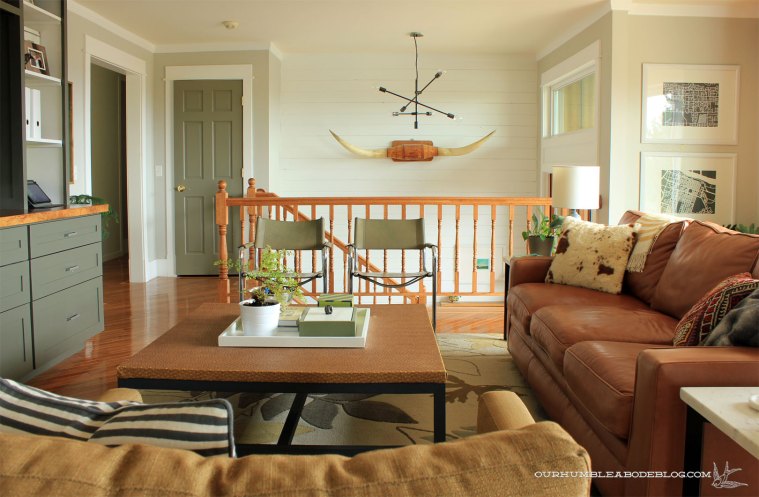
The simple railing blends in nicely with the tongue and groove wall and is a neutral background for the living room.  Slate floors finally replace the super traditional stained cream marble with inlaid tile rug.

Deck Makeover:

Technically, we finished the deck the summer of 2015, but it wasn’t until May of 2016 that we actually found furniture for it and started getting use out of it.  This was a complete tear down, resulting in months of working on digging post holes, setting posts, building a roof, laying new deck boards, attaching a modern rail, and staining.

We now have a cozy place to enjoy our view, grill, and relax.

Garden Update:

Yet again, the majority of work here had been done before 2016, but as the plants continue to grow, it’s fun to look back at the beginning stages of creating our backdoor oasis.

Back-Garden-and-Deck-from-Side-Stairs

Seeing these pictures really make me miss all of the life and color that are outside, but I’m so excited to get back out there come spring.


To see more of the progress we’ve made since buying this house, check out our Four Year Home Tour, parts one, two, and three.

We’ve already started on one of this year’s big projects, and I can’t wait to share more soon!

Last Minute DIY Gift for Women

Have you finished all of your holiday shopping?  No?  Well, then I think you’re with the majority of the public.  Maybe you have a woman (or two, or several!) on your list, but don’t know exactly what to get?  If that’s the case, consider this DIY that’s so quick and easy to personalize, you’ll be voted most thoughtful gifter of 2016.  I guarantee it.  Okay, I can’t guarantee it, but it seems likely.

stamped-necklace-detail

To make one, or twenty, you’ll need:

stamped-necklace-supplies

  • Small circle stamping blanks
  • Jump rings
  • Necklace chain(s)
  • A hammer
  • Steel block
  • A letter and number stamping kit

I found everything I needed to complete this project (minus the hammer and steel block, because I already had one) at Hobby Lobby.  There were several stamp options, in a variety of sizes and fonts.  I chose a simple block font, for $11.99 plus a 40% off coupon.  The more you plan on stamping, the easier it is to justify buying a set, so really go to town.

stamped-necklace-stamps

Place your stamping circle on the steel block or something that’s really hard, maybe concrete.  Wood will not work because the hammer will push into it and twist the metal piece.  It helps to place a piece of tape at the bottom, to keep the disc in place, but also give you a line to keep your letter straight.

stamped-necklace-taped-on-steel

Then, hold the letter in place, keeping it steady and tap the end 5 to 10 times.  I found it easier, and got better results, by lightly tapping several times rather than one hard whack.  Not only can you keep the letter from moving, but hitting multiple times, moving the hammer around slightly, will impress the letter evenly into the disc.  stamped-necklace-hammering

With the disc finished, open a jump loop and slip it through the hole before closing it back up.  String it on a chain and you’ve just made a thoughtful, beautiful gift.  For friends with several kids, go ahead and make a disc for each kiddo for a sweet, sentimental piece she’s sure to love.

stamped-necklace-finished

If sending through the mail, keep the necklace safe by attaching it on a piece of card stock, tape the back to prevent tangling.

stamped-necklace-on-card

For bonus points, make a fun little monogrammed ornament.  You’ll need wooden discs, small eye screws, ribbon, needle nose pliers, and paint.

monogram-ornament-supplies

Carefully screw the eye screw into the top of the disc, slip ribbon through, and paint a cute letter on the front.

monogram-christmas-ornament-gift-topper

It works as a fun gift topper, but something they can keep year after year.  Any great DIY gifts you’ve made this year or previously?

Painted Doors

Quite often, when I post an image on Instagram, I get questions about the paint colors used in our home.  Usually about the wall of the living room, master bed and bathroom, and our doors.  Everyone seems really comfortable painting walls any color, but doors feel like so much more of a commitment.  And I get it, sure you’re only choosing one color, but that one color has to play nicely with the colors of the rooms beyond.

From the get go, I knew I wanted to paint the orange toned wood doors in our home.

New-House-Dining-into-Living-Room April 13 2012

White feels like the easiest option, but I wanted to avoid the inevitable dirty fingerprints that two boys surely leave behind.  I gathered up any and all colors that got my attention.  Instantly, I was drawn to a warm gray with green undertones, Squirrel from Behr.  A quick paint sample on the door confirmed my love and I spent a couple of weeks painting every door.

Squirrel-Test-on-Bathroom-Door

The darker color feels like punctuation, a little accent.  We’ve had this unique color for nearly four years, and it adds so much character to our rooms.

painted-entry-closet-door

Far and away more than white ever could-just look at this quickly Photoshopped picture.  It’s fine, but pretty boring comparatively.  Oddly enough, I feel like the white draws more attention to that side.

painted-entry-closet-door-white

If you’re considering painting doors a color other than white, I’d suggest picking the door color first, if possible.  By painting our doors first, I’ve been able to choose wall colors for each room that compliment the door.  If I were reversing the selection process, it could have been tricky to pick a door color based on all the connecting room paint colors.

Install a modern ceiling fan, yes they do exist!: https://ourhumbleabodeblog.com/2016/06/21/a-fan-of-fans/

These gray doors have a slightly green undertone, but still pairs well with cooler neutrals.

Our Humble Abode Blog Main Bathroom Vanity

As well as saturated or bolder colors.

Guest-Room-Makeover-Green-Walls-Toward-Door

Unlike the white trim, the color is incredibly forgiving, not showing the smudges from dirty hands.

basement-bathroom-finished-shelves-and-shower

Of course, black doors are also a lovely option, especially paired with simple trim.  I love the combination Lauren Liess created by adding brass plates and unique door handles.

Navy is another beautiful option, like this closet door from Yellow Brick Home.  It’s especially easy if you plan to use a lot of neutrals on the walls.  It’s a great way to add color, but an unexpected way to bring it in.

yellow-brick-home-navy-closet-door

I also think a deep, nearly black green would be a lovely, unusual color on doors.  Something like our theater walls, painted Jasper from Sherwin Williams.

Theater-Room-Stage-1-Leather-Sling-Chairs

Do you have painted doors?  If so, what color and how do you go about pairing it with wall paint?

White Versus Colorful Mats

Seven months ago, I found a beautiful vintage dresser on Craigslist, begged Ben to come with me to buy/haul it, and have loved it since.  In that post, near the end, I had taped up a gorgeous Emily Jeffords print that I planned to frame and hang above.

Craigslist-Dresser-with-Emily-Jeffords-Art-VerticalBecause this wall is large, I knew it needed a proportionately big piece of art to fill it.  I ordered a 30 by 40 inch print, but, turns out, that size is hard to frame.  Initially, I wanted to build a frame, but never took the time.  After extensive searching, I didn’t find any affordable framing options and let it simmer on the back burner.  Well, it only took me seven freaking months to get it done, but now that it is, I adore it.

color-mat-around-emily-jeffords-painting-in-bedroom

Recently, while browsing Goodwill, I spotted a large chrome frame with near perfect dimensions.  The simple profile was exactly what I had in mind, keeping the focus directed at the art instead.  As a bonus, it was only fifteen bucks.  Once I got it home, I took the glass, mat, and backing out to give the frame a couple of coats of white paint.  Then, for a little drama, I decided to paint the double mat an olive-green.  Nothing as saturated as the colors in the painting to detract from the art, but enough to add interest.

color-mat-around-emily-jeffords-painting

But, to give the art a little buffer, I added a slim white mat inside to give visual separation between the mat and art.

color-mat-detail-on-bedroom-art

White mats are readily available, an easy go to, and go with anything and everything I’ve ever framed.  Let’s face it though, it’s a safe, standard choice.

white-mat-around-city-art

Colored mats add unexpected boost to art, and can highlight the art more than a white mat could.  However, colorful mats don’t belong around all art.  Generally, I like to use colored mats when the art is neutral, like these black and white leaf prints.

color-mat-around-leaf-art

color-mat-around-leaf-art-2

Do I think a white mat would look pretty?  Absolutely, but I also think the green gives more visual weight to the art, also bringing a touch of green from the curtains over to this side of the room.

living-room-with-new-table-and-lamps

If you’re not quite ready to go that bold, layer a colored mat beneath a white one.

color-mat-around-fingerprint-art

A slim grass-green border, just a quarter to half-inch reveal will emphasize the art without being over bearing.

color-mats-around-fingerprint-art

For a more subtle contrast, pull a color from the art to make a small piece of art seem a bit larger.

color-mat-on-entry-painting

White frames are better suited to busier, smaller, or more colorful art because it allows the art to be the stand out.

white-mat-around-house-protraits

For extra oomph with white mats, I like to use a thicker board or double up.  I found a precut 11 by 14 inch (inside, 16 by 20 inch outside) double white mat at Hobby Lobby for only five dollars to surround our new house portrait from The Littlest House.

Easy Bathroom Accessories

Utilitarian spaces like kitchens, bathrooms, and laundry rooms are always easier to accessorize than living/bedroom areas, simply because you’re aiming for function.  But function doesn’t have to equal ugly.  To finish off bathrooms, I select items that serve a purpose, are still pleasing to the eye, but aren’t always found in the bath section.  If you’re looking to add character, here are my favorite additions.

  • Cute towels and hooks:  Go crazy and pick a fun pattern and/or color because towels are so easy to swap out.  Near the shower, single label hooks hold peppy striped Turkish towels for a dose of fun.
  • basement-bathroom-finished-from-door-straightFramed mirrors:  I always ditch the builder standard plate-glass mirror in favor of a framed one.  Pretty mirrors are everywhere, so don’t settle for boring!  Our main bathroom sports a vintage campaign style mirror that came with a dresser set.

Campaign-Mirror-Hung-in-Bathroom

Our master bath has a unique round metal framed mirror to offset the rigid lines throughout the room.

Master-Bathroom-Vanity-for-BHG

Another vintage wooden mirror, that came with our bedroom dresser, is a welcome warm addition to the cool neutrals of the basement bathroom.

basement-bathroom-finished-vanity-from-door

Also, to get great, flattering lighting, use sconces instead of overhead lights.  Fewer shadows are cast because the sconces light from each side.

  • Add vertical storage shelves:  Short on floor space?  Go up!  In our main bathroom, we removed a wide vanity to add a smaller vanity plus a floor to ceiling shelf stack.  At 16 inches wide, it doesn’t eat up much of our floor plan, but does offer a great deal of storage.

Main Bathroom Shelving

By widening the basement shower, we narrowed the space between it and the door.  Rather than letting that space go to waste, four floating shelves fill the void, putting it to good use.

basement-bathroom-finished-from-door

  • Glass storage:  Especially in bathrooms that guests often use, I like keeping essentials in plain sight.  No one wants to rummage through cabinets to find cotton balls or soap.  Cylindrical jars keep band aids, soap, cotton balls and cotton swabs handy on a shelf in the main bathroom.

Store Toiletries in Sight

A triple stacked glass container on our master bathroom counter is used daily.

Master Bathroom Toilet

Four black lidded canisters fill a basement bathroom shelf, but keep those items out of limited drawer space.

basement-bathroom-finished-shelves

  • Art, preferably without eyes:  Almost anything goes here, but I always feel strange adding art with eyes.  With moisture concerns, I avoid using anything too expensive or precious.  Vintage, almost ugly oil paintings are great.

House-Tour-Four-Years-In-Main-Bath-from-Door

Or you can think outside the box and hang something different, like vintage arrows.

Cedar-Tub-Shelf-in-BathroomSimple Instagram photos add a bit of color, too.

basement-bathroom-finished-toilet-area

Near the toilet, an added outlet (on the same circuit as a GFI outlet, so it’s grounded) is a great spot for a little night light, or perhaps a fancy heated toilet seat.

For easy clean up, I prefer relatively clutterless counters.  Even so, I love to add something pretty, like a small plant or picture frame along with a drinking glass and soap.

stainless-steel-counters-in-bathroom

basement-bathroom-finished-vanity

  • Trays:  To keep drawers and cabinets free for toiletries, cleaning supplies, etc., I corral toilet paper in a wooden tray or basket.

House-Tour-Four-Years-In-Main-Bath-VanityAgain, keeping necessities in sight avoids awkward searching or running out.

basement-bathroom-finished-vanity-vertical

  • Upgrade shampoo, conditioner, and soap bottles:  I know my OCD is showing here, but I really love how sleek and fancy real soap pumps make a space feel.

House-Upgrades-Rain-Shower

Also handy when you shop at Costco and don’t want to keep a giant bottle in the shower.

basement-bathroom-finished-shelves-and-shower

  • Extra towels:  Have extra space?  Free up room in the linen closet by keeping towels in the bathroom.  A great accessory, but guests can easily help themselves.

basement-bathroom-shelves-finished

Of course stylish garbage cans and shower curtains never hurt.