Importance of Insulation

Bit by bit, progress is happening in the pool house and we’re this close to being able to close up all of the walls.  If you’re feeling like we’ve been working on this forever, you’re not alone.  Officially, we started late last year on the ceiling, which was a task and a half.  Though the rest of this room is relatively accessible, the peaks via ladder, we still have dozens of steps to tackle.  And that’s just the walls and the stuff inside.

Creating beautiful rooms is only half the battle.  Creating functional and efficient spaces is the other half.  The far less glamorous, ugly, tedious, and often underappreciated half.  Right now, we’re still in the ugly phase, but hope to create something beautiful soon.

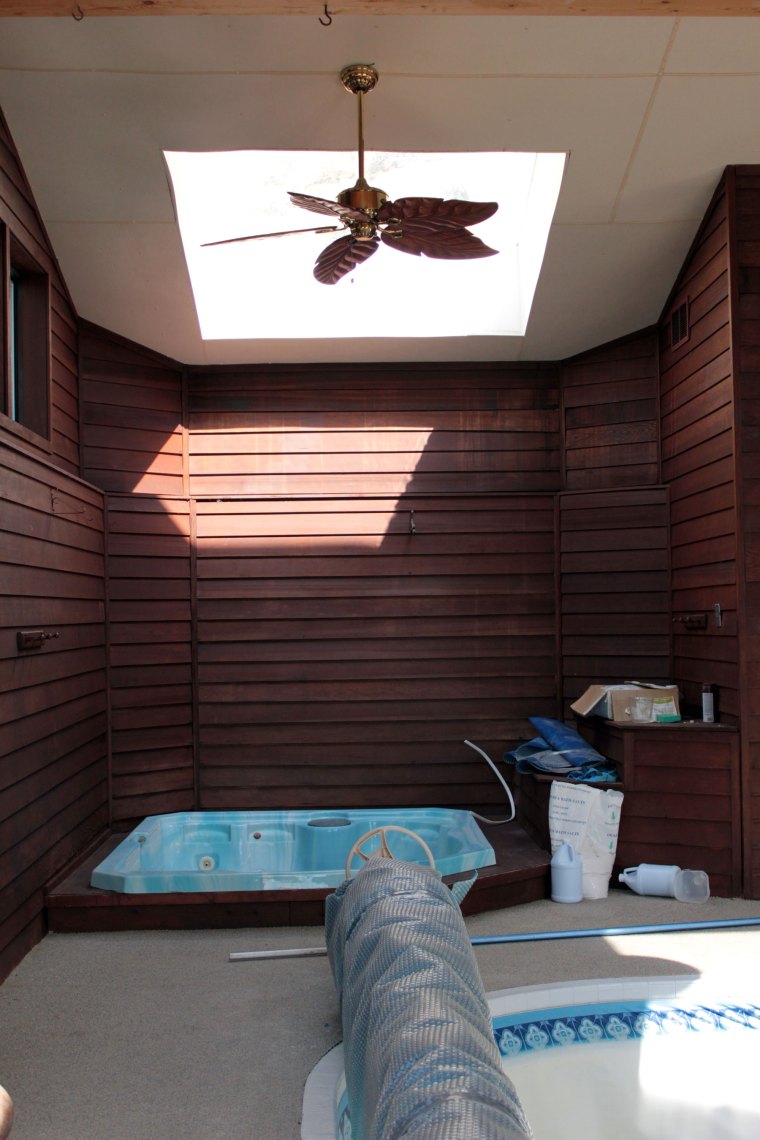
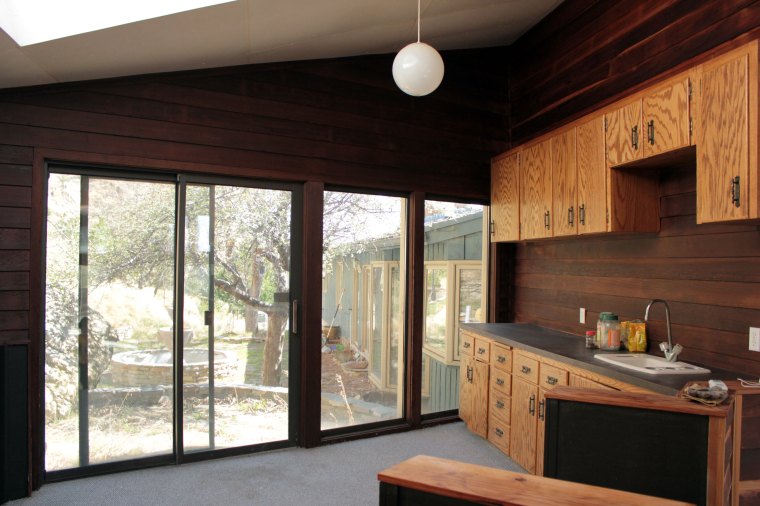
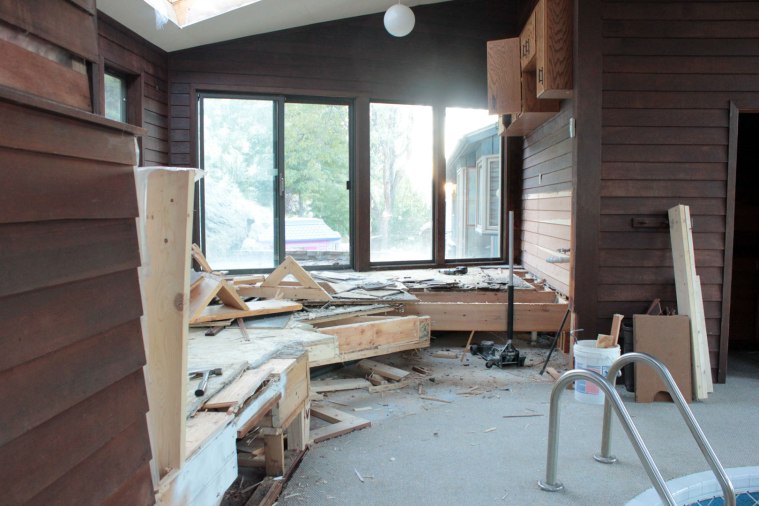
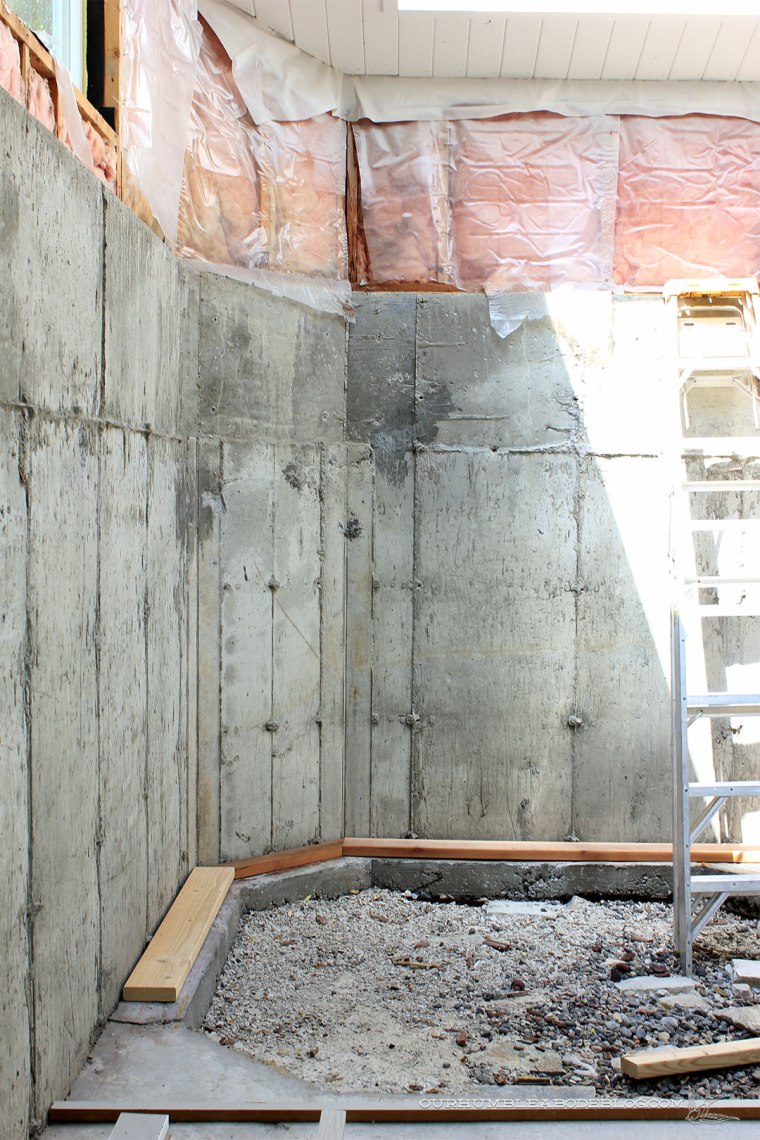
In the five and a half years we’ve lived in this house, the pool never functioned.  Which is a big reason we were able to scoop this house up for the price we did.  Because the pool doesn’t work, we shut off  all the water, hoarded building materials, and never have heated this space.  It’s large, about 1,600 square feet with 14 foot vaulted ceilings.  The majority of the north and west walls (straight ahead and right in the photo below) are concrete foundation due to the steep slope of our lot.

New-House-Pool-Room April 13 2012

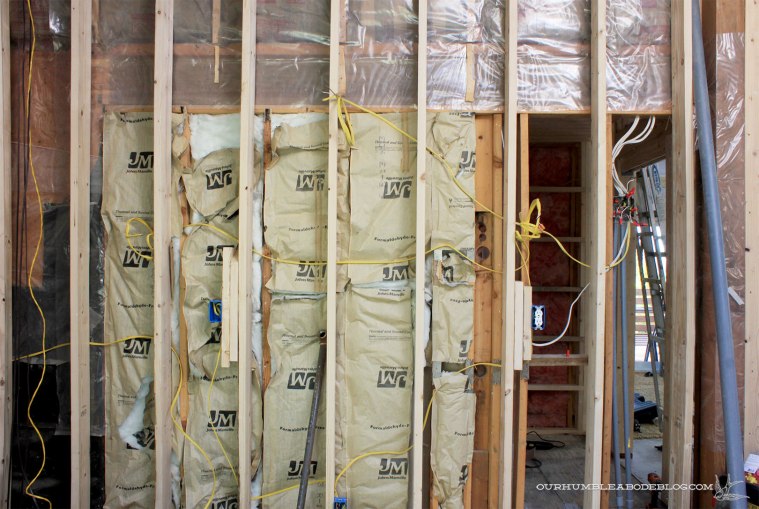
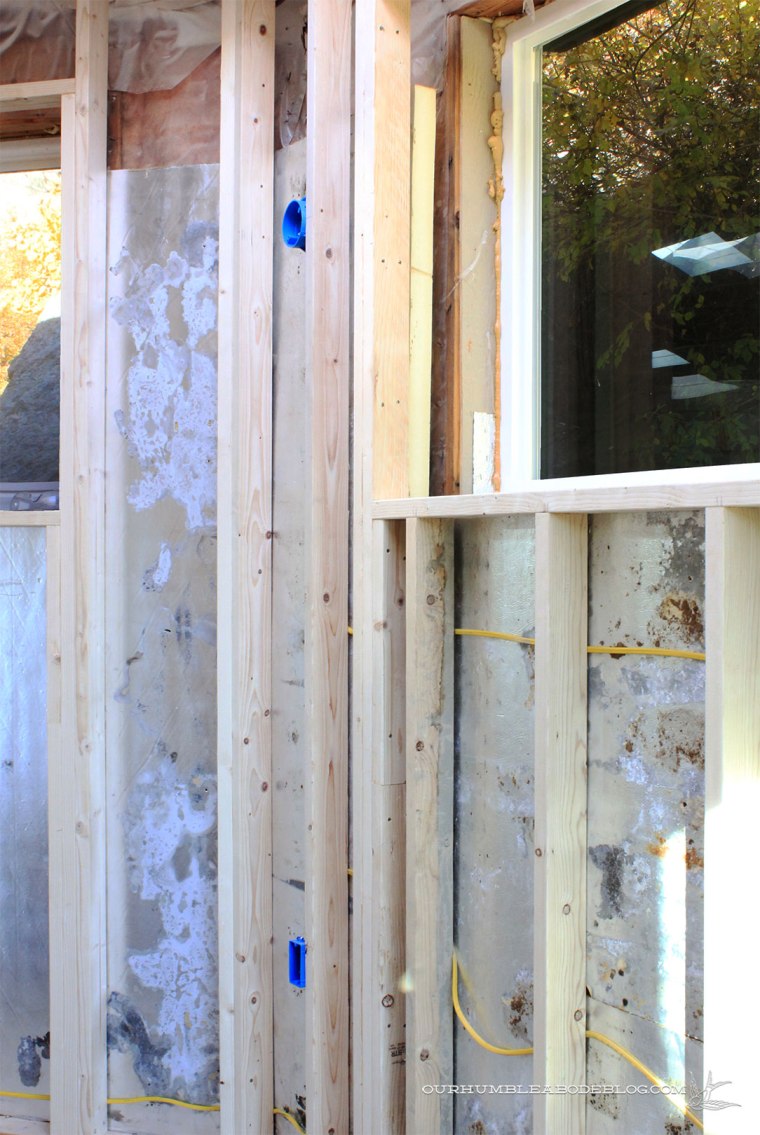
When our house was built in the 70’s, it was typical to build a wood framed wall atop the foundation and fir out the foundation with 2 by 2 inch wood strips.  Essentially, there’s a thin sheet of insulation and that’s it.  Actually, you can see a little bit at the bottom of the left wall in the photo below:

New-House-Pool-to-House-April-13-2012

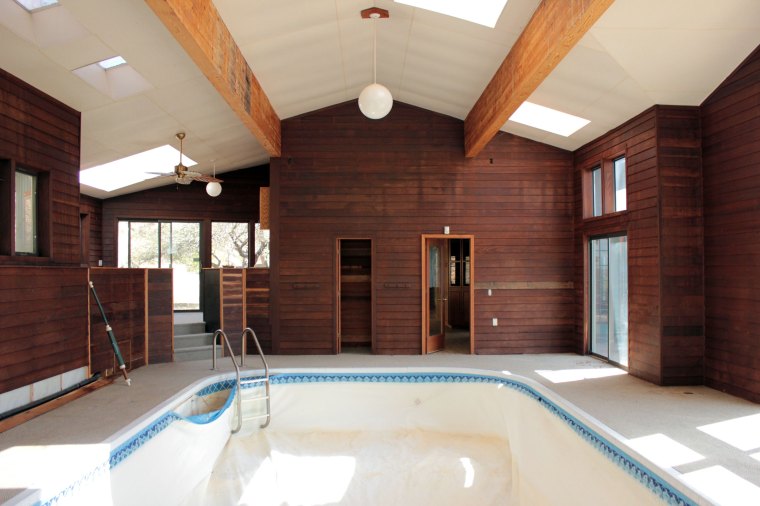
I guess what I’m trying to say is, this room as it was before, was about as efficient as a cardboard box.  And what’s the point of having an indoor pool if it’s impossible to heat the space to a comfortable swimming temperature in the cold months?!

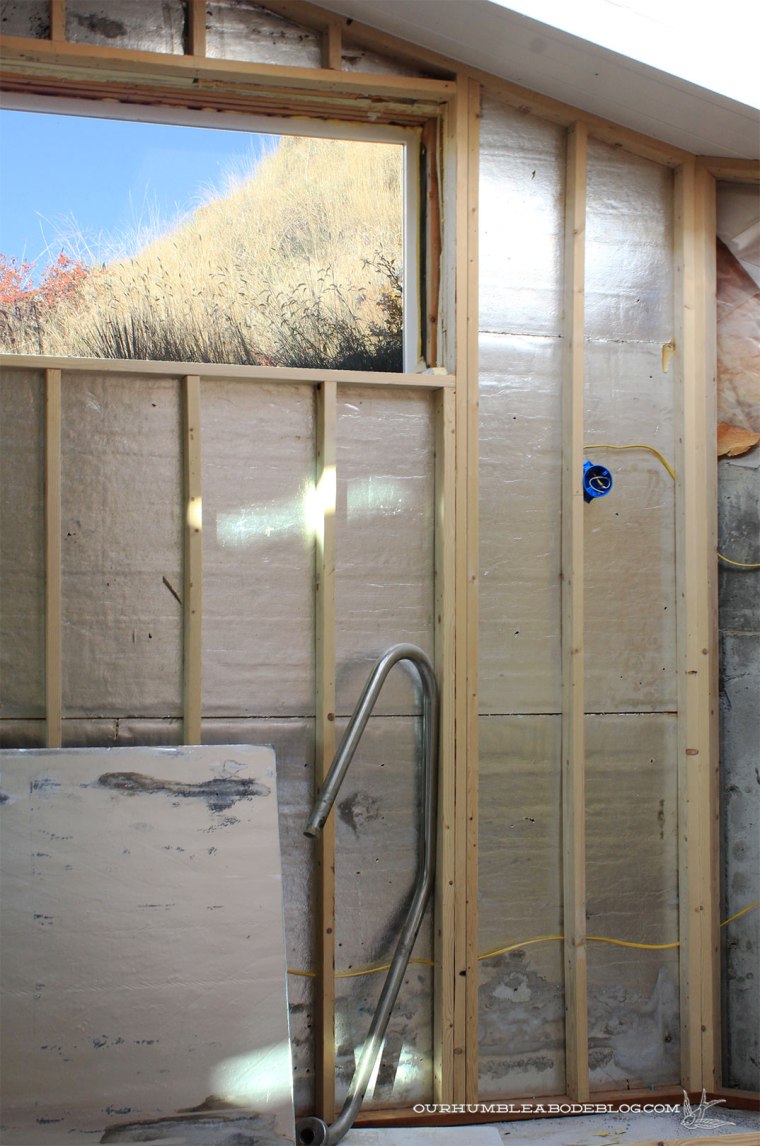
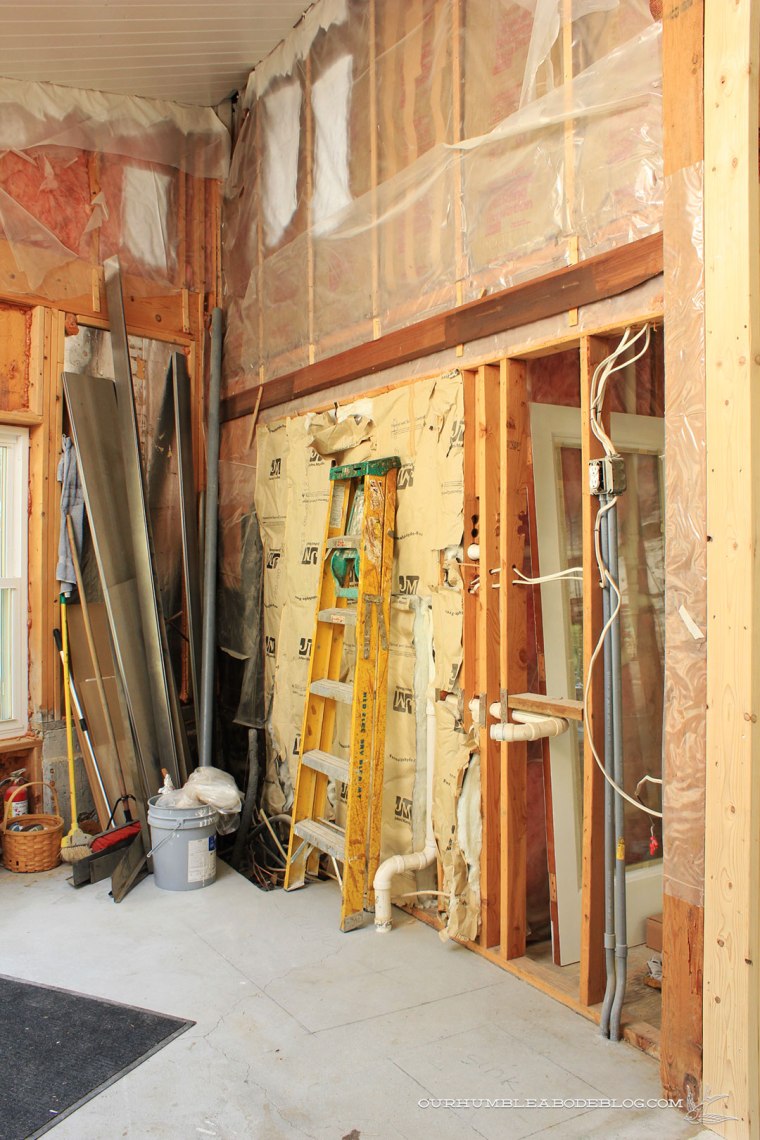
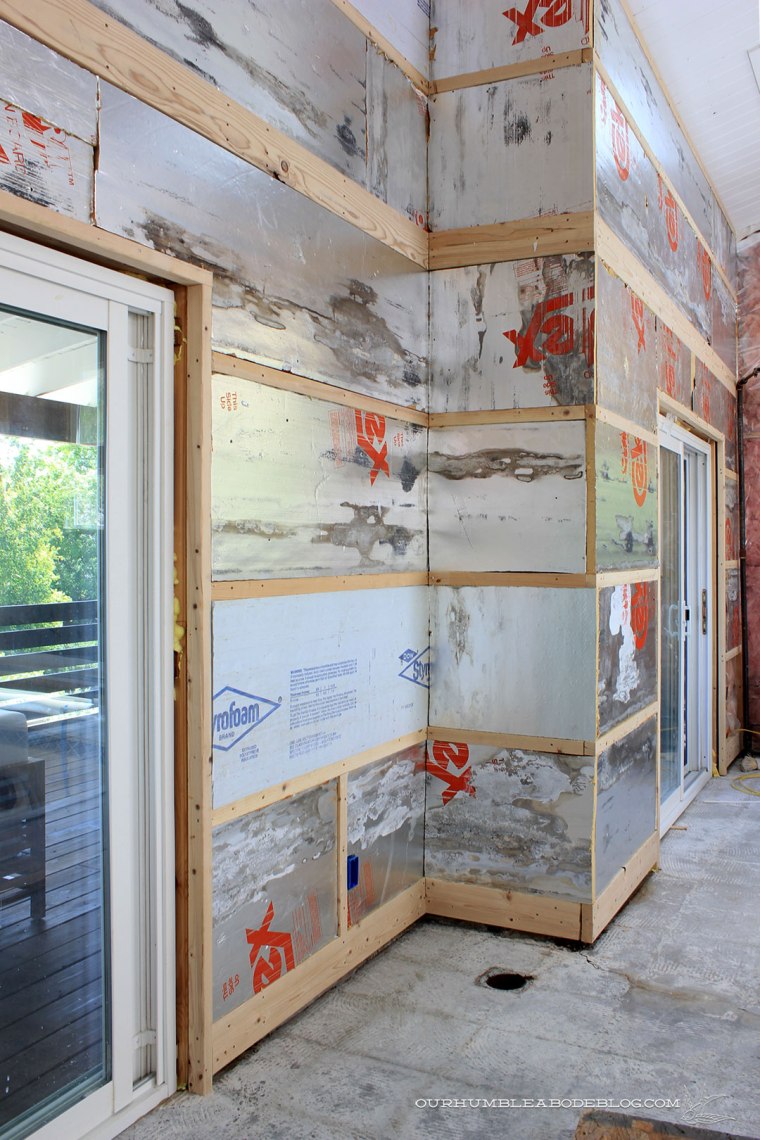
To achieve that, we’ve framed in new 2 by 4 inch walls, tucking insulation between the old and new.  Above the foundation, there’s space for another sheet because we’ve eliminated the half wall step.

Pool-House-Insulation-by-Window

Our new electrical  runs behind the new studs, then Ben adds another sheet of insulation inside each stud bay.

Pool-House-Insulation-Inside-Studs

Each 2 inch thick Polyisocyanurate foam sheet has an R value of 13.  (R value is the resistance of heat flow through a given thickness of a material.)  By doubling, or in some areas, tripling the insulation, we have a total R value between 26 and 39.  Fiberglass batts have an R value ranging from 2.9 to 3.8 per square inch.

Pool-House-Insulation-Above-House-Door

Back in 2014, before we installed our new siding, we took similar steps to insulate the exterior of our home.  Then, when we remodeled our basement two years ago, we followed the same steps I described above.  Immediately, we noticed the house maintained temperature much easier, keeping cool in the summer and warm in the winter.

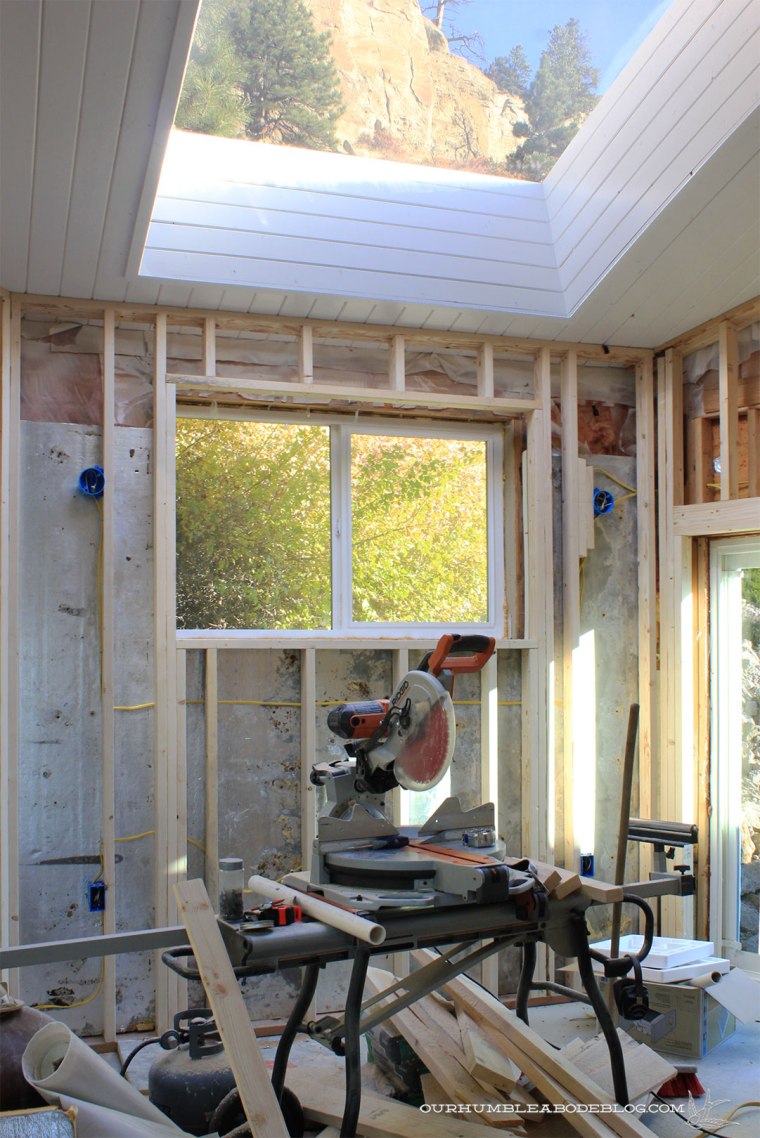
In the pool space, we (let’s be honest, it’s all Ben), have one more section of wall to insulate. We had already completed the front wall, so we took a break from the tedium of insulation to start hanging the 4 by 8 foot sheets of exterior grade plywood.

Pool-House-Insulation-and-Sheeting

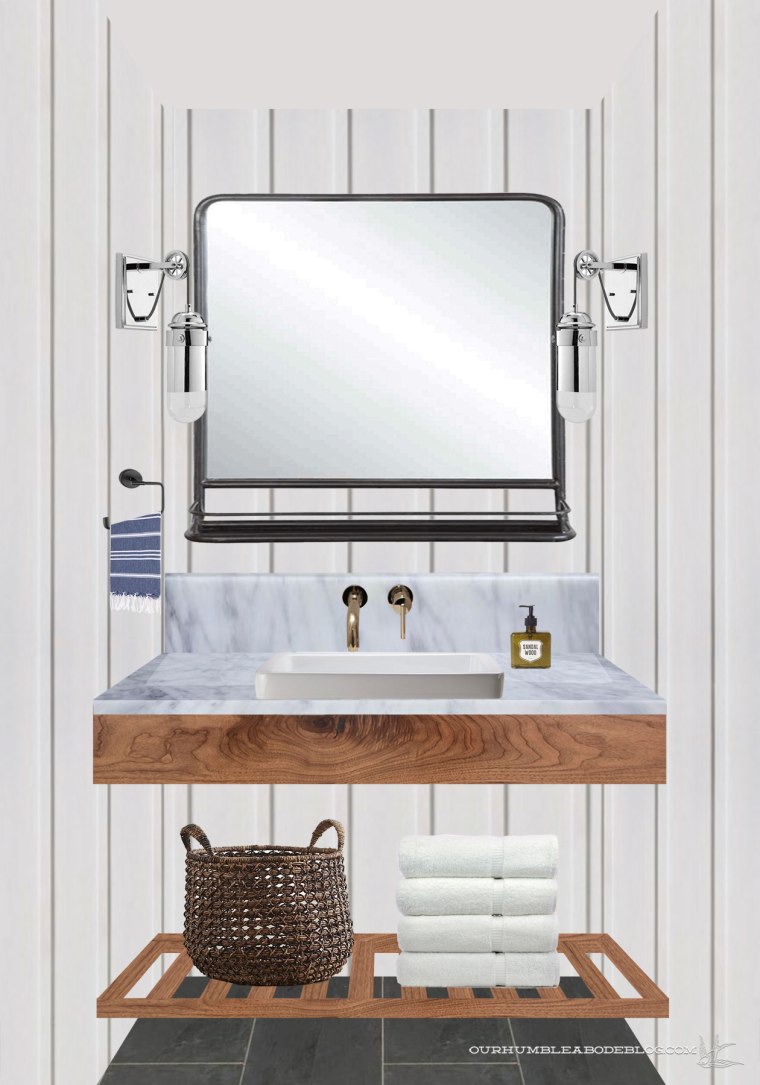
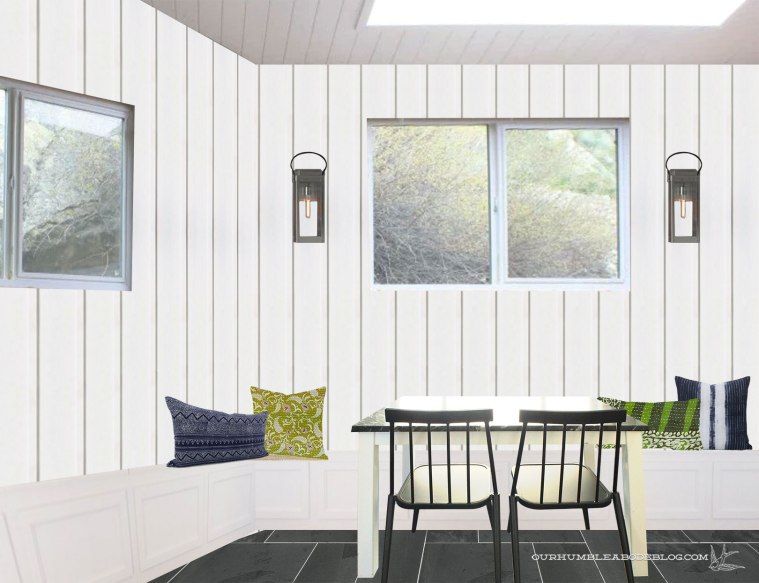
To complete the board and batten wall treatment, we need a durable backing that can perform in this wet environment.  Hanging the sheets requires marking the 8 inch spacing of the future batten strips, nailing in place where the strips will hide the nails.

Pool-House-Sheeting-2

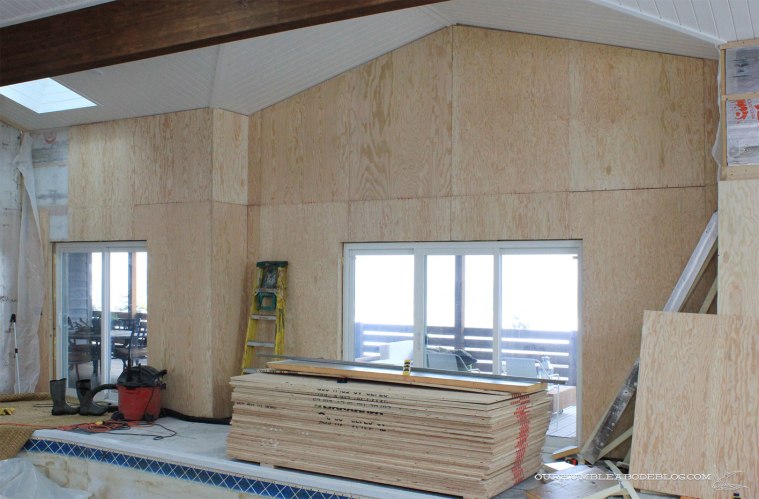
Each sheet hangs 1.5 inches above the floor, to prevent the sheets from wicking up any water near the wall.  Baseboards will cover the gap and thin boards will follow the edge of the ceiling.

Pool-House-Sheeting

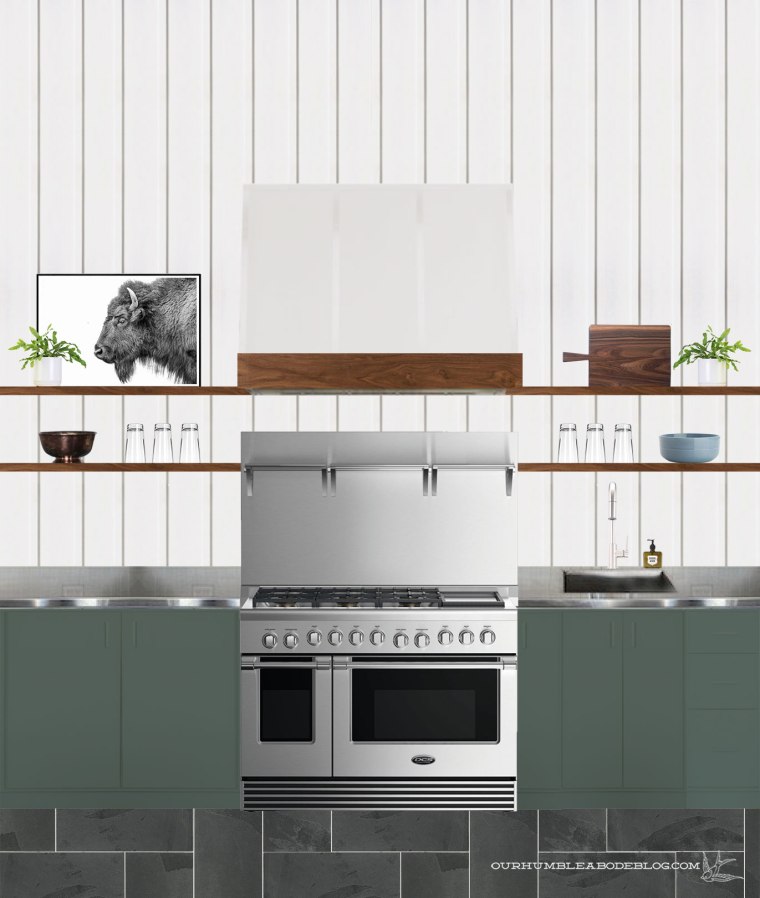
Another horizontal band will line the room at the 8 foot mark, covering the joint of the sheets.  Something along the lines of this, but you know, real:

Pool-House-Board-and-Batten-Design

As usual, there are many steps we need to take before we can get to that point, so we’ll keep working and I’ll keep you posted.

Planning for Electrical

You may have noticed that we’ve been plugging away on the pool house projects.  It’s far from speedy progress, but so far we’ve covered the ceiling in tongue and groove planks and painted it white. We followed that up by widening the door connecting the main house and pool, tore up the old outdoor carpet, and broke up the original tile.  Other than planning for the pretty finishes for the main space, as well as the bathroom and kitchen areas, we’re still in the ugly, dirty stage of remodel.  Each finished task feels like a victory right now, so wrapping up the additional framing and electrical allows us to move forward to insulating.

Bathroom electrical included installing a new bath fan, venting it to the exterior (and not just the attic space).  Two sconces flank either side of the (future) bathroom mirror.  A horizontal 2 by 4 wall allows us to hide the plumbing in the wall, which was hidden in the cabinet before.

Pool-House-Electrical-Bathroom

Hidden plumbing is necessary for our open vanity plan:

Pool-House-Bathroom-Vanity

On the other side of the bathroom wall, the working part of the kitchen has outlets and wiring for under shelf lighting.

Pool-House-Electrical-Kitchen-Side

The guts are all in place to create this set up:

Pool-House-Kitchen-Two-Shelves-Without-Backsplash

Directly across from the range wall will be a kitchen seating area, complete with sconce boxes for accent lighting.

Pool-House-Electrical-Kitchen-Bench-Side


Due to the six-foot square skylight above, an overhead light isn’t possible, but we didn’t want to rely strictly on the recessed ceiling lighting.

Pool-House-Electrical-Below-Skylight

A 17″ tall bench will line the left and back walls, so our outlets are placed just above, if someone wanted to plug-in a phone or computer in this area.

Pool-House-Electrical-Bench-Side

At the far back corner was an in ground hot tub, but it hadn’t worked in at least 15 years.

New-House-Hot-Tub-April-13-2012

Knowing how plumbing can fail, we opted to remove the old tub and instead will replace it with a standalone unit.  A pair of outlets designated for the future hot tub plug-in are at the bottom of the back wall.


Pool-House-Electrical-Hot-Tub-Area

Another pair of sconces will softly light this area.  Determining placement was interesting because of the height of the window in this area.

Pool-House-Electrical-Hot-Tub-Side

Everything that goes on inside the walls is incredibly important for the function of the room, but are easily taken for granted once closed off.  I’m hoping we can cruise through the insulation installation and start closing up the walls with our exterior grade A/C plywood.  From that point on, progress will be much prettier and far more noticeable.

Pool House Kitchen Plans

If you’ve been following for a while, you already know we’ve been chipping away at the pool house, which happens to be the biggest room in this house.  What started as a leaky, water stained dated room is slowly starting to come together.

New-House-Pool-to-House-April-13-2012

This year, we ripped out the old fiberglass ceiling sheeting and painstakingly installed individual tongue and groove pine planks.

pool-house-beams-stained

To create the light, bright atmosphere we’re after, we then stained the large beams and painted the ceiling white.

Pool-House-Ceiling-Overall-2

While already a huge improvement, the rest of the room still needs serious TLC, but today I’m focusing on the plan for this little offshoot area.   What was a wet bar, separated from the main room by three steps, will become a small kitchen.

New-House-Wet-Bar-April-13-2012

Work started in this spot four or so years back, when we discovered the raised platform was completely unnecessary.

Half-Demoed-Pool-House-Wet-Bar

For better flow, we demolished the platform, then lowered the door and window to create a seamless transition from inside to out.

Pool-House-Wet-Bar-Window-To-Lower

Pool-House-Door-and-Window-from-Inside

Today, it looks like this, with the back deck directly through that door:

Pool-House-Kitchen-and-Seating-Areas

Those floating white boxes represent the future range and sink.  We’ll have to reroute the drain pipe that drops into the concrete to be able to center the range on the wall.

Pool-House-Kitchen-Side

Something kind of like this:

Pool-House-Stove-Side

Or maybe this is a better visual:

Pool-House-Kitchen-With-One-Shelf

Before our kitchen remodel, but after we had already purchased the cook top and double ovens, Ben found a 48 inch DCS range with tall backguard on Craigslist for $1,500.  Normal retail price is around $7,000 plus around $800 for the backguard.  Before this amazing find, we planned to add a 30 inch range, which would have cost around $1,500 so this was a huge score.

Pool-House-Kitchen-Two-Shelves-Without-Backsplash

We’ll center the range, with a custom-built vent hood cover and an open shelf or two above.  Seeing as we’ve loved the stainless steel counters in our master bath and laundry room, we’re going that route again here.  A small bar sink will go off to the right, but we’re debating whether or not to add a stainless steel back splash from the counter to the shelf.

Pool-House-Kitchen-Two-Shelves-with-Backsplash

Range    .    Faucet    .    Tile    .    Bison Print    .    Serving Bowl    .    Drinking Glasses    .    Hand Soap    .    Cabinet Color

Over on the other side is an angled wall, with a five foot wide window in each section.

Pool-House-Seating-Areas

The plan includes building benches below, with hinged tops for pool toy, floatie, etc., storage inside.  A pair of sconces will flank the window, with a table and chairs for a little place to hang out or eat a snack.

Pool-House-Bench-Area

Union Square Sconces    .    Batik Pillow    .    Indigo Lumbar Pillow    .    Windsor Chairs

Just this weekend, we stocked up on our sheeting to cover the walls, hoping we can start hanging it soon!  Where do you fall on the one or two shelves?  How about the stainless back splash?

P.S. For more pool house progress and plans, check out the overall design board as well as the bathroom plan of attack.

Pool-House-Bathroom-Vanity

Pool House Bathroom Remodel Plans

We’re in the thick of summer and a prolonged heat wave with temps near or above 100 for a few weeks now.  I mention this because the heat and lack of air conditioning in the pool house make for rough working conditions, thus very little progress.  Now more than ever, the prospect of a pool is really appealing and we’re excited to get the space finished.  To keep myself busy (and in the cool climate controlled house), I’ve spent more time researching the exact designs and products for the space.

I’ve always had a rough picture in my mind, but now’s the time to track down every.last.piece that will go into this area.  Planning the half bath is perhaps my favorite part, so let’s get into the design.  I took to Photoshop to translate the vision in my head onto paper, err, screen.

Pool House Bathroom Vanity 2

This is the only half bath we’ve ever had in a house, and it allows a bit more fun, less practical choices than a full bath.  That doesn’t mean it won’t be hard-working.

Pool House Bathroom Vanity Labels

1  As with the rest of the pool house, the plan includes covering the walls in white board and batten for a bright, blank canvas.  2  We’ll also carry the Montauk Black slate into the bathroom for continuity.  3  With the black and white foundation, we need to add a warm wood to the mix, just as we did in our master bathroom.  Unlike the master bath, this half bath doesn’t need much in the form of storage, and a cabinet will surely accumulate junk.  Enter, stage left, the open walnut vanity of my dreams.  The top plank will hide the sink, with a slatted shelf below, perfectly modern, without room for clutter.  4  These Beaker sconces are one part industrial, one part nautical, and fully perfect for this bathroom.  5  Wall faucets are so sleek and simple, I think this is the perfect place to incorporate the Delta Trinsic in chrome, to match the sconces.  6  Clean lined vessel sinks are a go to of mine, but I want to go slightly off course with this semi-recessed vessel option.  7  I adore the collected look of mixed metals, so in addition to chrome, I’ll toss some matte black accessories in there, too.  We’ll need an odd sized mirror in this room, so I have plans to DIY a similar mirror with a slim shelf to store a small jar of cotton swabs and a lotion pump, both items I need after swimming.  8  Bringing in another black accessory to tie in with the mirror, this Trinsic towel ring is elegant and simple.  9  Cute Turkish hand towels will add a bit of pattern and color.  10  For a luxe touch, I’ll add  a beautifully scented Izola soap in a gorgeous and reusable glass dispenser.  Of course I have to add a little bit of green.  11  We’ll corral toilet paper in a cute basket, perhaps this wicker option or this black wire one. On the other side of the vanity shelf, we’ll stack extra towels.

I’m not 100 percent sure, but I’m leaning toward a white painted drywall ceiling for simplicity.

Pool-House-Bathroom-Vanity

The other thing I’m undecided on is whether to add a marble back splash or not.  It’s a look I love, and it certainly would be more durable.  What’s your vote-back splash or without?

Over on the toilet side, things are much simpler.

Pool House Bathroom Toilet Side

In this small space, I don’t want to overwhelm the room with stuff.

Pool House Bathroom Toilet Side2

1  The lack of natural light in this room, especially compared to the rest of the pool house which is so bright thanks to the generous windows and skylights, feels so dark.  Granted, before the walls were clad in dark stained wood and the only light source was an old light/fan combo.  To bring a little natural light in the room, we’re repurposing an old glass door by painting the frame and frosting the glass, similar to this one.  2  Carrying a bit of the warm wood to this side in the form of picture frames will make this side feel less stark.  3  For a burst of color, movement, and interest, I’d love to add gorgeous abstract art, like the Coral and Palm Nights prints from the talented Britt Bass.  4  While in Minnesota, I took a quick run (45 minutes start to finish!) through Ikea and grabbed a Grundtal toilet roll holder for this space.  The simple design was only six bucks, but I think I’ll paint it matte black to keep the mixed metals to chrome and black.

We’re still far off from the bathroom actually looking like this, but I find it helpful to get my ideas down, not only for myself, but also to show Ben what I have in my mind.  And in store for him in the building department.


The Slow Slog

These last few weeks have been hectic, with the school year wrapping up, complete with several fun field trips-yay!  We’ve also spent plenty of time helping friends of ours with projects for their upcoming wedding-double yay!  The combo of the events means very little has happened on the home front in the last few weeks-boo!  The little bit that has happened is boring, but necessary for the future wall finish.

Pool-House-April-Progress-Kitchen-Door

I think I confused at least a few people when I mentioned building new walls, as it implied we’re building interior dividing walls.  Instead, we’re building new walls following the exterior walls, simply to add insulation and electric.

Pool-House-Door

This pool space is large, around 1600 square feet.  Adequately heating this large area is crucial, especially if we want to be able to use it through the winter months.  To keep as much heat in without a furnace constantly running, we’re building another wall, just inside the perimeter.


Pool-House-Back-Wall-Studs

Another wall gives us plenty of space to tuck insulation in front of the previously minimally covered concrete wall.  It also eliminates the half ledge where the concrete and stud walls meet.  Before, only 4 outlets were in the entire 1600 square feet: the pump room, one in the bathroom, and two in the wet bar.  We’ll add outlets around the room, all GFCI connected for safety.

Before we can add walls around the hot tub area, we have to fill the hole with concrete.  In place of the previously broken and recessed hot tub, we’ll have an above ground, stand alone tub.  These self-contained models are much easier to work on, or replace if it becomes broken beyond repair.

Pool-House-Hot-Tub-Area

The front wall that connects to the deck is a slightly different situation, as it doesn’t need insulation because it is a full stud wall.  So it was already done, right?

Pool-House-Carpet-Removed-Left-Side

Nope, because the 24 inch stud layout doesn’t match up with our wall treatment.  Knowing we’re going with a board and batten finish, we need a 16 inch on center stud placement to be able to hide the nails behind the batten strips.

Pool-House-Front-Wall-Studs-and-Insulation

To avoid building a full wall, we opted to attach 2 by 2 strips horizontally along the wall.  This will allow us to nail into the strips at 16 inch intervals, but doesn’t add a thicker wall.

Pool-House-Front-Wall-Insulation

Tucking insulation between the strips is just a quick way to make use of the space between the boards.  A solid wall is the turning point when a project starts to look and feel finished.  It’s the culmination of all the hard work that goes on behind the scenes, er, walls.