Freeze Frame!

Near the beginning of the year, I ordered a lovely 18 by 24 inch leaf print from Minted, with intentions of immediately hanging it in our living room.  After coming up short on the perfect frame, I planned to make a 24 by 30 inch frame to protect and display the print.  At that time, we were just beginning our kitchen remodel (which is still nearly finished, with one more cabinet to build and hang-hence the lack of reveal) and time was limited to pertinent projects only.  Until recently, the frames were on the back burner, but after seeing the art sitting in my closet, begging to be seen by others, I jumped in and got it done.

Before building, I bought two pieces of plexiglass from Ace Hardware because these frames are in the living room and could get bumped or hit with a ball.  Shattered glass is always a concern with two boys in the house, so this seemed like a safer choice.  You certainly don’t need to buy glass first, but if you’re making a big frame, make sure your size is available before building.

For my project, I wanted a square edge thin frame, so I bought four 1 by 2 sticks and had the store cut each one into 3 and 5 foot lengths.  To create the channel for the glass, mat, and backing to rest in, I had to router out a groove.  Pine is a soft wood, so I found it easiest to clamp a few boards down to create a guide to run the router against.

DIY-Picture-Frame-Clamped-Before-Router

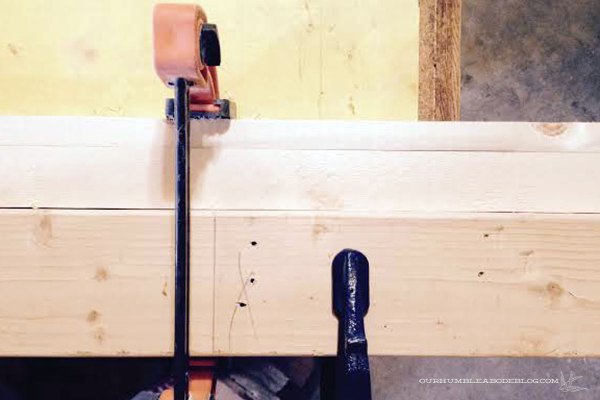
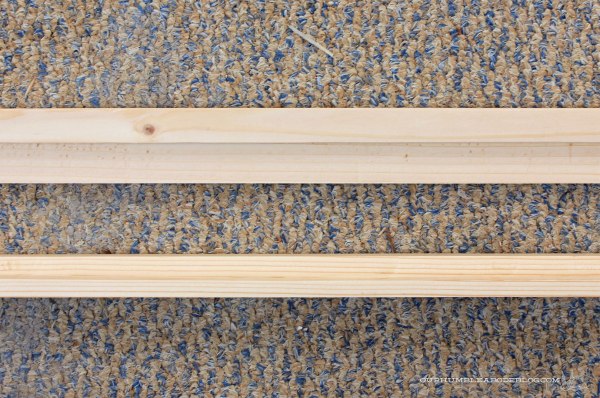
I set the router depth to 7/8 inches deep and slowly let it cut the channel, slowing at knots or weak points to prevent splitting.  Then I smoothed everything out with a thorough sanding.  Below, the top board shows the wide side, and the bottom the narrow face after cutting.

DIY-Picture-Frame-Routered-Strips

After grooved, I cut my pieces to length, mitering the corners but leaving an extra 1/8 for a little wiggle room.  Cutting after left perfectly square inside corners that a router can’t create after assembly, and with such a small face, I didn’t have much space to lose.

DIY-Picture-Frame-Checking-Corners

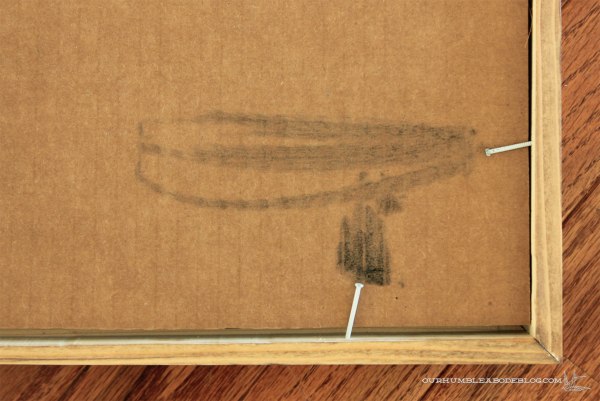
With tight corners, I pulled the glass out and held the pieces tight before nailing.

DIY-Picture-Frame-Mitered-Corner

I found it easiest to set the two sides on a flat surface, letting just the corner over hang the counter while nailing.  This way, I didn’t angle the nailer funny to shoot it out somewhere and with narrow margins, it was important.  Two little nails are visible on each side, but not noticeable after staining.

DIY-Picture-Frame-Side-Nails

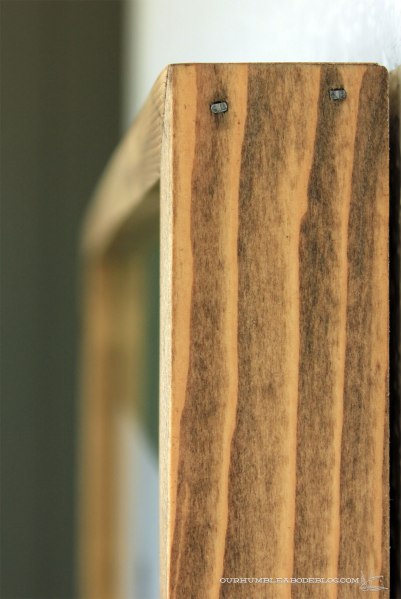
To darken the pine, I applied a quick coat of Special Walnut stain.  I love the richness it adds to the cheap wood, and it brings out the character of each board.  Normally, I’d staple the glass, mat, and backing in place, but I didn’t want to weaken the thin sides.  Instead, I tapped small nails in.

DIY-Picture-Frame-Backing

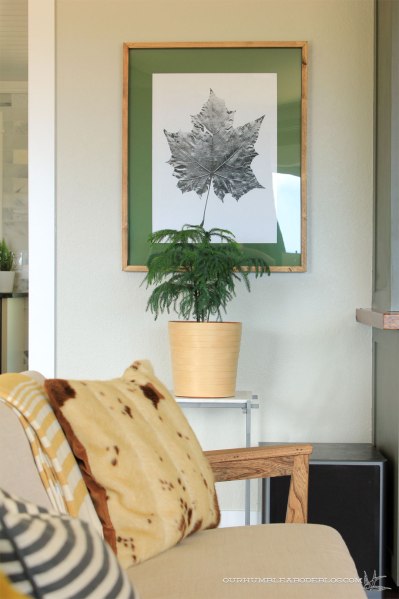
And there’s the King now, matted in grass-green to bring a little splash of the curtain color across the room.

DIY-Picture-Frame-Right-Side

DIY-Picture-Frame-Side-Profile

To balance out that print, I dried a maple leaf, photographed it, edited it, and printed a black and white engineer print.

DIY-Picture-Frame-Left-Side

Finally, we have art flanking the entertainment center, even more importantly, out of my closet!  Another to do list project is just staring at me in that last photo-move or create a cover for the ugly subwoofer.  With a cover, I could make it look kind of like a plant stand, right?  Let’s be honest though, who knows when that’ll happen; we’ve waited on entertainment center doors for years.  Perhaps that should happen next.  It wouldn’t be much different from making picture frames, but these would hide the ugly junk.

Rusted Steel & Curb Appeal

In last week’s deck and garden update, I shared a few pictures with peeks at the CorTen steel siding that has now started to rust.

Back-Garden-and-Deck-from-Side-Stairs

For those not familiar, CorTen is a steel alloy that develops an outer layer of rust patina, protecting from further corrosion. When purchased, the steel is gray with a slight sheen but as it is exposed to weather, it rusts, but only as a surface layer.

Standing-Seam-Steel-on-Back-of-House

Snow, rain, and two rounds of spraying with a water/vinegar mixture has warmed it up, though the process isn’t perfectly even.  See how much darker the rust looks closer to the house roof?  Vinegar quickly starts the rusting process, and helps even out the color.

Pool-House-Back-Rusted-Steel-Wall

Right after install and before rusting, the front looked very monotone and boring.  We wanted a maintenance free material to contrast against the traditional painted lap siding and break up the long, simple rectangle.  When freshly installed, the steel looked like a shiny version of the gray painted lap siding.

Standing-Seam-Steel-on-Front-from-Side-2

The addition of plants, the start of our bedroom balcony, and weather, the front looks very different.  When fully rusted, it actually looks like stained wood board and batten from short distances.  Once up close, the mottled look is noticeable and proves it’s actually rusted steel.  Again, you can see where moisture naturally hits the siding versus the eaves and protected areas.  Another round of spraying is on my to do list soon.

Rusted-Steel-Siding-on-Bathroom-Bump-Out

Notice how similarly toned the stained beams and bench are to the rust?  After finishing the railing install and staining, our balcony will fit right in.

Front-of-House-Side-Angle-Rusted-Steel-Siding

Rusted-Steel-Siding-Front-Door-Detail

When sprayed, gravity comes into play and darkens the bottoms more.  I’m going to experiment with a rag to see if rubbing vinegar will even out the top sections-at least on the easy to reach parts.

Rusted-Steel-Siding-Under-Bedroom

The most evenly and thoroughly rusted side is the garage end.

Rusted-Steel-Siding-on-Garage-End

A lack of overhang leaves the entire section open to water.  Note: even after fiddling with settings, some of the colors are a little off; the photo above is the most accurate color representation of the paint and steel.

Garage-End-Rusted-Steel-Siding

The local supplier/manufacturer created custom edge trim to go over the painted frames to help prevent the steel from dripping on the white.

Rusted-Steel-Siding-Variation-Detail

One area got a little more water and it has streaked the white on one side, but that’s nothing a quick coat of paint can’t fix.

Rusted-Steel-Siding-Left-Garage-Side-Detail

So far, we’re 100% thrilled with the results and ease of care, and our neighbors seem pretty happy as well.  On several occasions, people have stopped to compliment the new look, which is nice to hear considering our house is part of their view.  Heck, they probably look at the exterior more often than we do!

Butt of the Square

As our outside comes together, I’ve been furiously planting.  Almost 60 assorted plants over our property in the last few weeks.  Which spurred me to add a dose of life next to the front door.

Square-Planter-Box-with-Front-Door

With an 8 foot tall door, I wanted something taller, to not look dwarfed by the oversized door.  A small tree would have been gorgeous, but I didn’t want to block the doorbell.  After thinking about it, I might try a dwarf fruit tree.  We’ll see.  Before building this planter box, I looked at local nurseries, hardware, and home improvement stores but didn’t see any taller planters I liked.  DIY to the rescue.  Using four 8 foot long 2 by 4s and scrap 2 by 2 strips, I built a modern square planter box.

Square-Planter-Box-Filled-by-Front

Before building, I decided I wanted a 17 inch square box six boards (21 inches) tall.  To start, I cut twelve boards into 17 inch lengths.  With the butt end design, opposite sides are the same length, but the adjacent pieces are shorter to fit between.  For the design to be square, I cut twelve more sections at 14 inches long (the overall size minus two 2 by 4 widths).

Square-Planter-Box-Starting-Corner

Based on my finished height of 21 inches, I cut four 20 inch tall 2 by 2 pieces to secure the corners to.  I didn’t want see the nails or the corners once filled.  Working on a flat surface with a square, I set my pieces together and nailed 16 gauge 2 inch long finish nails from the inside, through the 2 by 2, into the 2 by 4.  Much like hardwood flooring, getting the first row straight or in this case, square, makes subsequent rows go smoothly.

From there, adding boards, rotating the exposed ends is the name of the game.

Square-Planter-Box-Assembly

I love the simple interest the staggered exposed ends add.

Square-Planter-Box-Corner-Detail

Once finished, the corner posts are tucked an in below the rim and are easily covered.

Square-Planter-Box-Inside-Corner-Fasteners

Before staining, I smoothed out the rough lumber with 80 grit sandpaper, slightly rounding the corners at the same time.

Square-Planter-Box-Before-Sanding

Wanting to accent the exposed end detail, I stained the box light gray.  It darken the end grain just enough to really make it pop.  To create the base support, I nailed scrap wood flush with the top of the third board down.  Then used another scrap of 3/4 inch material for the base, notching around the corner posts.  Sadly, I couldn’t find a square plastic hole-less liner to fit inside.  I improvised with four layers of thick plastic.  I really don’t want this leaking out and rotting the wood.

Sqaure-Planter-Box-Plastic-Sheeting-Liner


With the hard parts done, I got to fill it up with pretty plants my little helpers picked out.

Square-Planter-Box-Front-Detail

Aromatic lavender, fuzzy lamb’s ear, a purple sweet potato vine, and a small basil plant.

Square-Planter-Box-Top-Detail

With such a versatile design, I’d like to build a longer box to create a mini herb garden for our back deck.  The basil may get swapped to that one later on.  And at the end of the season, I can plant both the lavender and lamb’s ear in the ground.

Guest Green

I’m finished with the quick and cheap guest room update.  I wouldn’t consider it a makeover because all I really did was repaint the walls, upholster the headboard, rearrange the bookshelves, and swap a few furniture pieces.  Add in a few accessories and voilà, new room.  For a full walk down memory lane, here’s the room the day we got the keys to this house:

Good starting point, but it was dark and drab.  I quickly unloaded the books and accessories on the shelf and we pushed the bed against the only wall wide enough for a queen bed.  Not at all better.

To add another foot of usable space opposite the bed, we carved out a little nook in the shelves, adding sconces for a cozy space.  A larger window, white paint, and color cheered up the room tremendously.

Almost three years after finishing that, it didn’t flow with the rest of the house.  It’s not that I didn’t like the room, it now felt chaotic and cluttered.  Not wanting or needing to completely overhaul the room, I devised a plan to shake things up while toning it down.  All for under 100 bucks.  Ready to see it now?

Guest-Room-Makeover-Green-Walls-Upholstered-Headboard

I always say this, but paint offers the most bang for your buck when changing a room.  For only $25 the room is calmer, but still has color.  After comparing swatches, I settled on Thicket by Benjamin Moore, color matched at Home Depot.  It’s a mid tone green with subtle brown undertones, making it soft.

Green-Swatches-for-Guest-Room

Another easy change that cost twenty dollars was the upholstered headboard.  Two yards of natural linen fabric, batting, and a staple gun covered the old painted panel.  Better yet, it took two hours, tops, to knock it out.

Guest-Room-Upholstered-Headboard-Detail

I adore the softness and texture it adds.

Guest-Room-Upholstered-Headboard-with-Right-Side-Bookshelf

Guest-Room-Upholstered-Headboard-with-Left-Side-Bookshelf

Changing the bookshelves might be my favorite update though.  More on that soon.

Guest-Room-Upholstered-Headboard-and-Bookshelves

For another $20, I got a cream and gray stripe cotton throw from TJ Maxx.  Using more of my Fab.com credit, I chose a light rose Pendleton wool pillow.  Yet another fast way to add texture and pattern to the room without committing to anything drastic.

Guest-Room-Wool-Pillow-Detail

Shuffling furniture from different rooms was another free way to change the mood of the room.  Previously, a petite mid-century dresser sat against this wall.  I love it, but it always seemed just a tad small.

Gallery-Wall-in-Guest-Room

Moving my grandpa’s old dresser up from the basement took only a few minutes.

Guest-Room-Makeover-Green-Walls-and-White-Dresser

Just a few inches wider and taller, it fills out this side, but still leaves breathing room.

Guest-Room-Makeover-Green-Walls-White-Dresser-Chair

Perched atop is a small lamp, a few accessories, and what may be my favorite new houseplant.  This Rhipsalis, found as a hanging plant at Home Depot, thrives in low light.  Perfect live greenery for this north facing room.

Guest-Room-Dresser-and-Art-Detail

Oh, here’s another tip.  When artists include art on business cards, don’t throw it away.  Cut a small chunk of trim to size and mount the card to the front.  Tiny little art to settle in.

Guest-Room-Dresser-Accessories-Detail

Years ago, I received an old oak chair from my great-grandmother.  After sanding the peeling finish off and replacing the seat cushion, it’s a piece I love.

Green-Guest-Room-Dresser-Chair-and-Art

It still has plenty of character, but the wood tone against the green wall was too good to pass up.  A stack of stripe towels are guest ready and in sight.

Guest-Room-Chair-with-Towels

The bird, tree, and feather gallery wall is still my favorite collection/grouping.

Guest-Room-Makeover-Green-Walls-Toward-Door

Even better, it covers up the old sconce boxes, so you’d never know they’re behind there.

Guest Room Without Sconces Gallery Wall

So that’s the story on the calm and nature inspired guest room.  Even better, it cost about sixty-five big ones.

Cha-Cha-Cha-Changes

Our guest room was one of the first rooms we tackled after moving in.  Not much has changed since finishing it.

While I like the room on its own, now that we’ve worked on more of the house, it doesn’t exactly flow with the rest of the house.

Guest-Bedroom-Painted-Safari-Headboard

Fortunately, it’s nothing a can of paint, a few yards of fabric, and a little rearranging can’t fix.  For the walls, I’m really feeling an olive-green, to cozy up the room.

Green-Swatches-for-Guest-Room

After painting the main bath vanity Tate Olive, I started thinking about making similar changes to the guest room.

Our Humble Abode Blog Main Bathroom Vanity

Using leftover paint, I made a sample board on a scrap of foam core.

Tate-Olive-Sample-Paint-by-Bookshelf-Left

Clearly I like the color, but for an entire north facing room, it might be too dark.  In the much brighter south-facing master bed and bath, I didn’t hesitate to go dark and bold.

Tate-Olive-Sample-Paint-by-Closet

On the other hand, it could be warm and enveloping.  The wall of white bookshelves brightens up the room, too.  When paired with a linen upholstered headboard, the natural tones would be perfectly earthy.

Guest-Room-Headboard-Swatches

If Tate Olive is too dark, I found Thicket, a lighter, still similar color.  After paint, the other side, opposite the bed, will get a little change.  I still love the art and arrangement, but I’d like to repaint the dresser top.

Perhaps new curtain panels, too.  The rolled shade is easy to close, but annoying to roll up to open.  How do you feel about dark colors in small spaces?