Goodness Gray-cious

My quest to repaint the entry, living, and dining rooms took a lot longer than I expected.  First painting the new crown and waiting for it to thoroughly dry.  Next, a last coat on the tongue and groove wall.

Finished-T-and-G-Plank-Entry-Wall-with-Horns

Followed up with a first coat of paint on the walls.  Then tackling the ceiling where my shoulder and neck started cramping.  I ran out of wall paint and went back to get a third gallon, but we had issues matching the color, so the walls are slightly different from my original color.  But, now these dingy peach walls:

MCM-Sofa-in-Living-Room

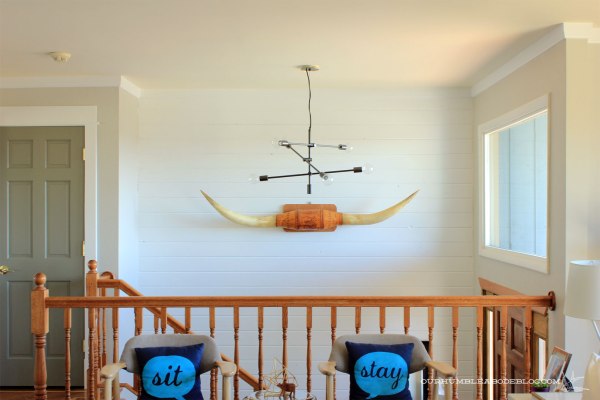
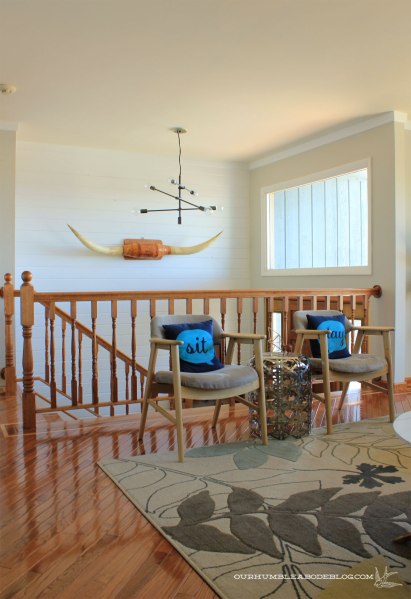
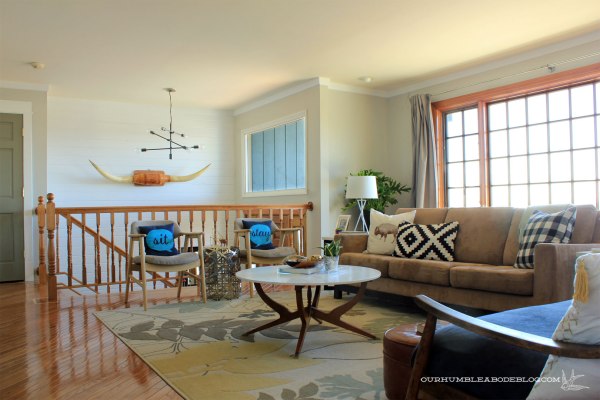
Are no more.  Totally worth the days of plowing through.  Instead we’ve got fresh light gray walls to bounce the light around.  Make no mistake, the room is still one thousand miles from done, but much improved.

Living-Room-Painted-Oyster-Pearl

And hey, we’ve got a solid color.  No more patched sheet rock or paint swatches.

Dining-Room-Painted-Oyster-Pearl

Unfortunately, I can’t say they’ll stay that way forever.  The too tall French door will become a standard window and the bay window a sliding door.  After replacing the windows, we’ll update the window trim to match the rest of the house.  If I nail down my stair railing plan soon enough, we might be able to replace it soon, too.  Say it with me, no more orange stained oak!

Living-Room-Painted-Oyster-Pearl-with-Stairs

For now, I’m just happy to have baseboard (and the entertainment center toe kick!) and blank walls.

Living-Room-Painted-Oyster-Pearl-Black-Chair

This was unfinished far, far too long.

Herringbone-Plant-Pot-and-Thrifted-Chair-Overall

Whenever I paint, I pull out every nail, patch it, and then start anew.  Which is why I have only a few frames on the walls.  Still deciding on the rest.

Living-Room-Painted-Oyster-Pearl-Window

Even so, I’m not desperate to slap things up in an attempt to hide something ugly on the walls.

Living-Room-Painted-Oyster-Pearl-Behind-Sofa

And that’s the power of paint.  Or love, as Huey Lewis might say.  Sweet, sweet victory.  Even if I will have to do it all over again after windows.

Hung Up on Horns

I’ve still got one coat of paint to finish the ceiling, but the rest of the entry, living, and dining room painting is done.  It’s amazing how much lighter and brighter everything looks.  Especially the entry.  Boy has it come a long way over the last month or so.  We started with this beige box of ugliness:

Entry-Problems-and-Plans

And now we’ve got a modernized, slightly rustic, light space.

Finished-T-and-G-Plank-Entry-Wall-with-Horns

Peachy beige walls looked sad and dingy, especially against my vintage Longhorns.

West-Elm-Mobile-Light-in-Entry-from-Dining

To create a light backdrop with warm texture (not the heavy knock down), Ben hung tongue and groove pine planks.

Tongue-and-Groove-Entry-Wall-Install

Installing simple crown moulding throughout the room for a crisp edge helped finish off the top of the accent wall.

Tongue-and-Groove-Entry-Wall-from-Living-Room

And giving it three good coats of white paint to finish it off for a neutral backdrop.

Sofa-and-Chairs-in-Living-Room-Toward-Stairs

Along with the freshly painted light gray walls, the room feels clean and fresh.

Finished-T-and-G-Plank-Entry-Wall-with-Horns-Detail

Not only does the tongue and groove cover the giant wall of knock down, it also acts as a huge stud wall.  Planks nailed into studs every 16 inches are completely secure, and the boards can easily hold the weight of art.

Finished-T-and-G-Plank-Entry-Wall-with-Railing


Don’t the horns and light fixture contrast nicely now?

Finished-T-and-G-Plank-Entry-Wall-from-Front-Door

Once our new windows come in, hopefully next week, we’ll replace the door and window.

Finished-T-and-G-Plank-Entry-Wall-with-Console

Usually a fully white wall feels sterile and cold to me, but the knots and grooves keep it interesting.

Finished-T-and-G-Plank-Entry-Wall-in-Living-Room

I’ve never had an accent wall, but I have to say I love it.  Seeing the horns and light against it just makes me giddy.  My parents will be here soon, and I’m excited for my mom to see her horns proudly displayed.

The Ole Switcharoo

Unfortunately I’m still not finished painting the entry, living and dining rooms like I had hoped.  However, I did get a first coat on the ceiling and walls.  We hauled the big furniture out so I didn’t have to work around it.

Painting-Living-Room-Ceiling-Empty-Room

While the sectional was out, I fully realized how much the big beast closed off the room.  Though I still have another coat to put on the ceiling, we moved the sofa, chairs, and coffee table to the living room.

Sofa-and-Chairs-in-Living-Room-Overall

When we replace the sectional, I want a normal sofa and two chairs.  It’s amazing how much bigger, brighter, and more open the living room feels now.  Walking completely around the couch is possible when it wasn’t before.

Sofa-and-Chairs-in-Living-Room-Overall-2

Seeing the open railing, and those coming in the door, is a great perk, too.  And having easy access to end tables?  It’s so convenient.

Sofa-and-Chairs-in-Living-Room-Toward-Stairs

Cozy upholstered chairs would be nice along with a long, rectangular coffee table.

Sofa-and-Chairs-in-Living-Room-Toward-Dining

After nearly two years of living here with the same furniture arrangement, this feels so fresh and inviting.  And gives us an idea of what we want as replacement stuff.

Sofa-by-Living-Room-Window

For now, the sectional awaits its fate in the family room.  Where it awkwardly fills the space.

Sectional-in-Family-Room-Toward-Fireplace

Though there’s still enough walking space to get to the back door, it’s much more cut off than the previous layout.

Sectional-in-Family-Room-Walking-Space

Most strange is the focal point it has to face.  The wall and entry.

Sectional-in-Family-Room-Direction

The behemoth is 10 feet wide by 7 feet long, so it won’t fit in the 14 foot wide family room any other way.

Sectional-in-Family-Room-from-Kitchen

Another annoying thing about this?  If centered on the rug, it’s close to the fireplace when lit.

Sectional-in-Family-Room-from-Stairs

Finally moving things around has made us even more sure we want to replace the sectional with a standard sofa and chairs.  Now to agree on the perfect couch, which is more difficult for us than it should be.  Ben wants leather, I want something with removable, flippable seat cushions.  Typically those two don’t go together, so a compromise must be made.

Worse Before Better

We’re making progress in the family room, after leaving it nearly the same since move in.

Honed-Marble-End-Table-Top-Left-Side-of-Living-Room

This is what progress looks like:

Living-Room-with-Crown-Installed

Yes, at first, progress always looks like a big mess.  It has to get worse before it can look better.  We pulled down the old, upside down (?!) crown before installing the new trim.  I forgot to take pictures, but here you can see it in the basement:

Basement-Crown-Upside-Down

We know the previous owner liked to do things his own way, but we’re not fans of the look.  Especially compared to properly installed crown via This Old House:

So, down came the old stuff, leaving small nail holes in the ceiling.  Filling with joint compound isn’t difficult, just another step added to my list.  Two if you count sanding.

Living-Room-Crown-Installed-Ceiling-Touch-ups

Along with caulking seams and filling nail holes in the new trim.  While I had the filler out, I removed all nails and spackled old nail holes (there were many).

Living-Room-Crown-Installed-and-Filled

Trim around the entry hasn’t gotten the full treatment yet, but will once we break the ladders out.  After that, painting the last white coat and walls.

Entry-with-Crown-Installed

We’re crownless in parts of the dining room until we swap the door for a window with a header.  At that point, we’ll run a solid piece across.

Dining-Room-Without-Crown

For now, and hopefully not much longer, we have a lovely patchwork of colors and textures.

Living-Room-Crown-Patched-Areas

I’m carving out time this week to get the trim, ceiling, and walls painted.

Reader Question: Bathroom Fixtures

When we remodeled the master bathroom, we chose a few less often used products that we hoped we’d love.  But we had back up plans if we didn’t.  Luckily it has all worked out well.

Finished-Master-Bathroom-Overall

A stainless steel shower pan and countertop.  Skipping a glass wall and using two curtains in place.  Because they’re kind of unusual, we’ve gotten several questions:  What do we think of the stainless?  Is is slick/slippery?  Hard to clean?  Do the curtains actually keep water in?  Is it cold?  Now that we’ve used the bathroom for a few months, I thought I’d give my review.  Here’s how the stainless shower pan typically looks:

Master-Bathroom-Stainless-Steel-Shower-Pan-Water

It has water spots.  Which would typically bother the crap out of me, but it only half bugs me.  The whole pan gets wet at the same time, so it’s more uniform than little droplets.  We’re testing out stainless steel cleaners to find one we’re happy with.  So far, we haven’t found the one.

Master-Bathroom-Stainless-Steel-Shower-Pan

I’ve used mineral oil on the countertop, and it shines like a new quarter.

Master-Bathroom-Stainless-Countertops

If I didn’t have to worry about the slickness, I’d use it on the shower, too.  I’m afraid it’d make the pan slick and greasy.  Any stainless cleaners you love?  Overall, we’re really happy with the stainless function and wipeability.  But it’d be nice to get rid of the water spots, even on the brushed nickel faucet.

Master-Bathroom-Brushed-Nickel-Faucet

A few scratches are on the counter, but they’re barely noticeable and just give it character.

Master-Bathroom-Stainless-Countertop-Scratches

As for the shower curtains, they work really well to keep the water in.  It’s really not much different from the main bathroom tub/shower combo with a curtain in that regard.  The only difference is that we have to use a suction cup/plastic loop combo to keep the convection current from pushing the curtains in.

Master-Bathroom-Shower-Curtain-Hooks

I think the reason we have this problem is because our curtain is only two inches from the ceiling, the heat can’t escape quickly.  Thus sucking the bottom in.  Unlike the tub, there’s nothing for the curtain to cling to either.  We have a suction cup with a hook at each corner and I sewed plastic rings to each end to keep the curtains taught while in use.  It’s annoying to have the added step, but still better than having to keep a glass wall spot free in my book.  If only the stainless were magnetic, we could drop little magnets in pockets to keep it closed.

As for the cold factor, the curtains do a decent (not great, but good) job keeping the shower heat in.  Once the curtain is open though, even a crack, it’s freezing.  Overall, we’re very happy with the updated bathroom.  Now if we could just get a good stainless cleaner or polish.