Furniture Thrifting Guidelines

It’s no secret I love hunting thrift stores for hidden gems.  Those dusty, dirty, seen-better-days pieces that make the perfect ugly duckling to beautiful goose transformations.  Far more often than not, I leave empty-handed or maybe with a small trinket, bowl, or more likely, a book or two.  Stumbling on those big furniture pieces is exciting, of course, but not too frequent.  But before I make a large (in terms of size) purchase, certain rules/criteria must be met:

  1.  Will this piece satisfy a need in our home?
  2. Do I have a place in mind for it?  Can it also work in other rooms?
  3. Do I like the shape, size, lines, style of this piece?  If not, can I change that?
  4. Is it sturdy and in good condition?  If not, how difficult it is to fix?
  5. Is it worth the price?  How much will I have to put into this piece to make it what I want?

I’ll get into each point as I go, and of course, for something I’m absolutely gaga over, I can make exceptions, usually in the need department.

First and foremost, do I need this?  I do realize I have a very small furniture hoarding problem, but mostly because we still have two large areas to furnish: the basement and pool house.  So, when I see something that might work, especially at a reasonable (or great) price, I get it.  Worst case scenario, I put it on Craigslist or donate it and eat the loss.

Two years ago, I scored a pair of chairs, which by the way, pairs seem incredibly elusive in my thrifting adventures, for ten dollars.  The petite size was surprisingly comfortable, yet lightweight enough to move easily.  After a thorough sanding, a couple of coats of polyurethane, and new fabric, they rounded out our family room seating arrangement.

West-Elm-Rug-In-Family-Room-by-Fireplace

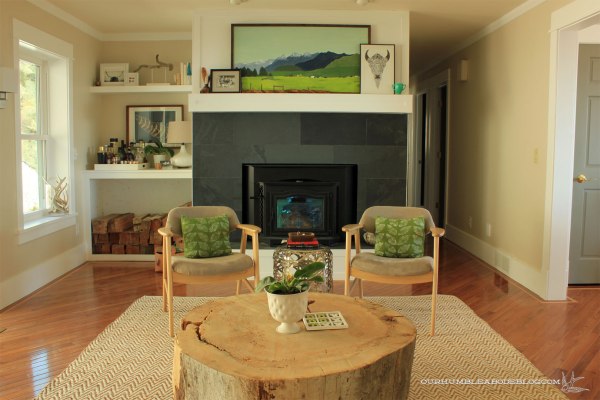
Flash back to a fateful day this past November and you would have found me standing in a thrift store, staring at another pair of chairs, internal debate running through my head.  To buy or not to buy-that is the question.  I loved the lines and shape, the frames were in good, solid condition despite needing a refresh, and only $5 each.  People spend more than that on a specialty coffee, at least I’d have something to show for it, right?

Five-Dollar-Chair-Before

In my mind, I knew they’d look great by the fireplace, in the exact spot I already had chairs.  Did I need this new set?  Nope, technically I didn’t.  Even so, I bought them with plans to use the previous set in the basement.  If they don’t work down there, for the two years of use we got out of them, I haven’t lost anything.  After my standard refinish + new fabric combo, the pair cost me roughly twenty dollars each.  More than anything, the size and style of these chairs works better in our family room.

MCM-Chairs-Updated-in-Family-Room

Do I have a place for this?  Can it work in more than one room?  If you habitually change your mind, move things around, or just like a change of scenery, this is a big question.  Of course, the larger the item, the more difficult it will be to move around to different rooms.  This little dresser, a hand me down that previously belonged to my grandfather, has lived in several rooms and in both houses.  It can function as a dresser (duh) but could also work in a small nook, in an entry, or mini desk surface in a pinch.

Guest-Room-Makeover-Green-Walls-White-Dresser-Chair

Do I like the size/shape/style/lines of the piece?  Occasionally, friends will ask me to keep a look out for a specific piece they need, say, a dresser.  I’ll send pictures of anything that might work, and if I get the go ahead, I’ll buy it.  When I found this beaut, it also came with a mountable mirror.

White-Painted-Dresser-Top

Lucky for me, my friend didn’t need it, and I desperately wanted it for my main bathroom.  The size was perfect, the simple brass details were lovely, and I had wanted to add more wood tones.  A quick strip and oil coat added the warmth this bathroom needed.

Campaign-Mirror-Hung-in-Bathroom

Is it in good shape?  If not, can the damage be fixed?  I think Ben (and perhaps several others) thought I was nuts when I dragged this small orange sofa (settee?) home with me.  Right away though, those gorgeous legs had me interested.

Thrifted-Vintage-Orange-Sofa-Front

Then I turned it around and saw the exposed wood frame detail on the back and that was it.  I had. to. have. it. Despite the loose joints, because wood joints, unlike the human variety, are typically very easy to fix with a little wood glue.

Thrifted-Vintage-Orange-Sofa-Back

Since scratchy, smelly, 70’s fabric isn’t my bag, I followed my standard fix up recipe of refinished wood and new fabric for a look I love.

Horizontal-Railing-with-Linen-Sofa

Fixing the frame was as simple as applying wood glue in the dowel holes, clamping, and letting it dry before sanding and staining.  Pieces with serious damage, like a missing leg, shouldn’t be passed over if all legs could be replaced.

Thrifted-Vintage-Sofa-Back-Corner-After

Is it worth the price?  I feel like I’m notoriously cheap with my thrifting, but it really irks me when stores ask near full retail price for something that was donated.  I think the most I’ve paid for something from a thrift store (this does not include Craigslist) is this Drexel dresser, snagged for $67, originally priced at $90.  At the time, I was searching for a wooden dresser to fit between the beds, below the window.  Measuring about three feet wide and in very used condition, the $90 price tag seemed steep.  After a 30% discount, the price was more in line with the quality, considering I still had a full refinish before it looked nice.

Boys-Bedroom-with-Large-Rug-from-Door-Wide

Then, when the stars align, there’s the lucky you’ve been very patient, once-in-a-lifetime deal, such as the case of our Craigslist leather sofa.  Simple lines, beautiful leather, and listed at $220?

Parallel-Couch-Window-Seat-Arrangement-Toward-Dining

Throw every damn rule out the window, quickly contact the seller, and arrange to pick it up pronto.  Then thank your lucky stars you saw the beauty first and lovingly pet it while you watch tv.

Building a Sleek Railing

A few weekends back, we took the plunge and replaced our stair railings.

Stair-Railing

It was our first venture, with a few small things to figure out, but overall went smoothly.  To get started, we of course had to remove the old set, loosening the bolts from the underside first.

Basement-Demo-Stair-Railing-Post-Base

With the flat side out, we determined our new post placement.  Since the old railing was too close to the front door trim, we shifted the posts over an inch.

Railing-Building-Old-Out

Ben cut the 4 by 4 inch post to size (38 inches above the floor with 11 inches below), set it in the hole, and cut another post in half length wise and to height for the wall side.  Neither were fastened in place so we could first attach the horizontal planks.  We purchased 2 by 6 boards, but ran the sides through the table saw to cut them down to 5 inches wide and take away the dimensional lumber look.  To save some time sanding, we also ran each plank through the planer for an ultra smooth finish.  Once all the boards were cut and prepped, we cut 4 inch spacers to make sure spacing between was even.

Railing-Building-Spacing

While I held the boards in place on the full post end, Ben worked on the half post side.  He screwed through the backside of the post, into each board three times to secure it in place without visible holes.  Then we shimmied it into place on the wall and fastened it to the wall.

Railing-Building-Wall-Edge

The full post end was only slightly different since we used longer screws.  Ben pre-drilled through the post, creating a recess for the screw head, then drove the screws into place while I kept the each board in place.

Railing-Building-End-Screws-Detail

Railing-Building-End-Detail

Working on the flat side was easy enough and went quickly, but the angled side was a bit tricky.  Again, removing the old was step number one.

Railing-Building-Angled-Side-Out

Another 38 inch tall 4 by 4 post was set into the hole at the top of the stairs.

Railing-Building-Top-Post-Installed

To keep the spacing between the boards even with the flat areas, the post at the bottom had to be taller since the angled cuts make the planks taller.  This post had to be notched out to cut around the stair wall before screwing it in at the base.

Railing-Building-Base-post

Then time for the straight meets angled cut to follow the stair angle.  Once the angles fit perfectly, Ben applied glue on the angle and drove screws in from the top and bottom to keep everything rigid and in place until the glue dried.

Railing-Building-Stair-Angle

Like the other side, Ben put two screws into each plank.

Railing-Building-End-Post

In that corner, where the stairs meet the small section terminated to the wall, we had to stagger the screws so they didn’t cross.  Since the wall section is shorter, one screw in the center held firmly.

Railing-Building-Sides

After everything was securely fastened on the upper sections, Ben drove 6 inch long screws through the posts and into the wall studs below for maximum rigidity.

For a seamless finish, I filled each screw hole, knot hole, and hairline crack with putty and sanded smooth.

Horizontal-Railing-Installed-at-Top

Caulking along the seams and walls was the last step before painting.

Horizontal-Railing-Straight-Section

When painting over raw wood like pine, sap bleed through can be an issue.  For greatest durability and stain blocking, I applied one coat of the same stain I used on our bedroom wall: Sherwin Williams Exterior Oil-Based Wood Primer.  It’s stinky, so I built a fire and opened the windows to air the room out.

Railing-Building-Primer

Knowing white will show any dirt, grubby hand marks, and well, everything else, I needed a paint that could withstand a good scrub.  After a chat with my favorite paint guy at our local Ace Hardware, he suggested Benjamin Moore’s Ben Exterior paint in the low lustre finish to avoid a glossy finish.  Three coats later and it’s a wrap.

Horizontal-Railing-and-Living-Room

With this checked off the to do list, we can start hanging sheet rock in the basement.

A Sleek Stair Railing

Back on closing day, nearly four years ago now, our living room had a lovely variety of honey toned oak.  Floors, doors, trim, and the railing.  The light fixtures, red accent wall, and arch over the railing were high points, too.

New-House-Dining-into-Living-Room April 13 2012

We’ve since added new trim, painted the doors and walls, replaced the lighting.  Basically changed everything except the floors (which will remain the same) and until recently, the railing.

Living-Room-Space-for-Window-Seat-3

With the basement completely gutted and free of drywall, we finally had access to the underside of the railings.

Basement-Demo-Stair-Railing-Post-Base

Over the weekend we removed the old oak railings and built a new, sleeker design.  Two years or so ago I started planning what would eventually replace the oak and thought a horizontal layout would look best.  A few months ago I spotted this railing by Milk and Honey Home and knew it would work for our home, too.

Horizontal-Railing-by-Milk-and-Honey-Home

To build our railing we used four by four posts and two by six boards for the rails.  It took a day to build and install, and even before primer and paint, it looked light years better.

Horizontal-Railing-Installed-from-Living-Room

One coat of primer and three coats of white paint later and here we are today:

Horizontal-Railing-with-Linen-Sofa

Be prepared for photo overload.

Horizontal-Railing-Toward-Closet-1

The simple design doesn’t attract unnecessary attention and is sturdier than the old design.

Horizontal-Railing-Straight-Side

Getting the straight section by the living room done was pretty straight forward, but the angled section was trickier.

Horizontal-Railing-from-Top-Toward-Door

I’ve got a post in the works covering the building process, so I’ll save the specifics for then.

Horizontal-Railing-Looking-Down

It’s much more modern and more in keeping with the straight lines of the house.

Horizontal-Railing-Top-Detail

Horizontal-Railing-Small-Straight-Section

I may regret my decision to paint it white after the millionth round of washing dirty hand prints off, but I love the way it blends with the tongue and groove wall.

Horizontal-Railing-Angled-Section

The post tops are simply a 45 degree angle and rise 2.5 inches above the top rails.

Horizontal-Railing-Angle-at-Entry

To give the boards a defined termination into the wall, we cut a post in half for a seamless look.

Horizontal-Railing-Half-Post-End

Every new change is so exciting to see when walking past, and this one has been a long time coming.

Horizontal-Railing-from-Family-Room

The way it brightens up the entry and living room is my favorite.

Horizontal-Railing-and-Living-Room

Once we’ve replaced the tile, our entry checklist will be complete.

Horizontal-Railing-from-Front-Door

And with the railing complete, we can continue work in the basement and should be ready for sheet rock soon.  Then the fun can begin!  I’m already gathering paint samples, measuring for furniture, and we’ve purchased a couch for the theater room.

Designing a Bathroom Vanity

When trying to figure out exactly which direction I wanted to go in the basement bathroom, I looked at the other two bathrooms upstairs to decide.  Our main bathroom features a completely open vanity with a shelving stack to the side.  I know this style isn’t for everyone, but in a space that’s often used by guests, I love that almost everything is in view.  It makes it much easier and less awkward to find the cotton balls, soap, extra towels, and toilet paper.  Having an open design means stowing smaller items in bins, baskets, and boxes, which works for us.

Our Humble Abode Blog Main Bathroom Vanity

On the other hand, our master bathroom sports a dark and handsome six drawer walnut vanity with legs leaving a four-inch open space at the bottom.  It too functions very well for us, stowing everything out of sight.  Thanks to the vessel sink, which has all the plumbing centered between the stacks, all drawers are full-sized and completely functional.  Leaving the base open visually lightens the dark wood and makes it look like the custom piece it is.

Master-Bathroom-Vanity-for-BHG

So, knowing the benefits of the polar opposite designs has led me to my ideal vanity design for the basement.  First, I love the floor to counter square legs of our open vanity and the open shelf.  But the drawers and vessel sink of our master vanity are the best wat to get small item storage.  We have 5 feet six inches of space to build the vanity in, which is a very good, workable size.

Basement-Bathroom-Vanity-Placement-and-Plumbing

Due to the placement of the supply lines and drain, we aren’t able to have all drawers for the upper section, like this option:

Bathroom-Vanity-Plans-All-Drawer-Upper

But, having drawers on the top with all cabinet space below isn’t exactly ideal either.  Bins would have to be used to corral everything and keep it organized, but the width of the doors is an even bigger issue.  Each door would be almost three feet wide, and opening a door swing that big could become an issue.

Bathroom-Vanity-Plans-Drawer-and-Cabinet

So here’s the Goldilocks of the vanity configurations:

Bathroom-Vanity-Plan-Double-Drawers

A vessel sink with cabinet directly below, a pair of narrower drawers on either side, and an open shelf with space below.  The cabinet accommodates the plumbing, drawers for tidy storage, and bottom shelf keeps it from feeling too visually heavy.

Bathroom-Vanity-Plan-Double-Drawers-Vertical

Just like the main bathroom, the plan is to find or build a wooden box to hold toilet paper and/or towels, hence the brown box.  For flooring, we’re using the same slate tiles we’ve used on the fireplace, master bathroom, and kitchen because, well, we really like it.  Tile will start at the base of the stairs and will continue through the two hall sections, into the laundry room, and bath for a continuous look.

Basement-Floorplan

Since this bathroom is a windowless dark hole without artificial lighting, I’m limiting the dark elements to keep it as bright as possible.  To contrast against the dark floors, I’m picturing a white vanity, possibly with some sort of dark wood pull or handle.  After a trip to our local stone yard, we found a pretty slab of dark gray/black with white veins, so that’ll be the countertop with a white vessel sink.  I’ll figure out a wall color once we’ve finished the drywall and have the lighting in.  We know the major components, but a few things are still in the air, until I track down the smaller pieces.  What I do know is this, I don’t want the bathroom to look like it once did:

New-House-Basement-Bathroom-April-13-2012

PSA time, friends never let friends install yellow plumbing fixtures, honey oak cabinets, orange laminate countertops, and carpet in bathrooms.

Old-Carpet-in-Bathroom

Seriously, why did carpet in a bathroom ever seem like an okay idea?  Let alone this orange and gold kaleidoscope pattern.

Basement Rebuilding & Plans

With basement demo completely out of our way, we’ve spent the remainder of holiday break cleaning and rebuilding.  None of the exterior walls had insulation, so we’ve added a layer of 2 inch rigid foam, then built new 2 by 4 walls to run wiring through.  Before sheet rock, we’ll add fiberglass batting.

Along with new exterior walls, we’ve made a few changes to the floor plan.  To give an idea of where everything was, as well as our plans, here’s a set of handy-dandy floor plans.  Let’s start with the before:

Basement-Floorplan-Before

And here are the changes we’ve started and are planning to tackle.

Basement-Floorplan

Some things are staying the same/very similar, while we’re making some other major changes, so how about a rundown of plans?  Okay, here we go:

  1.  The door to the garage (which is to the right of these plans) is at the base of the stairs, which can make things crowded at times.  More often than not, we enter and exit through the garage, so getting organization and order in this space is crucial.  Having a door to the under stair storage open into the hallway wasn’t the best use of space and further clogged a main artery.  Instead of accessing the under stair area from the hall, we’re creating what I’m calling a ‘mud nook.’  It’ll have a bench with shoe storage below and hooks above for a great drop zone that will keep the mess of life tucked aside.  Here’s the current view with my back to the garage door; mud nook on the left (where the bins of junk are) and the soon to be bedroom door straight ahead.

Basement-from-Garage-Door

Again, a shot of the future storage space, with a glimpse of the stairs to the left.  The opening of the nook is just under six and a half feet wide by 18 inches deep, so it’s a generous size for backpacks, winter gear, and shoe storage.  I measured over and over, considering taking it back a little deeper, but because this is tucked partly under the stairs, the deeper the bench, the shorter the ceilings get.  This seemed to be the sweet spot, and we just may have room for a shelf at the top, but we’ll see how everything feels when we get sheet rock up.

Basement-Mud-Nook-Progress2.  We’re dividing the large front room into two different spaces.  The smaller will become a bedroom, possibly for one of the boys when they’re old enough to want separate rooms.  Until then, we’ll use it as another guest space.  After debating the pros and cons of door placement, we agreed to keep the door at the end of the shorter hall, but pivot it to make a 90 degree corner.  Rotating it around to enter from the other hall stretch would have given a little more privacy, but wasn’t worth the effort to make it work in the load bearing wall.

Basement-Bedroom-Door

3.  Along the stair wall, we’ve added a deep closet with access to the under stair storage through the back.  Under the stairs, the plan is to finish it off with walls, carpet, and lights to create a cozy little play area that we can use for storage when the boys are too big/old to care about it.

Basement-Bedroom-Toward-Closet-and-Door

4.  In smaller changes, we’re shifting the laundry door over about 18 inches and eliminating the door swing by putting in a pocket door.

Laundry-Room-Washer-and-Dryer

Before, the door was 24 inches from the left, where the deeper washer/dryer sit, while the shallower cabinet side had 54 inches between the wall and door.  With the machines toward the back of the room, the units never stuck out per se, but it always felt off centered.  Basically, we’re swapping the proportions by moving the door and centering the door on the space open space between the appliances and cabinetry for better flow.  Here’s the start of the process, with the wider door framed and ready for pocket door install:

Basement-Moving-Laundry-Door

It’s a heck of a lot easier to move the door than the plumbing and electrical.  Stacking the washer and dryer will make space for our bulk storage in the upright freezer, which will sit where our dryer once did.  I know, it’s an unconventional placement, but there really isn’t a better place for it, upstairs or down.  And if we ever decide to do away with the freezer, we can unstack the washer and dryer with room to spare.  We’ll still have a wall of cabinets on the other side, but the cabinets will be counter height for a folding station as well as an open ‘desk’ spot for Ben to work on his reloading.

Laundry-Room-from-Door

While tearing apart the laundry room, we found something interesting.  At some point, there was a small fire in here.  Everything has been fixed, including two replaced joists.

Basement-Damage-Replaced

That cleared up our questions about why one joist bay in the future bedroom was darker, it’s smoke discoloration.

Basement-Smoke-Damage

5.  With the freezer relocated to the laundry room, we’ll have space to install heavy-duty shelves in the unfinished utility/mechanical room for tools/paint cans/messy storage items.

Utility-Room-Without-Water-Heaters

6.  We’ve already opened up the end of the hall to create a door to enter the theater room.  Due to the lowered ceilings, we’re still trying to figure out if we can put a pocket door in here as well. It might shorten the opening too much, but we’re hoping to make it work.  Oh, and the box on the left is my test for sconce placement thanks to a lack of overhead lighting options where the duct runs.

Basement-Hall-with-Test-Sconce-Size

7.  Once we’ve finished, the theater room can technically be considered a fifth bedroom because we’re adding an oversized closet at the back.  Directly left of the window (this was the end of the house before the pool house addition) is the start of our closet wall.  The window leads into an unfinished crawl space, so we do need to keep access to that, but it’ll be hidden inside the closet.

Basement-Large-Closet-Wall-Start

8.  Another fun demo discovery!  The shower drain isn’t actually a to code shower drain, just a floor drain.  Luckily, we planned to widen the shower, which required moving the drain, so replacing it isn’t an added task.

Basement-Shower-Floor-Drain

The remaining fixtures will stay where they were.

Basement-Hall-from-Theater

So that’s the basic overview of what we’ve done and where we’re headed with this basement.  As usual, the renovation saga will continue and I’ll share more details as we make progress, including the exciting parts that come after sheet rock has been finished.