DIY Board and Batten, Step 2

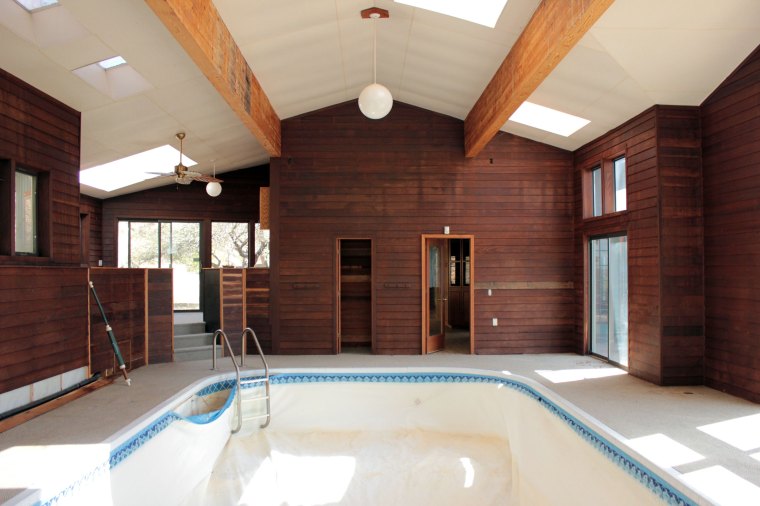
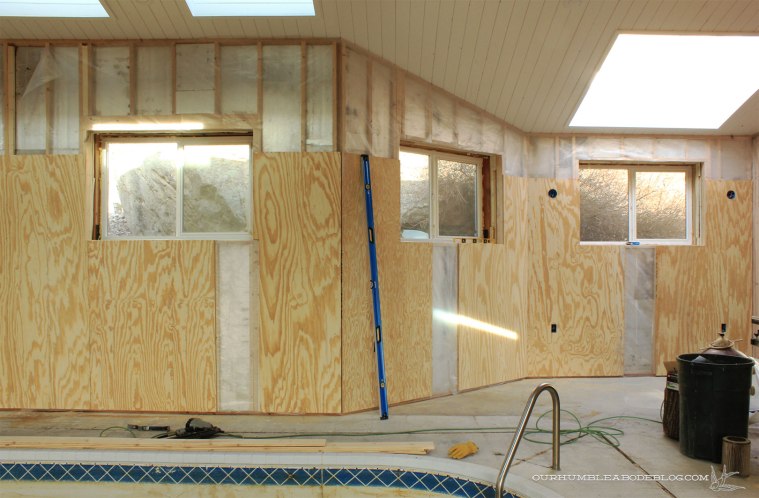
This is the year of the pool house, hopefully the year we get it all (or mostly) wrapped up.  Last year consisted of a lot of ugly, but necessary work inside the walls, but we did finish the tongue and groove ceiling.

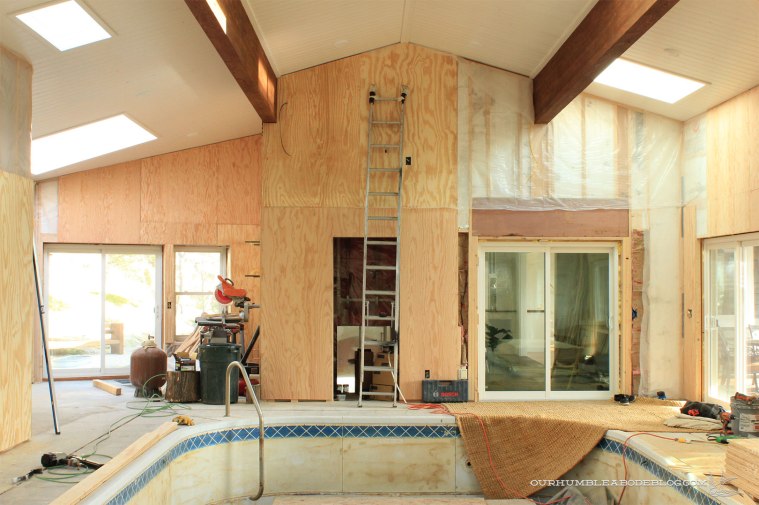
With the ceiling complete, walls covered in plywood sheeting, we’ve started adding batten strips to create the tone on tone texture.

Pool-House-Board-and-Batten-Design

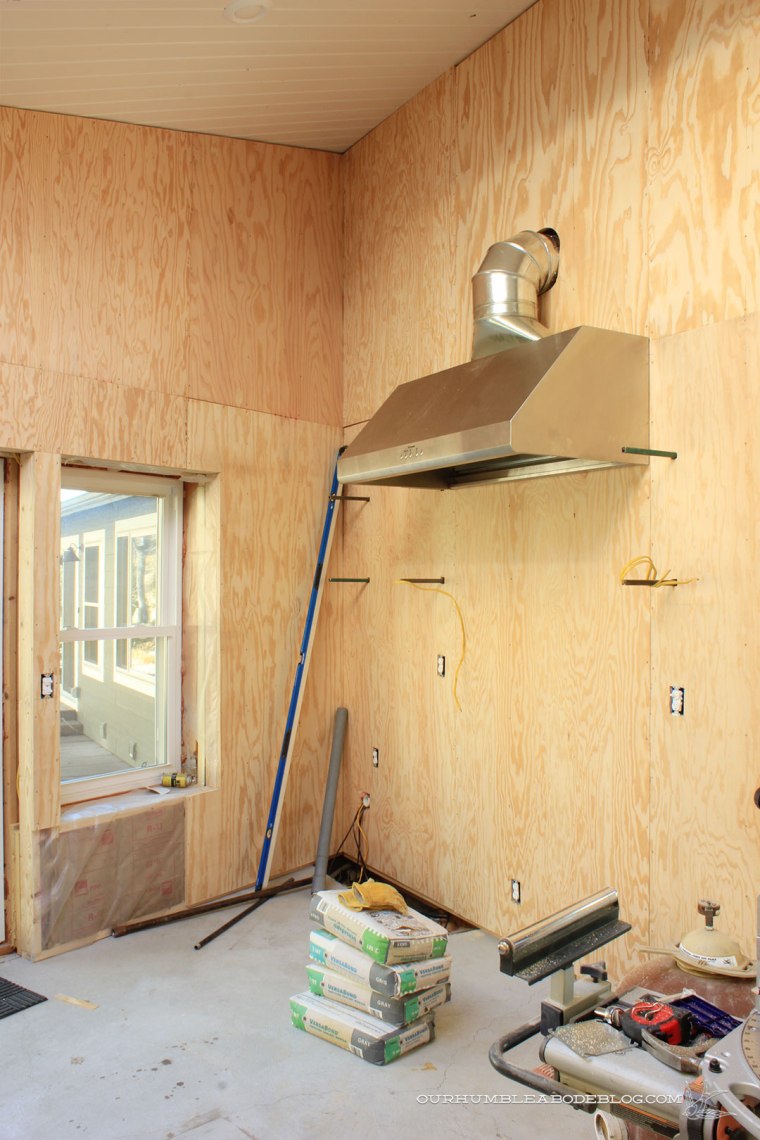
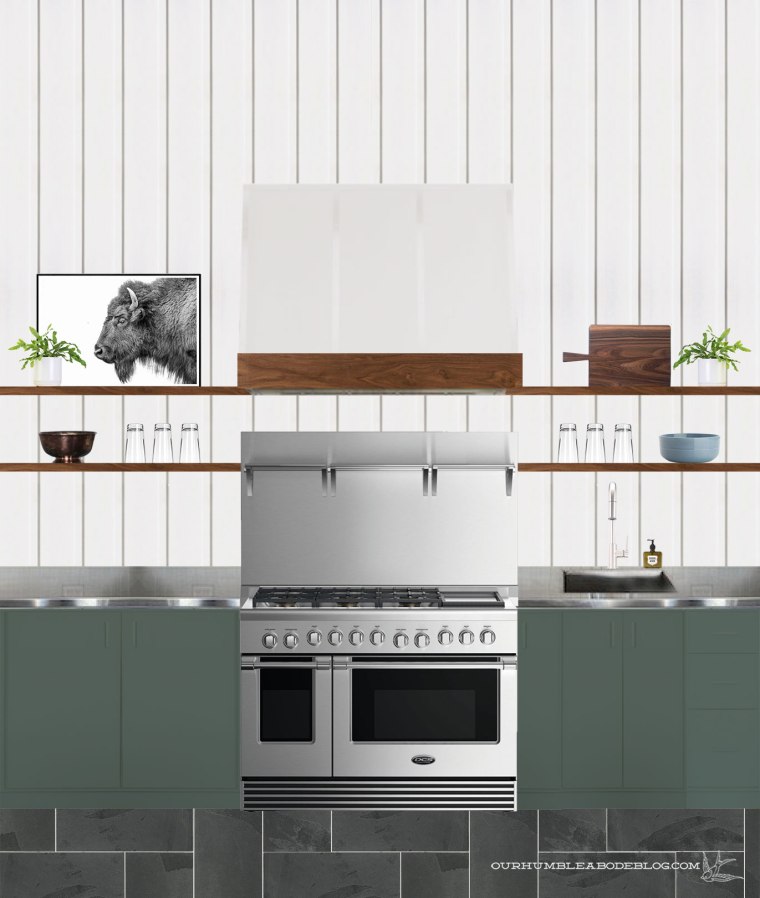
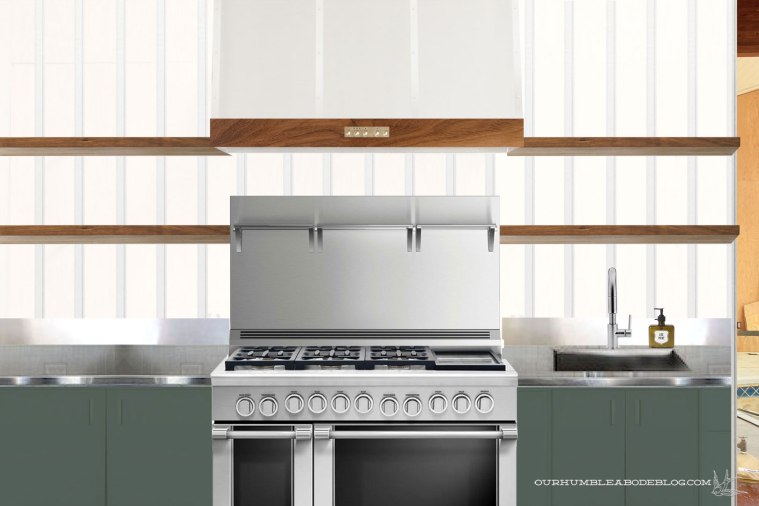
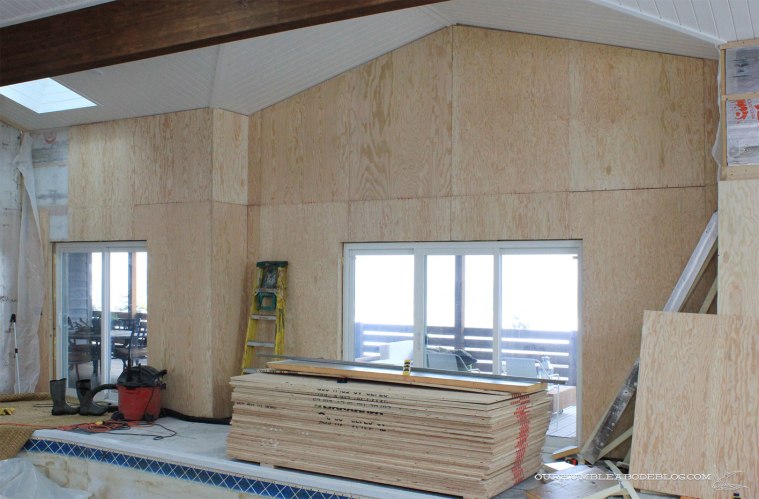
Above is obviously a photoshopped version, while below is the starting point of reality.

Pool-House-Board-and-Batten-Overall

Initially, we planned to install the tile floors immediately after hanging all of the plywood sheets.  After a discussion, we agreed it would be best to add the batten strips to everything above the eight foot mark, caulk, prime, and paint.  This way we can avoid dragging ladders over the new tile, potentially damaging it in the process.  The lower wall portions will get the same treatment after the floors are finished, allowing the batten strips to terminate into the baseboard.

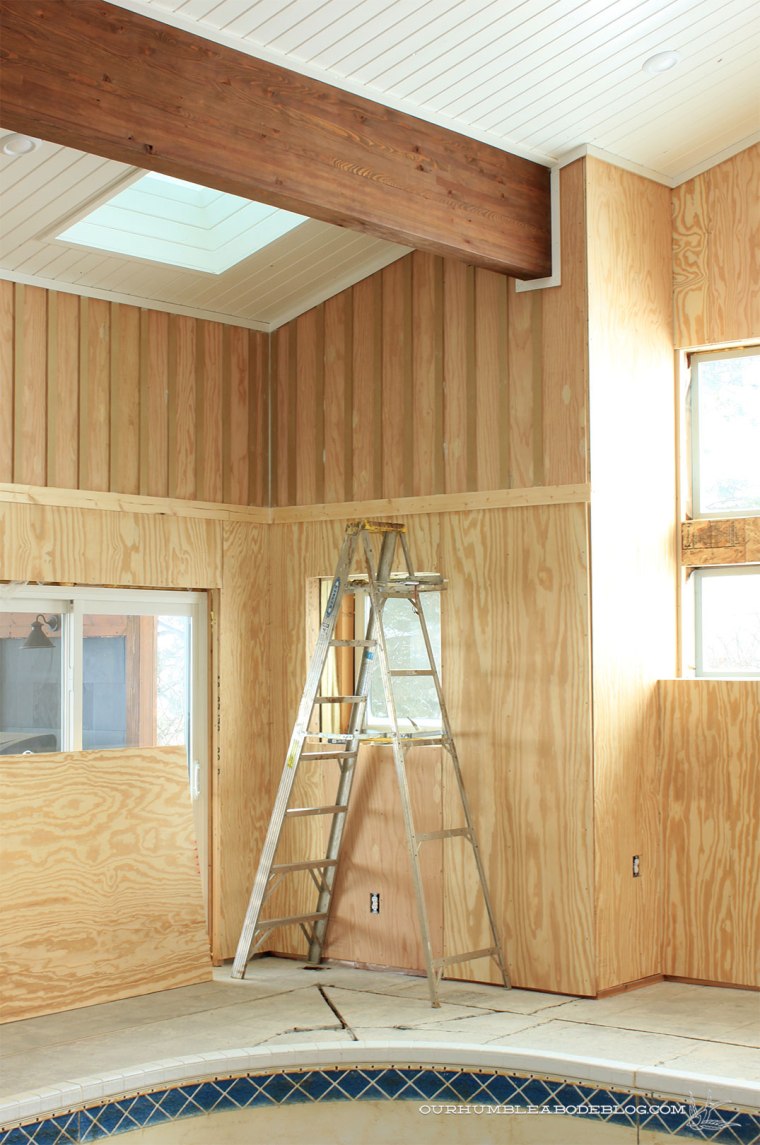
Before the vertical strips could be attached, we nailed two-inch strips into place along the ceiling, hiding the gap between the wall and ceiling.  A 3 1/2 inch wide piece of pine casement straddles the eight foot mark, covering the plywood seams.

Pool-House-Board-and-Batten-Horizontal-Strips

Two inch strips also cover the ceiling seams, keeping the measurements consistent.

Pool-House-Board-and-Batten-with-Ceiling-Detail

The areas following the vault are square strips, while the rest are cut at a 16 degree angle to snug up against the ceiling slope.

Pool-House-Board-and-Batten-Vault-Trim-Installed

Strips also wrap around the beams, with the ceiling pieces butting into those.  Wires for speakers are still dangling.

Pool-House-Board-and-Batten-Beam-Detail

With most of the horizontal strips in place, we started installing the vertical pieces.  When I proposed the board and batten idea, Ben wasn’t totally on board with it, but he started researching material and prices.  Pre-cut two-inch by half-inch thick strips aren’t particularly affordable, especially when spaced 8 inches apart.  To keep the material cost as affordable as possible, we cut sheets of MDF into two inch strips.  Once covered in oil based primer and paint, we shouldn’t have swelling issues.

Pool-House-Board-and-Batten-Strips-Detail

While on the ladder, Ben called out measurements, I’d cut to length and walk it over, then he’d nail into place.  Nailing into plywood is much easier than drywall as it has more bite.  As such, we can get away with small 18 gauge nails, leaving tiny holes to fill.

Pool-House-Board-and-Batten-Center-Bump-Out

To further speed up the process, he cut a scrap of plywood to six inches wide to use as a spacing guide.  Similar to hardwood floor install, once the first row is square, the rest go in quickly.

Pool-House-Board-and-Batten-Along-Peak

Everything above was installed over a weekend, which is exciting because this part of the process should go along quickly.  I spent my Monday afternoon caulking, so this stretch is almost primer ready!


Pool Liners and Water Colors

Though premature, I’ve begun researching pool liners as the liner we select will have a dramatic impact on our finished space.

New-House-Pool-Room April 13 2012

When we bought this house, the pool had an old, sagging, faded liner with a lovely border detail.  We were told the pool hadn’t been operational in several years, and as such, have never seen water in here.

New-House-Pool-to-House-April-13-2012

Not clean water, anyway.  Just stagnant green water that had dripped in through the then leaking roof, with a few dead mice, for good measure.

New-House-Pool-Tearing-Liner

Surely this pool was a vital selling point to most people.

Due to the way the pool was constructed, it requires a vinyl liner which I’m realizing are surprisingly difficult to shop for.  Maaaaybe even more difficult than rug shopping, because the commitment is even greater.  Once finished, the walls and ceiling of this space will be a crisp white, with a black slate floor.

Pool-House-Plywood-Hanging-Progress

If you’ve never shopped for pool liners, you are probably in the same mindset I was a few months ago.  It’ll be easy, like picking a paint color.  Boy is that wrong.  The liner color and pattern determine the water color and mood of the pool.

Fantastic Inground Pool Liners Design with Unique Shaped Decoration

Dark, saturated patterns will create a deep abyss looking pool, which we kind of already have considering ours is about 9 feet at the deepest point.  Deep colors also show color fading much quicker, whereas light colors absorb sun less and don’t fade as quickly.  For our space, I’ve always imagined a light water, similar to a full bath.  After a lot of online searching, I’ve found our winner:

AQUARIUMLINER

It’s fun, whimsical, and I love the idea of swimming along a coral reef without leaving my home.  Haha, actually, I want something a bit more simple than that, which is why I’ve settled on this:

Royal Dolphins

What can I say, dolphins just really do it for me?!   That’s a big fat lie, too.  It just seems the majority of pool liners are similar to mid 90’s decorating.  Bright, patterned, and theme-y, like the Tuscan vineyard kitchens or beach themed bathrooms complete with wall paper border.

Here are my liner requirements:

Light

Borderless

Small pattern

Not kitschy looking

This pebble look is okay:


Royal Pebble

Water/waves, not so much!

White Diffusion

Clearly fake mosaic border, nope!

White Santiago

A speckled terrazzo look however, checks all of the boxes, with a pattern that fades into the background.

White Terrazzo

It’s classic, yet modern and shouldn’t look too fake, even for a vinyl liner.  After lots of internet digging, I found a photo with the simulated water color on a similar liner design.

crystal-quartz-water-colour-liner-detail

Doesn’t this pool look spa-like tranquil, but still inviting?

fe9ddb81e0db6529cbb53bf67c729350

Now to turn my internet shopping into actual local shopping to make sure we can get the same thing (or something similar) and have it installed.

Installing a Vent Hood

Sometimes, when doing the same thing over and over again, you have to switch gears.  Though we don’t have much sheeting left to hang, over the weekend, Ben decided to hang install the kitchen vent hood.

Pool-House-Plywood-Hung-in-Kitchen

We bought this one over three years ago for our main kitchen, but after opening up the kitchen wall, I didn’t want anything blocking the new open feel.  Plus, we have a big whole house fan about ten feet away, so it seemed redundant.  Having purchased a 48″ wide DCS range off Craigslist for the pool house, we knew it would eventually be put to good use.

To install the vent hood, Ben first secured a 3/4 inch thick strip of wood at the vent hood back height.  There’s a little lip for the housing to rest on, making it a bit easier to screw into the wall.  While Ben held it in place, I screwed into the predrilled holes to keep it in place.  With the frame up, Ben installed the fan and duct work to get it all in working order.

Vent-Hood-Under-Side

The venting angles into the dead space between the main house and pool house roof lines before angling up and out the roof.

Pool-House-Kitchen-Vent-Hood-Overall

Next, we’ll build a frame around the hood and duct work, sheet over it, and paint it when we get to the walls.

Pool-House-Kitchen-Vent-Hood-Vertical

Everything is great, except the buttons on the front, which I had completely forgotten about as the fan had been in storage all this time.

Pool-House-Kitchen-Vent-Hood-Button-Detail

While not detrimental, the button placement does play into the walnut accent I want at the bottom of the hood.

Pool-House-Kitchen-Two-Shelves-Without-Backsplash

Ben and I discussed various options such as forgoing the walnut strip and leaving the front edge steel.  Or building the frame out around the hood, leaving a 1 to 2 inch gap to reach in a press the buttons.

Pool-House-Kitchen-Vent-Hood-Plan

Each option wasn’t perfect and had issues, so we’re planning the simplest: notching out the walnut strip around the buttons.  It’s not ideal, but a solution we can both agree on.  I know we have much more to complete, but I can’t help getting excited over the details that will finish off this space.

DIY Board and Batten, Step 1

In the last pool house update, I shared all of the details on the guts inside our walls: insulation, electrical, and a little bit of plumbing.

Pool-House-Insulation-Above-House-Door

With all of that important, but generally unseen business taken care of, we are able to start hanging our vapor barrier and sheeting.

Pool-House-Plywood-Hanging-Progress

To create the board and batten look, we’re using exterior grade A/C (one side is good A grade, the other a lesser quality, C) plywood as our base.  After, thin (1 1/2 to 2 inches wide) strips will cover the seams and nails.

Pool-House-Board-and-Batten-Design

Before installing, Ben meticulously measures all obstructions, then transfers the measurements to the sheet before cutting the sheet to fit.  Once cut, I hold the cut sheet in place, about an inch off the floor to prevent the plywood from wicking up water that will be on the floor.  A quick nail into a visible stud helps hold the board in place while we mark the stud placement across the panel.  Obviously, nailing into the stud is necessary to securely hang the sheet on the wall.  But it also ensures the nails will be hidden beneath our spaced batten strips.  Marking is made quick with an eight foot level and pencil.

Pool-House-Plywood-Marking-Studs

More nails along the pencil lines keep the panel firmly in place.

Pool-House-Plywood-Hanging-Detail

Installing the sheets isn’t difficult, just time-consuming thanks to the many necessary cuts around outlets, windows, and doors.  Particularly the kitchen wall, which had as many as seven cuts around objects in a single panel.  Careful measuring and marking of the sheet before hanging is crucial to keep the sheets as seamless as possible.

Pool-House-Plywood-Around-Kitchen-Shelf-brackets

Knocking out the most intricate pieces first makes the rest of the sheets feel easy by comparison.

Pool-House-Plywood-Hung-in-Kitchen

We’re continuing, working our way around.  In an effort to prevent as much waste as possible, we’re cutting pieces in strips to avoid big, unusable chunks taken from the windows.  The gaps below will get filled in with left over pieces cut from other areas like doors.

Pool-House-Plywood-Hanging

Essentially, we’re putting together a big puzzle, looking at each piece and how to best use it.  It might not look like much yet, but this is similar to the drywall phase of a project.  It’s the turning of the corner from “unfinished construction” toward “beautiful, finished room.”  Because the batten strips will terminate into the baseboard, we’ll have to tile the floors after hanging all of the sheeting.  Big, exciting things coming up!

Importance of Insulation

Bit by bit, progress is happening in the pool house and we’re this close to being able to close up all of the walls.  If you’re feeling like we’ve been working on this forever, you’re not alone.  Officially, we started late last year on the ceiling, which was a task and a half.  Though the rest of this room is relatively accessible, the peaks via ladder, we still have dozens of steps to tackle.  And that’s just the walls and the stuff inside.

Creating beautiful rooms is only half the battle.  Creating functional and efficient spaces is the other half.  The far less glamorous, ugly, tedious, and often underappreciated half.  Right now, we’re still in the ugly phase, but hope to create something beautiful soon.

In the five and a half years we’ve lived in this house, the pool never functioned.  Which is a big reason we were able to scoop this house up for the price we did.  Because the pool doesn’t work, we shut off  all the water, hoarded building materials, and never have heated this space.  It’s large, about 1,600 square feet with 14 foot vaulted ceilings.  The majority of the north and west walls (straight ahead and right in the photo below) are concrete foundation due to the steep slope of our lot.

New-House-Pool-Room April 13 2012

When our house was built in the 70’s, it was typical to build a wood framed wall atop the foundation and fir out the foundation with 2 by 2 inch wood strips.  Essentially, there’s a thin sheet of insulation and that’s it.  Actually, you can see a little bit at the bottom of the left wall in the photo below:

New-House-Pool-to-House-April-13-2012

I guess what I’m trying to say is, this room as it was before, was about as efficient as a cardboard box.  And what’s the point of having an indoor pool if it’s impossible to heat the space to a comfortable swimming temperature in the cold months?!

To achieve that, we’ve framed in new 2 by 4 inch walls, tucking insulation between the old and new.  Above the foundation, there’s space for another sheet because we’ve eliminated the half wall step.

Pool-House-Insulation-by-Window

Our new electrical  runs behind the new studs, then Ben adds another sheet of insulation inside each stud bay.

Pool-House-Insulation-Inside-Studs

Each 2 inch thick Polyisocyanurate foam sheet has an R value of 13.  (R value is the resistance of heat flow through a given thickness of a material.)  By doubling, or in some areas, tripling the insulation, we have a total R value between 26 and 39.  Fiberglass batts have an R value ranging from 2.9 to 3.8 per square inch.

Pool-House-Insulation-Above-House-Door

Back in 2014, before we installed our new siding, we took similar steps to insulate the exterior of our home.  Then, when we remodeled our basement two years ago, we followed the same steps I described above.  Immediately, we noticed the house maintained temperature much easier, keeping cool in the summer and warm in the winter.

In the pool space, we (let’s be honest, it’s all Ben), have one more section of wall to insulate. We had already completed the front wall, so we took a break from the tedium of insulation to start hanging the 4 by 8 foot sheets of exterior grade plywood.

Pool-House-Insulation-and-Sheeting

To complete the board and batten wall treatment, we need a durable backing that can perform in this wet environment.  Hanging the sheets requires marking the 8 inch spacing of the future batten strips, nailing in place where the strips will hide the nails.

Pool-House-Sheeting-2

Each sheet hangs 1.5 inches above the floor, to prevent the sheets from wicking up any water near the wall.  Baseboards will cover the gap and thin boards will follow the edge of the ceiling.

Pool-House-Sheeting

Another horizontal band will line the room at the 8 foot mark, covering the joint of the sheets.  Something along the lines of this, but you know, real:

Pool-House-Board-and-Batten-Design

As usual, there are many steps we need to take before we can get to that point, so we’ll keep working and I’ll keep you posted.