Basement Bedroom Plans

Now that we’re nearing the end of (parts of) the basement remodel, I’m determined more than ever to put together a cohesive, inviting, and colorful room.  The newly created bedroom will serve as an overflow/more secluded guest room, at least until our kids are old enough to want separate sleeping spaces.  Right now, the room looks like this:

Basement-Bedroom-Window-Wall-Painted

She’s all dressed up with nowhere to go.  All the trim is painted Simply White and walls are Templeton Gray, both from Benjamin Moore.  Carpet has been finalized and ordered, but we’re waiting on install.  After that, we can put closet doors on, and get what little furniture we have back in here.

Basement-Bedroom-Closet-Painted

Right now, the only piece of furniture we have is a mattress.  Everything else still has to be built/found, but that hasn’t stopped the ideas swirling around in my brain.  Some days I want a plush upholstered headboard.  Others, I’m brainstorming up a beautiful leather creation.  And then there are days I want nothing but a simple wooden headboard.  This beauty has stolen my heart (as with many of the other items in the mid century Chairish collection), but it’s two sizes too small for our California King sized mattress.

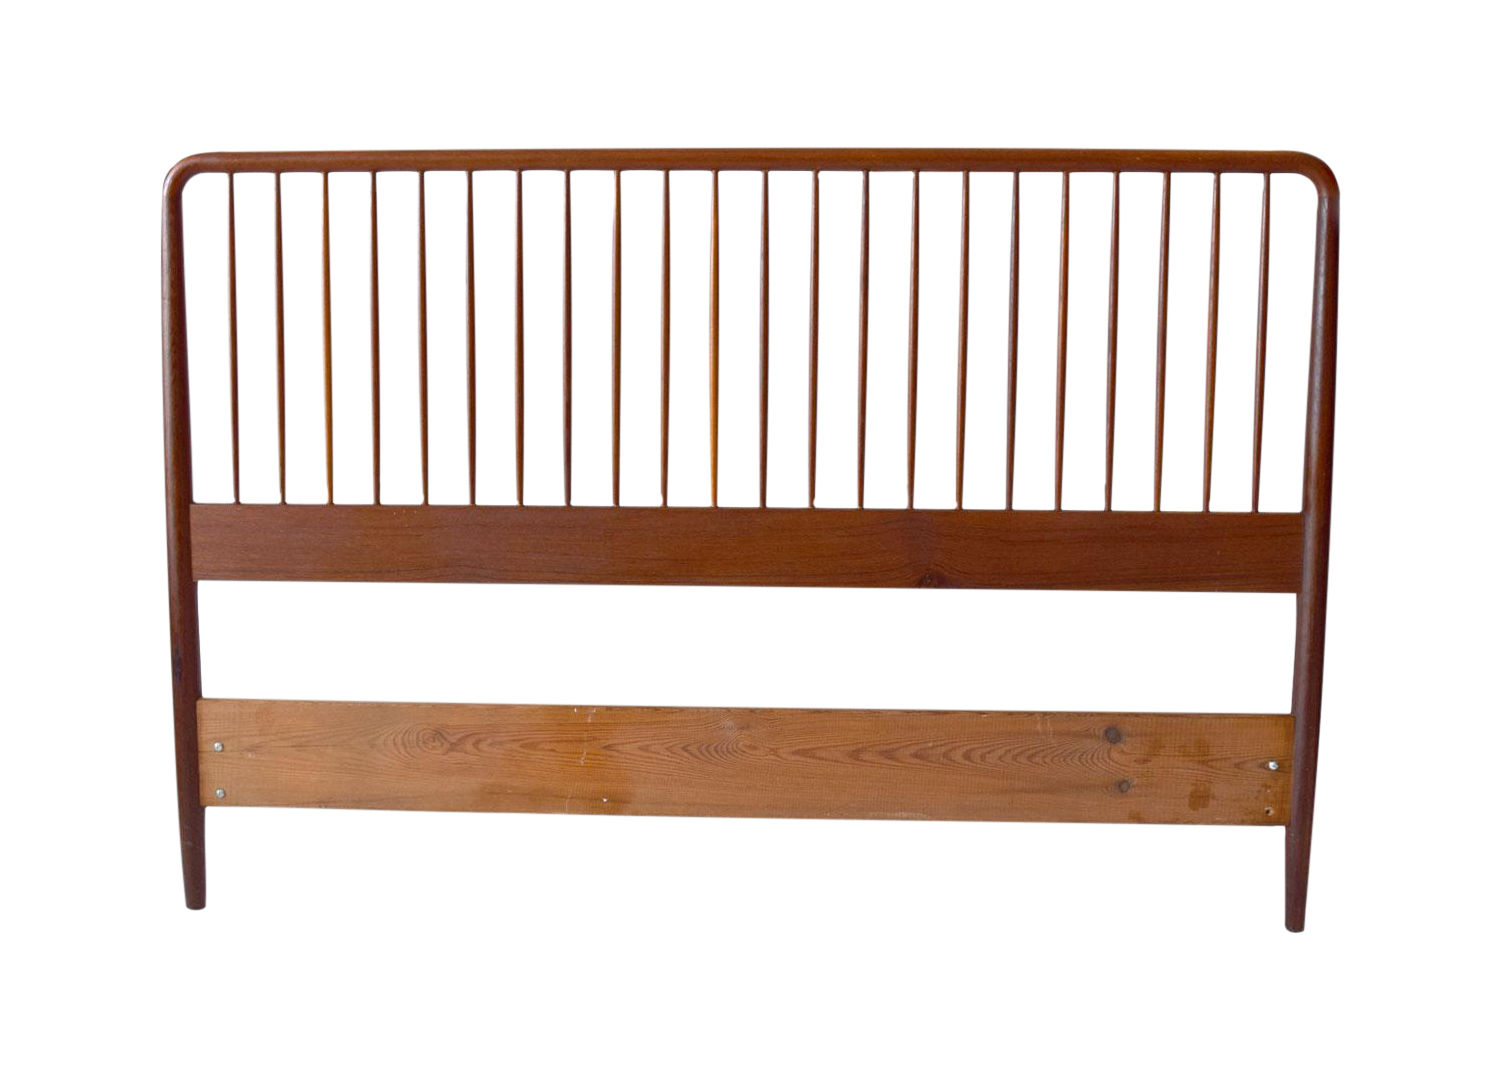
Even if the size isn’t right, it doesn’t mean I can’t use it as an inspiration/jumping off point to create something like this:

Basement-Bedroom-Design-Board-Ideas

I’ve mimicked the wall, trim, and carpet colors before layering in some of my favorite elements.  Neutrals mixed with a few bits of color, but nothing overwhelming.  Above the bed, I’d love to frame a turkey tail my father-in-law gave me.

If the final headboard is neutral, I’d love to add in some more color with painted night stands or dressers flanking the bed.  These green beauties by The Painted Hive are so fantastic. ;lkuefrlkaseliuth  Oops, that was me, wiping the drool off my keyboard.  Lamps are still up in the air until I find a pair I love.  Sconces are also an option, depending on the size of the night stands I can muster up.  Have you noticed the trend?  Everything is in flux, each item depending on another to know which way to take the design.

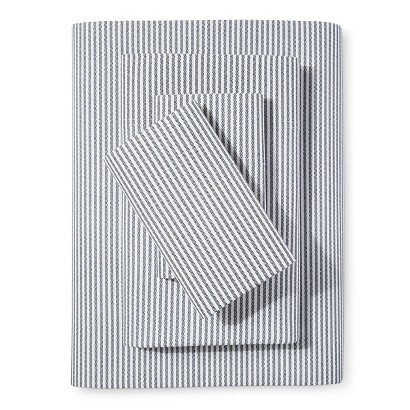
Over the years, I’ve realized I absolutely loathe making king beds with solid colored sheets.  Since the dimensions are so close, it always seems like I get the wrong side on and have to start over again.  Striped sheets not only look pretty, but the directional pattern is helpful when making a nearly square bed.

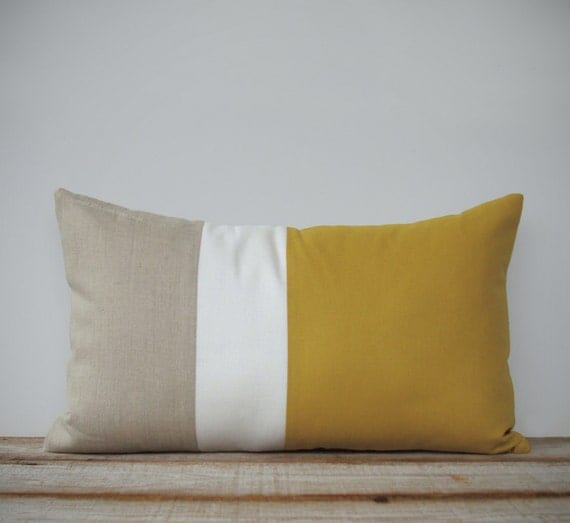
When I selected the wall color, I knew I wanted something that wasn’t a neutral, but would easily pair and complement my favorite colors: blues, greens, and mustards.  A beautiful, but simple color blocked lumbar pillow in a neutral and mustard colorway is just enough color.

For a bit more green, I’d love to hang a pair of beautiful prints by the ever so lovely Living Pattern shop.  I especially like the Pine and Maidenhair ferns.

Depending on how the space feels, I may or may not add a bench at the foot of the bed.  If that happens, I’d love a natural linen tufted beauty.  At this point, I haven’t had much luck finding pieces I absolutely love.  A test of my patience is probably going to happen, and I’m always impatiently waiting.

Carpet Sampling

Choosing carpet isn’t something we’ve done often.  In our first house, the only rooms with the cushy stuff were the basement bedrooms.  At this house, hardwood and tile are the only flooring types currently installed, but that will change soon.  Before we can get to install, we had shopping and serious deliberations to go through.  Ironically (or luckily?) carpet is the element Ben and I disagree on most.

At the beginning of our search, I said I preferred patterns created by texture, something like this.  A shorter, dense pile that holds up better to foot traffic, with subtle interest from the pattern.  All great selling points in my book.

Home-Decorators-Texture-Pattern-Carpet-Sample

Ben, however, prefers for his carpet to feel, well, like a wall to wall mattress.  Thicker + cushier = better.  I tease that he’s a princess about area rugs and carpet, and he doesn’t argue against that.

Basement-Carpet-Samples-Sharkskin-and-Gray-Flannel

He also wanted nylon fibers, which greatly whittle down the available options.  After hitting up several stores, we dragged any and all interesting sample boards home to evaluate.

I nearly had him ready to pull the trigger on the waffle-esque  pattern, but then he talked to installers.  Always researching, that guy.  Turns out, installers don’t really like the pattern, because it takes considerably more time and effort to keep the lines straight.  Essentially, the pattern is like tile and grout lines, but can easily be stretched out of alignment.  Crooked walls are even more of an obstacle.  Unlike tile, as carpet wears the fibers loosen and look saggy, needing restretching down the road.  Often times, the wear is not even throughout the room, and certain areas can be stretched up to several inches while others go untouched.  For these reasons, a patterned carpet was officially out of the running.  Womp, womp, wooooomp.

Back on the hunt for a plush carpet we could agree on.  Here were our basic considerations to get to our final choice:

1.  Fiber type:  In our search we found that the majority of carpets carried are polyester, polypropylene, or a polyester blend.  Yes, there are some nylon, wool, cotton and other fibers, but polyester seems to greatly outnumber the other options.  Generally speaking, nylon costs more, but is the strongest fiber, thus can handle heavier foot traffic.  Nylon carpets hold their twist better, preventing the worn look of frayed ends.  For this reason alone, Ben wanted a nylon carpet.

2.  Pile length:  From my wish list, I wanted a shorter, dense pile to minimize the look of traffic patterns.  Just like grass, the longer it is, the more obvious the wear.

3.  Face weight:  The face weight of a carpet is how many ounces of one yard of actual fiber (not including the backing).  To generalize, the higher the weight equals a more dense and better quality carpet.  That is, assuming the pile length is the same.  If it’s really easy to feel (or even see) the backing, the lower the face weight will be.

4.  Coloring: With the carpets we considered, we had the choice between solid or flecked.  I immediately eliminated the obviously speckled look, since it’s just not my thing.  On the other hand, in some cases, Ben likes the interest it adds.

5.  Price:  Like all products, there’s a wide variety, covering all ends of the price spectrum.  We didn’t set a budget for carpet, instead, we wanted the quality and durability to take priority.

After checking all of those boxes, we had our winner: a nylon, 70 ounce face weight, subtly speckled plush carpet that feels like walking on a cloud.

Basement-Carpet-Sample-Back-Info

Of course, there was one last debate-colors.  I loved the lighter slightly oatmeal gray, Sharkskin, to keep the rooms feeling bright.  Ben, being the more practical of the two of us, liked the darker, more forgiving if spilled on Grey Flannel.


Basement-Carpet-Samples-in-Bedroom Both are good neutrals and will work, but I really pushed for the lighter, arguing these aren’t high traffic areas.  Ben still insisted on the dark, and I gave up the fight.  When making so many house design/decor decisions, we’re in 100% agreement.  Sometimes, Ben just doesn’t have an opinion (typically when paint colors are involved).  Since he so rarely insists on something, I couldn’t argue.

Basement-Carpet-Samples-in-Theater-Room

In both doorways, the carpet will butt up to the slate tile, so the darker will allow the color to flow a bit more seamlessly.

Basement-Carpet-Samples-by-Slate-Tile

The basement has been measured, carpet is ordered, and we’re waiting for it to arrive and be installed.  One last step to moving furniture back into these rooms and finishing the laundry and bathroom.


Basement Trim & Paint Progress

Basement progress hasn’t been quick, but with a down-to-the-studs starting point, I guess that’s only natural.  It’s been a while since the last update, so here’s a run down of the changes made.  Directly ahead from the base of the stairs and garage door is the mud nook with the bedroom beyond.

Basement-Hall-Toward-Bedroom-Sheetrock

We spent two weekends hanging sheetrock before hiring a crew to tape, mud, sand, and prime to avoid getting bogged down.  Money well spent, if you ask us.  Right after they finished, we laid slate tiles in a herringbone pattern (same as the kitchen).  Next, Ben hung doors and installed baseboards, crown, and door trim while I filled, caulked, and painted doors.

Basement-Hall-and-Mudnook-Trimmed

With all the trim filled, I spent most of my waking hours painting.  Just painting away.  First trim, then walls.  We carried the same paint from the main level down the stairs, and into the hallway.

Basement-Hall-and-Mudnook-Painted

In the south facing bedroom, I wanted to use a bolder color.  Something to break up all of the neutrals in the adjoining spaces.

Basement-Bedroom-Closet-Sheetrock

Enter Templeton Gray from Benjamin Moore.  It reminds me of dark and stormy skies; blue with enough gray to keep it from feeling bright.  Depending on the lighting, it can look gray or blue.  A color that can easily pair with golds, mustard yellows, navy, wood tones, and my favorite-green.

Basement-Bedroom-Closet-Painted

Bedroom and closet doors are waiting in the wings, ready to install soon.

Basement-Bedroom-Painted-Toward-Garage

Back out in the hall, the first door leads to the laundry room.

Basement-Laundry-Sheetrock

To save space, we installed a pocket door, and modified the trim to fit the lowered ceilings.

Basement-Laundry-Pocket-Door

Let’s continue down the hall, toward the theater room.

Basement-Hall-Toward-Theater-Sheetrock

Duct work runs the length of the hall, lowering the ceilings by about one foot.

Basement-Hall-Toward-Theater-Trimmed

In an effort to minimize the height difference, I carried the wall color up to the ceiling.

Basement-Hall-Toward-Theater-Painted

Down in the theater, the duct continues through part of the room.

Basement-Theater-from-Hall-Sheetrock

To create a dark, enveloping room, I chose a deep green for the walls, Jasper from Sherwin Williams, in a flat finish.  As with the hall, the color continues onto the lowered ceiling.

Basement-Theater-from-Hall-Painted

Eventually, we’ll mount the TV to the wall with a cabinet below.

Basement-Theater-TV-Wall-Shetrock

This shot is the most accurate color representation.  It’s exactly what I hoped for, dark enough, but still looks green.

Basement-Theater-TV-Wall-Painted-2

Carpet samples are on their way here so we can decide on a color before ordering.  Once carpet is in, we can officially start using these rooms!

Basement-Theater-Window-Wall-Sheetrock

Thanks to the configuration, we had to make the theater door swing into the hall to avoid a door awkwardly sticking out.

Basement-Theater-Door-Sheetrock

Through that door is a storage space, which would be a closet if used as a bedroom.

Basement-Theater-TV-Wall-Painted

Looking back down the hall, the doorway on the left is the bathroom, laundry after that, and mechanical straight ahead.

Basement-Hall-from-Theater-Sheetrock

And the nearly after view, minus missing carpet and lights until the paint has cured.

Basement-Hall-from-Theater-Painted

I’ve got ideas swirling in my head for furniture and accessories, which I can’t wait to get a start on.

Four Year House Tour: Part 3

For the last part of the four-year tour, let’s look outside, at our first impression.  Initially, the neighborhood, lot, and views piqued our curiosity.  Enough to look it up online, which only fueled our discussions.  If for no other reason, we had to see the inside just to get it off our minds.  Clearly that didn’t stop the swirling ideas, instead, we would regret not moving forward.  The house had been lived in, but neglected.  Many parts hadn’t been updated since the house was built.  Some work had been done, but not completed.  Landscaping all over grown.  The picture of beauty, right?  Maybe not, but at least potential.

New-House-Exterior-Bedroom-April-13-2012

Before replacing the siding, we decided to take the opportunity to make the house more energy-efficient at the same time.  We wrapped the house with insulation, then started with the pretty changes.  A mixture of dark gray painted lap siding, warmed up by rusting CorTen vertical siding.  Horizontal railings modernize and compliment the boxy structure of the house.

Stained-Balcony-Front

In the back, a large fountain sat centered on a weed filled paver patio.  It looks like there was landscaping done before, but had all grown over.

New-House-Back-Yard-April-13-2012

To create a more usable outdoor space, we pulled out the patio and fountain to create a large deck with a more natural looking water feature-a waterfall.  Though unconventional, the deck is made from reclaimed structural beams.  A DIY natural gas fire pit is a great gathering space for parties and s’mores roasting.

Big-Ass-Benches-by-Waterfall

Near the house, there was a small landing area created from rock with several steps leading down to the patio area.  It wasn’t ideal and broke up the area without adding function.

New-House-Back-Yard-Stairs April 13 2012

We chose to remove the steps, lower the door, and make everything one level.  Over time, I’ve slowly added plants, turning the drab landscape as lush a possible.  There are areas I’d love to fill in for maximum coverage.

Back-Garden-and-Deck-from-Side-Stairs

Before, the large space felt very compartmentalized and single use.

Back-Yard-Apple-Tree-Down

Now it’s our private oasis, perfect for relaxing, eating al fresco, and watching the kids play.

Pool-House-Back-Rusted-Steel-Wall

A steep hillside quickly goes up from the house level, but the lack of landscaping looked dull and lifeless.

Back-Yard-from-Low-Tier

It’s been a long process, but the work has certainly been worth the effort.

Back-Deck-from-Hill

That sums up our four year house tour and progress.  Hope you’ve enjoyed the before and after comparison and updates.  Thanks for the encouraging comments and suggestions!

Four Year Home Tour: Part Two

Continuing the tour, let’s walk down the hall and peek into the bathrooms and bedrooms.

Four years ago, when we closed, the only tub in the house was the clawfoot in the main bath.  Having two little kids and guests, a tub only wasn’t the most ideal layout, nor were the finishes selected.

New-House-Main-Bathroom April 13 2012

Our first project was to remodel the bathroom, adding a tub/shower combo, and create more privacy by the toilet.

House-Tour-Four-Years-In-Main-Bath-from-Door

Across the room, a large, intricate vanity with small drawers and little storage took up a lot of floor space.  Note the plug-in sconces, in a bathroom.

Main Bathroom Vanity Before

Utilizing vertical space, we built the floor to ceiling narrow shelving for storage.  Keeping the vanity open, and painted a unique color, visually lightens the room, while still offering storage for toilet paper, towels, and bath toys.

House-Tour-Four-Years-In-Main-Bath-Vanity

The smallest bedroom in the house, the guest room, featured wall to wall, floor to ceiling oak bookshelves, a boob light, and another broken window.

Guest Room Before

With a tight layout, we wanted to create a useful room, with plenty of walking space and even a dresser.  To do so, we cut out a notch in the shelves to recess the bed, making a cozy nook.  Sconces flank either side, with the shelves serving as a nightstand.  A larger window creates an egress access and brightens the north facing room.

Guest-Room-Makeover-Green-Walls-Upholstered-Headboard

Across from the bed is a petite dresser and small closet.

Guest-Room-Makeover-Green-Walls-Toward-Door

Perhaps the most neutral space before, the boys’ bedroom, had two windows and oodles of sun shining in.  It also had unevenly patched walls and popcorn ceilings.

Boys Room Before

When working on spaces for kids, I like to ask for their opinions.  Before getting started on the fun stuff, I fixed the walls, scraped the ceiling smooth, and we replaced the fogged up old windows.  Then came the fun part, and the boys helped choose the wall color, art, and stripe curtains.

Boys-Bedroom-with-Large-Rug-from-Door-Wide

There’s a small space between the entrance and closet doors, but the starting point was a blank slate.

Boys Room Before

To use the small space, a handed down bookshelf fills the space nicely, without eating up precious real estate.  Of course the Star Wars gear makes an appearance.

House-Tour-Four-Years-In-Boys-Bedroom-Closet-Side

While the boys’ room was neutral, the master bedroom had peeling/painted over wallpaper, electric blue walls, two large windows, an ugly ceiling fan, and popcorn ceilings.

New-House-Master-Bedroom-Front-April-13-2012

As with the entry, we added a wood planked wall for texture and interest and later painted it white.  On other walls, I painstakingly peeled off the old wallpaper and scraped off popcorn ceilings.  A custom bed, sewed leather top curtain panels, and floating nightstand add character and warmth.  We also replaced the window and added a door leading out to a small, private balcony.

King-Bed-Frame-Finished-Overall

Along the left wall is our walk in closet.

New-House-Master-Bedroom-April-13-2012

Oh the power of paint!  Blue walls be gone, in with bright white and nearly black walls.  A large leaning mirror is a functional way to put the small area to work.  Storing extra blankets looks good on a DIY ladder rack.

House-Tour-Four-Years-In-Master-Bedroom-Left-Side

Across the room is the entry door (to the right) as well as the master bathroom (on the left).  With a generous open area, it’s a bit challenging to put to good use.  A master sitting area seems to be the go to.

Master-Bedroom-Bath-Side-After-Move-In-April-30

Instead, a recently found Craigslist dresser brings the warm wood tones over to this side of the room.  Added storage is always a plus, but I love having a surface to hold decorative items, too.  I hear masking tape is the new, modern alternative to picture frames, didn’t you?  Haha, no, a frame will happen…eventually.

Craigslist-Dresser-with-Emily-Jeffords-Art-by-Bathroom

Four years ago, if you went through the door you would have seen a hot dog covered with ketchup and mustard-esque room.  Red walls, yellow tile and sinks, and brown floors.  In a word, woof.

Maroon Master Bathroom Before

After a full gut remodel, we have a modern meets rustic retreat.  Ben built a custom walnut vanity, topped with a stainless steel counter and vessel sink.  More tongue and groove is a durable lower wall and a high contrast against the dark upper.

Abstract-Landscape-Painting-in-Bathroom-Version-2-with-Vanity

Double sinks on a long vanity were nice, but not something we really need.

Maroon Master Bathrom Vanity Before

Instead, we shortened the vanity to five feet with a single sink, allowing room for the clawfoot tub we pulled out of the main bath.

Master-Bathroom-Vanity-for-BHG

Though much of the basement is still in the process, here’s a peek at the previous arrangement.  Door number one (to the left) led into the under stair storage, and the small French doors went into a big, open space.

New-House-Garage-Entry

With a bit of reconfiguration, we turned part of the under stair storage into a small mud nook.  Straight ahead is a bedroom, with a theater space on the other side.

Mud-Nook-from-Garage

Stay tuned for the exterior changes, as this post has also gotten lengthy.