Fauxrarra Marble

Winter is still here in full force, which means I’ve been stuck in the house.  A lot.  So I’m forced to keep my self entertained, often involving a project.  Precisely why I’ve painted this table top for the third time in less than one year.  Third time’s the charm, right?

Faux-Marble-Table-Top-Toward-Fireplace

See, as I flipped through the new West Elm catalog, I kept imagining the Reeve Mid-Century Coffee Table in our house.

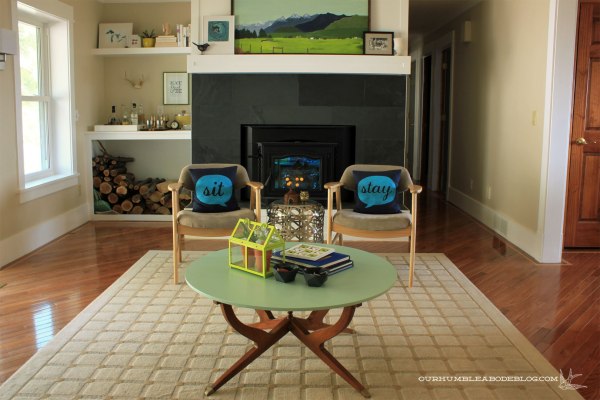
Then it dawned on me, I already have a similar clean lined, handsome wood, brass footed table.  The big difference?  It didn’t have the beautiful, sophisticated marble top.  Instead it had a bold chevron top.  At the time I painted the stripes, I loved the added pattern.  Now, I’m kind of over it.  Not over it enough to paint over it, oh no, that took too long to do.

Chevron-Table-Top-in-Family-Room

Ideally, I’d have a real marble slab, but I’m afraid the folding base design couldn’t handle the added weight.

Faux-Marble-Table-Top-in-Family-Room

But the other side, a minty green, was fair game.

New-Coffee-Table-in-Family-Room-Toward-Fireplace

I painted three coats of eggshell white latex on it and then started my faux marble paint treatment.

Using a few gray and black craft paints, I watered each color down.  I didn’t measure (and don’t have pictures) but I’d guess it was 1 part paint to 2 parts water.  Super runny and I barely mixed each color, which helped create a more natural variation.  A feather worked best to apply a thin, free-flowing line of watery paint.  Immediately after making the line, I used a 2 inch angled craft paint brush to stipple the paint.  Just after stippling, I followed up with a damp paper towel, blotting to blend the paint and soften the edges.

Faux-Marble-Table-Top-Vein-Detail

Some areas are much lighter and more blended.  A few other veins are darker with black patches.  If I didn’t like how one area looked, I used my damp cloth to wipe the paint away and start over.  Once I finished, I coated the top with satin Polycrylic for a protective finish.

Faux-Marble-Table-Top-Detail

The sides are painted to match.  Carrying the marble paint to the sides helps give a more realistic effect.

Faux-Marble-Table-Top-with-Legs

Maybe I just needed a change, but I’m enjoying the lighter, more subtle top.

Faux-Marble-Table-Top-2

I think it balances the base better and lets the interesting leg shape shine.

Faux-Marble-Table-Top-Toward-Windows

Faux-Marble-Table-Top-Toward-Entry

Not a bad result for a free project and 10 dollar base.  What coffee table tops do you like best?

Cart Wheels

The thrifted bar cart has a new home and new purpose.  Miss Scarlett, in the dining room, with the candlestick.

Dining-Room-with-Cart-and-Plants

Okay, actually for me, in the dining room, holding plants.

Cart-with-Plants-in-Dining-Room

When I bought it, only one shelf had glass.  To make the cart fully functional, I had Ben cut a piece of of 1/4 inch MDF and painted it white.

Cart-in-Dining-Room-with-Plants

Plants sit on the glass shelf, which is great because it’s super easy to wipe up if I drip water.  This sunny spot is perfect for keeping my growing plant collection happy.  Including the $2.50 orchid I recently picked up from the grocery store clearance section.  It’s not looking good right now (hence the clearance price).  Do you have any tips to help me revive this beauty?

Cart-with-Plants-in-Dining-Base

The new bottom shelf holds napkins, placemats, extra plates, and a few decorative items including mini disco balls.  Having napkins and placemats easily accessible has come in handy at dinner already.

Cart-in-Dining-Room-from-Corner

I’m glad to have a place to corral my plants, while keeping them happy.  And to put this little wheeled dude to practical use in a tucked away corner.

Tangle of Triangle

Going stir crazy this winter, I’ve been looking for changes I can make to the living room.  It’s not terrible, but we have barely touched it.  I’d really love a new sofa, but I’m settling for new lamps right now.  I remember seeing the Isosceles lamps from Land of Nod (now unavailable) months ago, and loved the simple design.

So I recently made a version for about 12 dollars per lamp because I already had the white shades.

Isosceles-Table-Lamp-Finished-on-Table

At Home Depot, I bought 12 feet of 1/2 inch round wooden dowel for six bucks.  To make the bases, I cut 7 1/2 inch long pieces, with 60 degree angles to form each base triangle.  And another set at 3 1/2 inches to make the top equilateral triangle.

Isosceles-Table-Lamp-Base-Cuts

A little wood glue and tape to hold it in place until it dried did the trick.  To connect the triangles, I cut 15 inch long pieces at a 20 degree angle, though my cuts were slightly off.  But that’s okay, wood filler will make it look okay.  Ben helped my by shooting in pin nails while I held the pieces together to make this:

Isosceles-Table-Lamp-Assembled-and-Filled

The triangles face opposite directions, and the connectors swirl around, point to opposite point.

Isosceles-Table-Lamp-After-Filled-Joints

Fill in all gaps and corners, then let them dry.

Isosceles-Table-Lamp-Filled-Joint

Because I wanted slightly rounded corners, I used 50 grit sand paper to quickly take off the extra base triangle point.  Holding the sand paper at the same angle as the vertical while I worked made for a more seamless corner.  Then I followed up with 150 paper for a smooth finish.

Isosceles-Table-Lamp-Sanded-Joint

Then, to hold the lamp socket in place, I but two more triangles from 1/4 inch MDF.  The top looks normal, but to fit snugly without falling through, I sanded the bottom to fit the rounded shape.  Before putting the top in, I found the center and drilled a hole large enough for my threaded piece to fit through.

Isosceles-Table-Lamp-Triangle-Top-Pieces

More wood glue holds this top in place, giving the socket a resting place.

Isosceles-Table-Lamp-Top-Triangle-In

I bought two bottle lamp kits from Wal-Mart for $6.50 each, and used these pieces in addition to the wire.

Isosceles-Table-Lamp-Wiring-Pieces

To cover the threaded fitting, I bought a small chunk of brass tube to make a sleeve.  Once cut to size, I spray painted it white to match the lamps.

Isosceles-Table-Lamp-Cover-Tube

Then threaded the piece through the hole:

Isosceles-Table-Lamp-Wiring

And secured it with the small flat nut on the underside.

Isosceles-Table-Lamp-Wiring-Underside

After connecting the wires, I popped the shade on and voilà, a new lamp.  Like the Land of Nod lamp, the cord isn’t hidden, just tucked in the center and drapes along the back.

Isosceles-Table-Lamp-Finished-Cord-Detail

Isosceles-Table-Lamp-Finished

No more clinking of lamp chains from our old lights.  And the taller lamps give have a warm, even glow.  I tried lining the shades with gold fabric, but it blocked too much light, so I had to nix it.  All the gold paper I could find wasn’t long enough to fully wrap around the shade.

Isosceles-Table-Lamp-Finished-in-Living-Room

I’ve got a plan to update those cheapie end tables, too.  White marble remnant in the garage, prepare to be used.  And look how happy my fig looks!  It has already sprouted two new leaves and is working on a third.  Those tulips should bloom in a few weeks, too.  I’m so excited.  Loving all the green in the house during this dark, cold winter.  Anyway, back to the lamps.  If I were to make these again, I’d make the top triangle a little larger to have a wider spread.  But, I’m still happy with the result.

If You Mess With the Bull

You get the horns, hung up.  Last week, the UPS man delivered our West Elm Mobile chandelier.  After living without an entry light for two months, it certainly is nice to see at night again.  Right now we have six small round 25 watt globe lights, but I’d love bigger 15 or 20 watt bulbs.

West-Elm-Mobile-Light-in-Entry-On

Install was pretty easy, though poor Ben had to hold it while wiring because I couldn’t reach to help.  While he had the ladder out, I asked him to hang the Longhorns.

West-Elm-Mobile-Light-in-Entry-from-Dining

Unfortunately, a stud wasn’t centered on the wall, so the horns are a few inches off to one side.

West-Elm-Mobile-Light-in-Entry

But, I’m still thrilled to have a light and decor in the entry.

West-Elm-Mobile-Light-in-Entry-from-Below

I’ll be even more excited when we get around to other entry changes.  Like sanding the ceiling and wall patch, installing paneling on the tall wall, and swapping out the front door and window.

West-Elm-Mobile-Light-in-Entry-from-Family-Room

See the tape on the window?  We’re hoping to reuse the 8 foot tall glass door from the dining room with a transom style window above.

Christmas-Home-Tour-Dining-Room-and-Living

After researching doors, we really like the look and function of a double door with large windows.  A few houses in our neighborhood have full glass double doors and we love them.  With below freezing (and lately far below zero) temps, we can’t exactly start on this, but we’re itching to get there.

Bathroom Before and After

When we moved into this house, the master bathroom was dated with yellow tile on the floors, counters, and shower.  The brown grout always looked dirty.  And those red walls.  Oh, I couldn’t stand those red, patchy walls.

New-House-Master-Bathroom-Toilet-April-13-2012

Though the bathroom was large and filled with light from the big window.

New-House-Master-Bathroom-April-13-2012

A shower leak bumped this remodel up the priority list, and we couldn’t be happier to bid the old room adieu.  Last fall I quickly painted the walls a light green, just to cover up the red (but didn’t bother taking the light fixture down to paint behind).  So, here’s what the room looked like before demo work began:

Master Bathroom Macinack Island Green

Master Bathroom Macinack Island Green Window

Which is a stark contrast to the finished room we’re using today:

Finished-Master-Bathroom-Overall

Ben built a custom solid walnut vanity topped with a vessel sink with stainless steel countertops.

Finished-Master-Bathroom-Vanity-Overall

Wood planked walls and ceiling give subtle texture and the nearly black painted upper part has a high contrast I love.

Finished-Master-Bathroom-Mirror-Detail

Accessories and the long teal linen window curtains pop against the neutral walls.

Master-Bathroom-Finished-Vanity-Area

Simple DIY art, arrows, and a copper bud vase add personality and really make the room feel lived in.

Finished-Master-Bathroom-Vanity-from-Door

Finished-Master-Bathroom-Toilet-and-Vanity

The new slate floor and marble shower tile feels ultra luxurious.

Finished-Master-Bathroom-Shower-Overall

Our low profile curtain hanging system also helps keep the bathroom open and airy in a way even a glass wall couldn’t.  And with far less cleaning and maintenance.

Master-Bathroom-Finished-Shower

But we can’t forget the tub, because that’s a key piece in this remodel.  By shortening the vanity to a single sink, we were able to make room for the claw foot tub.

Finished-Master-Bathroom-Tub-from-Door

I’d love to make a small shelf to rest on the tub, because the rattan stool is in the way of the door swing.

Finished-Master-Bathroom-Tub

Finished-Master-Bathroom-Tub-and-Arrow-Detail

One last item on the bathroom to do list is replace the window and surrounding trim this spring or summer.

Finished-Master-Bathroom-Door-and-Tub

Finishing a room always feels great, but this one is especially satisfying.  So many elements we love, some we weren’t comfortable putting in a main bathroom.  Like the claw foot tub.  The boys have used it a few times already, and we’re happy not to have to worry about four sides of splashes on a daily basis.