The Progression of Our Entry

As with many remodels, some rooms take priority and are finished first and quickly.  Others are a slow but steady progression toward an end goal.  Our entry has certainly fallen into the latter category, with small changes taking place over the last four years.  In such a small space, why can’t progress go quicker?  First, let’s look at the space the day we got the keys.New-House-Entry April 13 2012It was as dark as it looks, heavy on the wood tones, red curtains, and stained beige marble floors.  The Tiffany style light was too ornate as were the corbels supporting an arch dividing the entry and living rooms.  Soon after, we pulled off the curtains, tore out the arch, built a slim entry shelf, and put in a new light fixture.West-Elm-Mobile-Light-in-Entry-from-Family-RoomOy, I don’t know if I’d say the space looked better, but it was going places.  The big blank wall with a heavy knock down texture just loomed, all peach and boring.  Knowing we’d need a giant piece of art to cover it, we decided to add a painted tongue and groove accent wall.  Not only does it add a good kind of texture, but the simple white is a great backdrop for a pair of vintage Longhorns.Tongue-and-Groove-Entry-Wall-from-Living-RoomJust painting over the peach walls with a warm gray made a huge difference, somewhat updating the orange oak railings.  Still, the old front door and too tall window above weren’t cutting it.Finished-T-and-G-Plank-Entry-Wall-with-ConsoleThen, a big game, ehhh, room changer happened when we swapped the front door.  Replacing the standard door and sidelight combo with an 8 foot tall by 6 foot wide full glass door floods the entry and stairs with natural light.  A shorter, transom style window above is better proportioned.Replace a Front DoorMore recently, while we had access to the underside of the posts from the unfinished basement, we built a sleek stair railing.  Ahh, the transformation was nearly complete.Lingering-To-Do-Entry-TileTwo weekends ago, while discussing what tools Ben could clean up and put away, I mentioned the entry tile could be a quick project to tackle.  He said it wasn’t on his priority list and I carried on with painting the basement bathroom.  That was, until I heard an awful lot of hammering and went to check it out.  Turns out, Ben had started tearing out the old tile.  After I finished painting, I grabbed a hammer and gleefully broke up tile with him.  By carefully scraping, we were able to reuse the Hardie board and were left with this:entry-without-tile
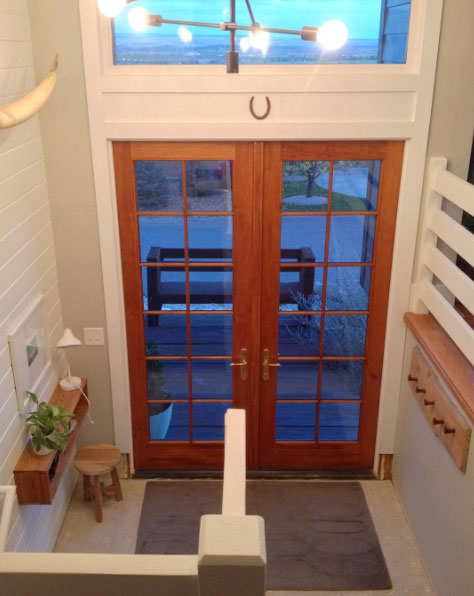
Last Saturday, Ben laid new slate tile in a staggered brick pattern and grouted on Sunday.  Baseboards are finally in and waiting caulking, filling, and painting to complete the look.entry-slate-tile-from-top-of-stairs

entry-slate-tile-from-top-of-stairs-2Other than painting the baseboards, I’m ready to call the entry complete.entry-slate-tile-toward-plank-wallWith or without the Halloween decorations.  The bats have made another appearance, along with a barbed wire ‘wreath’ wrapped with twinkle lights.entry-halloween-2016That concludes the entry transformation, at least I think it does.  You know, until I change my mind and want to add something.

Railroad Spike Coat Rack

Our entry isn’t huge, roughly eight by four and a half feet, but it is very nice to have a separate designated space.  With the door slightly off-center, there’s a sliver of wall with a box shelf to keep keys, sunglasses, and other necessities close by with a stool tucked below.  Across, there’s a half wall, where the living room floor starts.  It’s an awkward little wall, with the stairs going up that turns into a strange polygon.

coat-rack-in-entry-from-top-of-stairs

Though we have an entry closet at the top of the stairs, and our newly added mud nook right inside the garage door at the base of the stairs, those are areas mainly used by our family.

Build in a mini mudroom: https://ourhumbleabodeblog.com/2016/04/01/mud-nook/

I wanted a quick and easy drop spot for our guests to hang coats, purses, and backpacks close to the front door.  After a day visiting Ben’s dad at the ranch, I found some great items to turn into a unique coat rack.  I also came home with an old horseshoe and another turtle shell to hang above the art in the dining room.  Such a treasure trove of goodies!

turtle-shells-in-dining-room

Anyway, back to the coat rack.  To start, I snagged a board of live edge wood along with a bunch of railroad spikes.

coat-rack-from-front-door

After discussing my idea with Ben, he helped me make my idea a reality.  While I thoroughly looked at the board, I settled on the most character filled three feet and cut it to size.  At three feet wide, I wanted to space 5 spikes six inches apart, leaving six inches on either end.  Following the shape of the wood, I marked five dots while Ben used a steel cutting chop saw to cut the spikes to three inches.

coat-rack-materials

I didn’t want any visible attachment, so Ben drilled 3/4 inch holes, then used a rubber mallet to pound the spikes in.

coat-rack-holes

Who says you can’t jam a square peg in a round hole?

coat-rack-making-hammering

The result is seamless, simple, and rustic-just the way I like it.

coat-rack-spike-detail

Hanging was as easy as two screws through the wood, into the floor joist.

coat-rack-in-entry-toward-living-room

Turning that little sliver into usable space should come in very handy this winter season, especially.

coat-rack-in-entry-toward-doors

Style wise, the simplicity blends seamlessly with the adjacent living room.

coat-rack-below-living-room

The best part is that it took about 30 minutes, start to finish to make and hang.  I’m wondering if it’d be too much to make another to use as a towel rack.

A Simple Headboard

Sometimes it feels like we’re treading water on big projects-you know, doing a lot of work but easily goes unnoticed.  Wow, what an encouraging, uplifting way to start, huh?  You know what is uplifting?  Small, quick, straight forward projects to break up the longer, meatier ones we have going on.  With most of the basement wrapping up, we’re getting to the fun, really obvious changes stage of the game.  One of those changes was getting the Sleep Number mattress up and off the floor with a custom bed frame.

Basement-Bedroom

Basic dimensional lumber, stain, and poly can come together to create a sleek, modern frame.  To create the base, we followed almost the exact same steps as our bed frame.

King-Bed-Frame-Finished-Left-Side

It has held up well, costs about $100 in materials, and can be assembled in less than a day.  One noticeable difference is the headboard.  I love the splash of green in our bedroom, but wanted something warmer to contrast against the blue-gray in the basement.


Basement-Bedroom-Headboard-Overall

After debating a variety of wood designs, I went with the KISS method and kept it simple, stupid.

Basement-Bed-and-Nightstand

Ben used 2 by 4 boards for a completely solid design.  I’m usually 100 percent opposed to the rounded edges of dimensional lumber, so we ran each board through the table saw before assembling.

Basement-Bed-HeadboardDetail

With boards prepped, we cut to length, lined each up on the garage floor, and screwed boards to the back, connecting the pieces together.  For a finished edge, we used more 2 by 4 material to create a frame to wrap the edges.

Basement-Bed-Headboard-Corner-Detail

These boards hide the edges as well as the vertical connecting pieces, leaving a 3/4 inch reveal.

Basement-Bedroom-Headboard-Corner-Detail

We now have a neutral base to layer anything and everything on and around.

Basement-Bed-Pillow-Detail

Pinstripe sheets, small plus sign pillow cases and a kilim throw pillow add a boost of pattern and playfulness to the room.

Basement-Bed-Pattern-Mix

Next step, new night stands to replace the single petite dresser that is standing in.

Laundry Room

Do you hear that?  No, I’m not crazy, the choir of angels is singing because we have one room in the basement without anything on the to do list.  As in, finished.  100% done.  Complete.  Granted it’s one of the smallest rooms, but it does boast nearly as much custom cabinetry as our kitchen, so it wasn’t as simple as throwing down flooring, slapping up trim, and tossing paint at the walls.  While the appliances have been functional nearly the entire duration of the remodel, the room as a whole has caught up.

To really feel accomplished, let’s take a look back four years ago to the beginning.   New-House-Laundry-Room-April-13-2012

I’m sorry for the orange overload seared into your brain, but that’s what we lived with until demo started.  Across the room sat the side by side washer and dryer with a utility sink oddly stuffed behind the door.  Oh yeah, and we had glue covered floors so I tucked a rug in the room to make it feel a little less gross under foot.
Laundry-Room-Washer-and-Dryer

With a few minor tweaks like scooting the door frame over, adding a pocket door, and different cabinets, we’ve got a fully functional laundry room.

Laundry-Room-Right-Side

Bright white cabinets help lighten up the windowless space, while stainless counters provide a durable work surface with a touch of shine.

Laundry-Room-From-Door

A tall cabinet in the corner holds a vacuum and ironing board, with bulky cleaning products above.

We decided to stack the washer and dryer, leaving space for our upright freezer on one side and a sink with a bit of countertop on the other.

Laundry-Room-Sink-Side-from-Door

After precariously balancing things on the edge of the old utility sink, I knew I wanted a little more space to set soaking clothes, soaps, and paint brushes.  Two shelves store the most used laundry and cleaning items, keeping it in reach.

Laundry-Room-Sink-and-Shelves

In place of the plastic wash bin, we used a single bowl stainless steel kitchen sink and pull down faucet for easy spraying or rinse action.  Don’t worry about the standard looking outlet, it’s actually connected to a GFCI in the bathroom, on the other side of the wall.

Laundry-Room-Sink

Since we buy in bulk, I decant laundry staples into containers for easy handling.  Big boxes tuck in the cabinet below for a quick refill.

Laundry-Room-Soap-Detail

Just for fun, and because I wash nearly everything on a cold cycle, I added a sarcastic laundry chart to the room.  If you really want to know what all those crazy symbols mean, here’s a real chart option.

Laundry-Room-Chart-Detail

Back to the other side, custom drying rack drawers tuck neatly away behind slim fronts.  A six-foot long counter space makes folding and sorting a breeze, and the drying racks come in handy as extra surface space to drape hanging shirts and pants on.

Laundry-Room-Drawers-Drying-Rack

On the counter, I added a Great Lakes cut out from Crafterall, along with a wooden sculpture to have something pretty to break up the gray and white.  A little cup holds chang, ear plugs, rocks, and other items I find in pockets.

Laundry-Room-Counters-and-Cabinets

This is the first time in my life having such a functional, fully finished, and if I do say so myself, beautiful and clean laundry room.  I know most people see it as strictly utilitarian, but choosing durable, hard-working elements doesn’t automatically equate to ugly.

Lingering Little To Dos

Over the course of the last four years, we’ve updated every room in this house as well as our outdoor spaces.  Pool house not included, as that is serving as a personal warehouse of building materials until we have time to finish it off.

Most rooms are completely functional, minus the basement bathroom that currently sits showerless.  Despite functionality, we’re solid 95 percenters, as I like to say.  With as many big projects to tackle as we have, it’s easy, too easy, to get side tracked and move onto the next task.  So, there are little unfinished tasks throughout the house.  All are purely cosmetic, which means they’re low on the priority list until we wrap up the basement remodel.  Ironically, most of these are quick fixes and wouldn’t take even a weekend to finish.

Replacing the cracked, stained beige entry tile with beautiful slate is on the to do list.  Removal, laying the tile, and grouting should be a weekend task.  I’m just dreading the dust storm that removal will create.

Lingering-To-Do-Entry-Tile

In the living room, our entertainment center is still without doors, and I’m greatly regretting painting the backs yellow.  We’ve gone back and forth on how we want to handle air and sound flow that isn’t an option with solid wood.  Fabric and perforated metal insets are the top contenders.

Lingering-To-Do-Entertainment-Center-Doors

Directly across from there is where I’d love to have a wall to wall window seat with bookshelves on either side.  I’ve nailed down my plan, so the hardest part is out of the way-haha.

Lingering-To-Do-Window-Seat

Over in the dining room, I had started patching the hole from the previously off centered light fixture, but still haven’t finished sanding and painting.

Lingering-To-Do-Dining-Room-Ceiling-Patch

A quick addition of thin trim along the top of the bar hutch will finish it off, covering the small gap along the ceiling.

Lingering-To-Do-Hutch-Top-Trim

In the kitchen, I’d love to add vertical dividers above the double ovens to store and divide cutting boards and baking sheets.  Right now, they’re stacked up in the drawer below.

Lingering-To-Do-Vertical-Divider-Over-Ovens

A pesky, improperly installed can light hangs down in the family room.  The housing isn’t screwed into place in the attic, so the insert can’t go completely in.  It wouldn’t take long to fix, but climbing in the hot, dusty attic isn’t high on our to do list right now.

Lingering-To-Do-Family-Room-Can-Light

In addition to wanting cabinet doors on the entertainment center, I’d like to add a set covering the wood storage area next to the fireplace.  When full, it’s a dirty mess that may be easier to contain behind closed doors.

Lingering-To-Do-Wood-Storage-Cabinets

While the back deck is finished, we still have to run wiring and install two outdoor sconces on either side of the pool house door.  Until then, we have holes with insulation stuffed inside.

June-Garden-Update-Toward-Back-Deck

Rooms on the sleeping side of the house are more finished.  No unfinished parts in either bathroom, the guest room or the boys’ bedroom.  A simple addition of a bench at the foot of our bed would fill in the awkward open space and complete the room.

Lingering-To-Do-Bedroom-Bench

Moral of the story, don’t feel bad if your home isn’t 100% finished.  Ours certainly isn’t, and that’s okay.  Everything is a work in progress, eventually those tasks will be completed, just in time for more I’m sure.