Pressed Baby Clothes = Laundry Art

Our recently remodeled laundry room is almost a square, with cabinets on either side of the door.  This arrangement left a blank wall directly ahead, desperately screaming for something colorful.

Laundry-Room-From-Door

I briefly hung a custom flag there, but decided it worked better in the hall, so the wall was empty again.

Flagology-Flag-in-Laundry-Room-2

While getting the Halloween decorations out of our crawl space storage, I also rummaged through bins of the boys’ baby clothes.  I pulled out the baby blue two piece outfit they both came home from the hospital in and another favorite I forced them to wear.  I’m not really one for theme-y decor, but the tiny clothes were far too cute to continue to hide away in storage.  Fortunately, baby clothes are small and fit into a couple of 16 by 20 inch frames I had on hand.

basement-art-clothes-in-laundry-room

After ironing the clothes flat, I carefully laid the clothes face down on the glass.  For a bit more color, I backed the clothes with a piece of green mat board before securing the bulging backs in place.

basement-art-baby-clothes-in-laundry-room

They’re certainly not perfect, but I adore the little details.

basement-art-blue-outfit-in-laundry-room

Itty bitty pockets!  Mini arms that can’t reach the head!

basement-art-shirt-in-laundry-room

As usual, I’ve fallen victim to the ‘if you give a mouse a cookie’ syndrome, and am planning more art.  Near the garage door, I snagged a 20 by 30 inch American Bison screen print from Wolf Jaw Press.

basement-art-buffalo-print-toward-garage

A frame is still to come.  Oddly enough, the cello sleeve and tape aren’t cutting it, but he sure is a handsome fella.

basement-art-bottom-of-stairs

In the guest room, I’m still on the hunt for a pair (matching or not) of proportionately sized dressers to flank the bed.  Until then, I’m propping a random, rotating display of art on the dresser.

basement-art-in-guest-room

Poor, poor blank room.  Still, I’m happy to give things time to naturally come together.

basement-art-bedroom

Same goes for the theater room, though I do have a single piece of art to go directly ahead.

basement-art-in-theater-room

Tom Selleck, one of Ben’s favorite cowboy actors and the handsome guy he is, will greet our tv watchers.tom-selleck-print

Just as soon as I make a walnut frame, thanks to the odd, custom size.  I’ve also been dreaming of the beautiful art from Linton Art.  I especially love the gigantic, detailed, graphic look of the Locust Tree to fill the large, empty walls of the theater room.

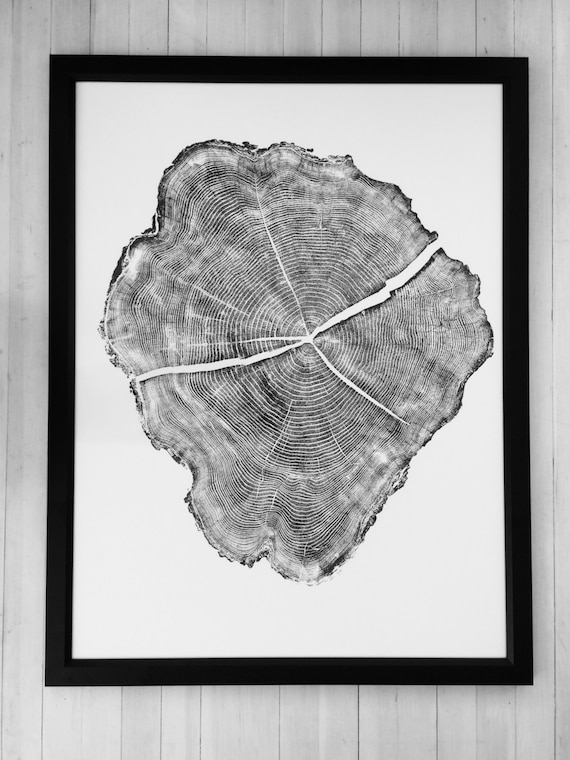
It’d be a simple, yet striking contrast against the deep green walls.  Any artful additions going on in your home?

The Progression of Our Entry

As with many remodels, some rooms take priority and are finished first and quickly.  Others are a slow but steady progression toward an end goal.  Our entry has certainly fallen into the latter category, with small changes taking place over the last four years.  In such a small space, why can’t progress go quicker?  First, let’s look at the space the day we got the keys.New-House-Entry April 13 2012It was as dark as it looks, heavy on the wood tones, red curtains, and stained beige marble floors.  The Tiffany style light was too ornate as were the corbels supporting an arch dividing the entry and living rooms.  Soon after, we pulled off the curtains, tore out the arch, built a slim entry shelf, and put in a new light fixture.West-Elm-Mobile-Light-in-Entry-from-Family-RoomOy, I don’t know if I’d say the space looked better, but it was going places.  The big blank wall with a heavy knock down texture just loomed, all peach and boring.  Knowing we’d need a giant piece of art to cover it, we decided to add a painted tongue and groove accent wall.  Not only does it add a good kind of texture, but the simple white is a great backdrop for a pair of vintage Longhorns.Tongue-and-Groove-Entry-Wall-from-Living-RoomJust painting over the peach walls with a warm gray made a huge difference, somewhat updating the orange oak railings.  Still, the old front door and too tall window above weren’t cutting it.Finished-T-and-G-Plank-Entry-Wall-with-ConsoleThen, a big game, ehhh, room changer happened when we swapped the front door.  Replacing the standard door and sidelight combo with an 8 foot tall by 6 foot wide full glass door floods the entry and stairs with natural light.  A shorter, transom style window above is better proportioned.Replace a Front DoorMore recently, while we had access to the underside of the posts from the unfinished basement, we built a sleek stair railing.  Ahh, the transformation was nearly complete.Lingering-To-Do-Entry-TileTwo weekends ago, while discussing what tools Ben could clean up and put away, I mentioned the entry tile could be a quick project to tackle.  He said it wasn’t on his priority list and I carried on with painting the basement bathroom.  That was, until I heard an awful lot of hammering and went to check it out.  Turns out, Ben had started tearing out the old tile.  After I finished painting, I grabbed a hammer and gleefully broke up tile with him.  By carefully scraping, we were able to reuse the Hardie board and were left with this:entry-without-tileLast Saturday, Ben laid new slate tile in a staggered brick pattern and grouted on Sunday.  Baseboards are finally in and waiting caulking, filling, and painting to complete the look.entry-slate-tile-from-top-of-stairs

entry-slate-tile-from-top-of-stairs-2Other than painting the baseboards, I’m ready to call the entry complete.entry-slate-tile-toward-plank-wallWith or without the Halloween decorations.  The bats have made another appearance, along with a barbed wire ‘wreath’ wrapped with twinkle lights.entry-halloween-2016That concludes the entry transformation, at least I think it does.  You know, until I change my mind and want to add something.

Basement Bathroom: Almost Finished

The last basement puzzle piece is nearly finished.  Starting from scratch after demo, we framed new walls and have checked rooms off one by one.  A newly finished theater/hangout room, guest bedroom,  small mud nook, and laundry room are all finished minus some accessorizing.

Only ten months after tearing everything apart, the bathroom is just about finished, too.

basement-bathroom-from-door-2

We built the custom vanity  with a combo of storage options.  Drawers for small items, a cabinet for large/ugly things, an open shelf for toilet paper and/or towels, and a gap at the bottom to keep it from feeling too heavy.

basement-bathroom-vanity-toward-doo

As soon as the paint cures, sconces and a wood mirror will go up.

basement-bathroom-vanity


By far the most involved room, the bathroom has taken many weekends over the last few months to get put together, with the shower taking up the bulk of the time.  Forming the shower pan, coating the walls with red guard, tiling the floor, walls, and ceiling isn’t a quick process and requires a lot of dry time.

It’s all worth it for the finished product.

basement-bathroom-from-door

Caulking the tile seams still has to happen before the shower is usable, but that’s a small step in the scheme of things.

basement-bathroom-shower

A soap nook above the shower control is convenient, but out of sight from the door to keep ugly bottles hidden.

basement-bathroom-shower-front-wall

Tiling the shower ceiling is a new thing for us, but really elevates the look while keeping the moisture inside.  A sleek shower head extends from the ceiling for a modern look.

basement-bathroom-shower-ceiling

Next to the shower, behind the door in the old closet space, we built four shelves to hold any bathroom necessities or accessories.

baement-bathroom-shelves-behind-door

It’s a far cry from the orange and yellow beginnings, that no matter how much scrubbing, never felt clean.

New-House-Basement-Bathroom-April-13-2012


And now I can tackle the fun part of adding art and accessories.

Railroad Spike Coat Rack

Our entry isn’t huge, roughly eight by four and a half feet, but it is very nice to have a separate designated space.  With the door slightly off-center, there’s a sliver of wall with a box shelf to keep keys, sunglasses, and other necessities close by with a stool tucked below.  Across, there’s a half wall, where the living room floor starts.  It’s an awkward little wall, with the stairs going up that turns into a strange polygon.

coat-rack-in-entry-from-top-of-stairs

Though we have an entry closet at the top of the stairs, and our newly added mud nook right inside the garage door at the base of the stairs, those are areas mainly used by our family.

Build in a mini mudroom: https://ourhumbleabodeblog.com/2016/04/01/mud-nook/

I wanted a quick and easy drop spot for our guests to hang coats, purses, and backpacks close to the front door.  After a day visiting Ben’s dad at the ranch, I found some great items to turn into a unique coat rack.  I also came home with an old horseshoe and another turtle shell to hang above the art in the dining room.  Such a treasure trove of goodies!

turtle-shells-in-dining-room

Anyway, back to the coat rack.  To start, I snagged a board of live edge wood along with a bunch of railroad spikes.

coat-rack-from-front-door

After discussing my idea with Ben, he helped me make my idea a reality.  While I thoroughly looked at the board, I settled on the most character filled three feet and cut it to size.  At three feet wide, I wanted to space 5 spikes six inches apart, leaving six inches on either end.  Following the shape of the wood, I marked five dots while Ben used a steel cutting chop saw to cut the spikes to three inches.

coat-rack-materials

I didn’t want any visible attachment, so Ben drilled 3/4 inch holes, then used a rubber mallet to pound the spikes in.

coat-rack-holes

Who says you can’t jam a square peg in a round hole?

coat-rack-making-hammering

The result is seamless, simple, and rustic-just the way I like it.

coat-rack-spike-detail

Hanging was as easy as two screws through the wood, into the floor joist.

coat-rack-in-entry-toward-living-room

Turning that little sliver into usable space should come in very handy this winter season, especially.

coat-rack-in-entry-toward-doors

Style wise, the simplicity blends seamlessly with the adjacent living room.

coat-rack-below-living-room

The best part is that it took about 30 minutes, start to finish to make and hang.  I’m wondering if it’d be too much to make another to use as a towel rack.

Our Kitchen Organization

I’m always curious about houses and love seeing what’s lies behind the front doors of houses I admire.  Walking through open houses and estate sales is my idea of a fun day.  On a creepier side, I even enjoy getting glimpses of the interiors of homes while driving at night.  Come on, you know you do, too.  Don’t confuse that with stalking or walking up and peering in windows.

House-Tour-Four-Years-In-Kitchen-Pantry

Part of the appeal is just seeing what the homes look like.  It’s also interesting to see how people live in the homes, as each person has a different style, set of needs, and way of using the home.

In that vein, I thought I’d show where and how things are stored in our kitchen.  Our pantry holds the bulk of our dry goods.  Baskets on the highest shelf (not shown) hold bulk spices that we use to refill our containers.  The next shelf down has a basket of chips/crackers, nuts, peanut butter, and dried fruit.  Below that is the microwave and canned goods.  Another basket holds oatmeal, snacks, and extra cereal.  The last shelf is dedicated to extra condiments, oils, vinegar, produce, mac and cheese and rice.  At the very bottom are the heaviest items like juices, protein powder, and the bin holds dry pasta.

kitchen-pantry-organization

Rotating just to the right are the double ovens with a drawer below and cabinet above.  The cabinet stores our vertical items like serving platters, cookie sheets, and cutting boards.

kitchen-cabinet-vertical-divider

In the tall drawer below we store large baking dishes, muffin pans, our food processor, and the crock pot is normally in that open spot.

kitchen-drawer-baking-extras

Our glass front upper cabinet stores our most often used dishes, keeping the daily use items closer to the bottom.

kitchen-cabinet-upper

In the drawer stack below the glass cabinet is our junk drawer, as well as our overflow storage.  Glass baking dishes, pie and loaf pans, and coffee supplies aren’t used too often around the house, so they’re handy, but not in the central area.

kitchen-drawer-junk

kitchen-drawer-baking-dishes

kitchen-drawer-baking-pans

The top drawer of the stack nearest the sink holds sponges, towels, foil, and storage bags.

kitchen-drawer-towels

kitchen-drawer-kids

Kids dishes and food storage containers are in the middle drawer, with extra foil, bags, straws, water bottles, and lunch containers below.

kitchen-drawer-bags

Typically, we do our prep work on the left side of the island, near the cooktop.  To keep everything as close to the work area, the knives and utensils are directly below.

kitchen-drawer-utensils

Pans and a salad spinner tuck away in the middle drawer while larger pots and lids live below.

kitchen-drawer-pans

kitchen-drawer-pots

Directly below the left side of the cooktop, and just to the right of the work surface, is our trash drawer with a recycle bin and extra bags.

kitchen-drawer-trash

Lunch supplies and snacks are within arms reach of our lunch making spot.

kitchen-drawer-lunches

Under that are the small appliances we use on a regular basis, including the toaster, waffle maker, and blender.

kitchen-drawer-small-appliances

Baking usually happens on the right side of the island, near the pantry and ovens.  Again, to keep things handy, the top right drawer stocks our spice jars, labeled on the top for easy finding, but are easily refilled when low.  A few baking specific utensils are also in here along with oven mitts and a small recipe binder.

kitchen-drawer-spices

The middle drawer has mixing and serving bowls, a few cookbooks, and hand mixers.

kitchen-drawer-baking-bowls

Storing the baking staples in the bottom drawer has been so handy.  The red lid containers hold white and wheat flour, sugar, brown sugar, and chocolate chips.  A few round containers have powdered sugar, cocoa powder, and baking soda.  Containers with flip lids keep cereals fresh, but handy for the boys to pull out.

kitchen-drawer-baking-supplies

Across the kitchen, near the breakfast nook and dining room is this built-in hutch.

House-Tour-Four-Years-In-Bar-Cabinet

It’s stocked with liquor, drinking glasses, and extra serving pieces.

Lingering-To-Do-Hutch-Top-Trim

The left drawer keeps the boys’ art supplies close at hand, but not in the main area.

kitchen-drawer-kids-art-supplies

The other drawer is stocked with napkins, candles, bottle openers, and other randomly used items.

kitchen-drawer-napkins

If you’re a nosy house lover, I hope this post satisfies that curiosity.