2013 Favs

Hey, everyone!  Happy New Year!  Our 2014 is off to a rough start with sick kiddos, but we’re so excited for a fresh start.  While Ben and I both love projects, sometimes it’s tough.  Roadblocks hit, things take longer than anticipated, or just an itch to get started on a new project.  It can feel like treading water.  Plenty to keep busy, but you’re not getting anywhere.  A look back on what has been accomplished or finished is an easy way to feel better.  What better time to reminisce than a new year?  So, here are some of my favorite projects from 2013.

In January we: Built wood storage and shelving, organized the main bathroom, crafted tree slice art, and art for our freshly finished fireplace.

Art On Mantel Overall

February included: A little demo, followed up with freshly painted walls (man is that a good feeling!), a thrifted dresser makeover and reveal, hey-o, a finished bathroom, then, of course, a toilet set back.

Mini-Dresser-Front-After

March was our guest room revamp month: Starting with cutting out the existing bookshelves, then styled shelves and a blue headboarda DIY pendant with wrapped cord, finished off with warm yellow walls.  Hey, we finished a room in a month.  That has to be a record for us.

Guest-Bedroom-Painted-Safari-Overall

April we had less focus:  The beginnings of a waterfall and landscape filled summerembroidered constellation artmodern rectangle quilt, and yet another thrifted dresser makeover.

Waterfall-Stream-and-Filling-Pond

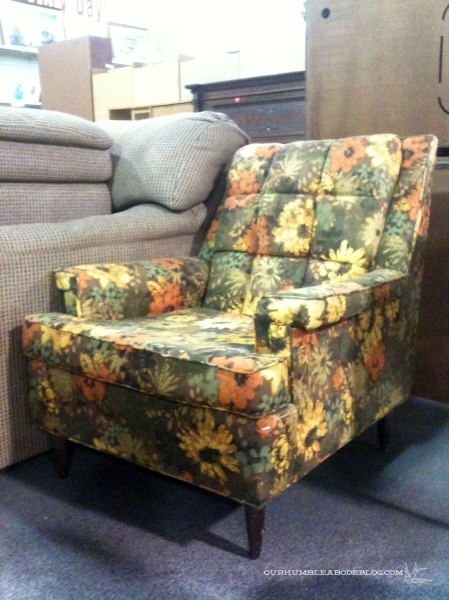
May was furniture filled:  I crafted some cute hooks, foundrefinished, upholstered, and revealed $5 thrifted chairs, made and installed a PVC pendant.

MCM Chairs by Fireplace from Breakfast Nook

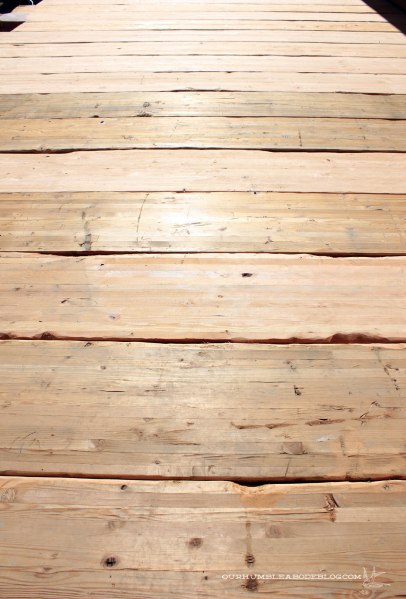
June was a little slower: Our biggest, most time-consuming project was building a reclaimed beam deck.  Between decking, I scraped off a popcorn ceiling and patched it, made a quick, rough (read, not museum quality…ever) large painting, cheaply and easily built canvas frames, and put a walnut to the test.

Back-Deck-Character

July was filled with landscape work and a fresh boys room: Ben finished the deck, built a bocce ball courtcustom beds while I made text bubble pillow cases, and painted Green Eggs and Ham art.

Boys-Bedroom-Makeover-Overall

August, another month of outdoor work: stained the deckbuilding beam stairs, turn a book into a game boardhow to cut a round top for our thrifted table basenail and string plus art, and surprise, another thrifted chair!

Gold-Nail-String-Plus-Side-Detail

We wrapped up outdoor work and did small crafts in September: Finally painted over the crazy blue in our bedroom, cringed while our landscaping washed away (lesson learned.  If I declare a project finished, something will happen to prove me wrong), created a wheeled stump side tableinitial bottle labelswood wrapped planterknock off clay wishbone, jewel toned fall scheme.

Bar-Bottles-with-Inital-Labels-Three

In October we: herringboned (now a verb) a table top, DIY’d an outdoor gas fire pitfixed the damaged back yardplotted our bathroom remodel, updated our coffee table top with V stripesunder $5 lyric art.

Chevron-Table-Top-in-Family-Room

November was busy with family, but fewer projects: demoed the master bathroom, brought our MCM bench inside and gave it an update, sewed more pillows (shocker!) got crafty with paper mâchébuilt an entry console shelf, set a colorful Thanksgiving table with a painted plus table runner.

MCM-Sofa-in-Living-Room-to-Dining

December had a lot of bathroom work and Christmas crafts: bought a real dining tableeasiest way to sew in a zipper, got in the Christmas spirit with a colorful scheme and felt garlandtiled the heck outta the bathroomplanked the ceiling and wallsdebated colors then painted the bathroom walls dark.  What a way to end the year.

Marble-Herringbone-Shower

Whew, makes me happy and exhausted going through it all again.  Now I’m even more excited to wrap up the bathroom and get started on another project.  What project have you tackled this year that makes you giddy?  Or makes you happy you’re done?

Console-ation Prize

Our entry is rocking a new look and organization (potential).  Just in time for winter.

Entry-Console-Shelf-Overall

Though it’s very, very far from done.  Our split level entry is cramped, so slim storage is key.  The little accent table wasn’t offering much in that department.

Entry-One-Year-Later

After seeing a stack of old siding in the pool house, I knew what I wanted.

Entry-Console-Shelf-Wood-Before

Using coarse sandpaper, I took off the super rough texture and most of the blue paint.  I asked Ben to cut the tongue and groove off the old boards.  He did, then built a 36 inch wide by 6 1/2 inch deep by 7 1/2 inch tall rectangle.

Entry-Console-Shelf-Built

Wanting the imperfections, I left the nail and old staple holes, and blue paint in the knots.  Using my new friend, Teak Oil, I coated the shelf and let it cure.

Entry-Console-Shelf-with-Teak-Oil

It darkened the cedar a little, adding warmth and bringing out the character.  And these knots, I’m smitten.

Entry-Console-Shelf-Blue-Knot-Detail

Entry-Console-Shelf-Knot-Detail

We used screws directly in studs to hold this bad boy up.  Now for the fun part, accessorizing.

Entry-Console-Shelf

Because this shelf is only 6.5 inches deep, I bought a small desk lamp at Target.  Right now, it’s purely decorative, as there are no outlets in the entry.  Hopefully soon.  The cute hexagon paper mâchê tray is too deep.  Looks like I’ll have to make another.

Entry-Console-Shelf-From-Living-Room

A light, but sturdy ottoman (Target clearance!) is the perfect perch for putting on or taking off shoes.

Entry-Console-Shelf-From-Top-Stairs

I’m working on a mitten drying system to sit on top of the shelf.  The ottoman would look nice with a fun fabric.  And we’ll need hooks for coats and purses.  I really wish I wasn’t afraid to stand on a ladder over stairs because the peach paint and textured wall drives me friggin’ bonkers!  I’ve planted a cover up idea seed with Ben, so we’ll see if it grows or dies.

Spruce & Giveaway

If you thrift shop, garage sale, or antique shop, I’m guessing you’ve run into the same situation I have.  You see a piece of furniture with great lines, but terrible, horrible, no good, very bad upholstery.  You love it, but it’s complex upholstery isn’t an undertaking you’re comfortable with.  This exact situation happened to me just a few weeks ago.  A disgusting chair with great bones.  Atrocious fabric riddled with cat hair, but neat shape.

Five-Dollar-Upholstered-Chair

Even though the chair was only five bucks, I didn’t get it.  Why?  Fear.  I’ve never upholstered something this intricate before.  And I worried I’d screw it up.  So I walked away.  But the very same afternoon, I got the perfect book in the mail; Spruce, a Step By Step Guide to Upholstery and Design by Amanda Brown.

SpruceCover

Amanda is an expert upholsterer, with her own shop, Spruce in Austin.  She even writes an upholstery basics column on Design Sponge.  Basically, if you want to learn upholstery, Amanda’s your gal.  This is exactly what I needed!  In Spruce, Amanda covers everything, soup to nuts.  Or should I say, springs to piping.  Seriously, this book is a one stop reference for all things furniture.  If you need to tie springs, no problem.

Spruce-Tying-Springs

Upholster a wingback chair, step by step with picture and text explanations?  You bet!

Spruce-Wingback-Chair

Or create a custom tufted ottoman.  Whatever your needs, this book has you covered.

Spruce-Tufted-Ottoman

I stopped in the thrift store the following day, armed with a new book and confidence, but the chair was gone.  Womp, womp.  I guess I’ll have to do something to this eight dollar number I found a month or so ago.

Thrift-Chair-to-Upholster

While not entirely hideous or in bad shape, the shabby paint job must go.  I’m debating colors.  I could paint it black for drama and a fun fabric.  Or a bright color paired with a neutral fabric.

Thrift-Chair-Upholstery-Set-Detail

Thrift-Chair-Upholstery-Side-Detail

Upholstering around the arms should be fun.  Probably not as terrible as I’m imagining.

Thirft-Chair-Upholstery-Details

Watch the book trailer to learn more about Amanda and Spruce.  Love that she’d rather update an old piece of furniture than buy new.  Then check out the Spruce Ugliest Chair Contest.  You can add your chair for a chance to win prizes, design recommendations from Amanda, and a signed Spruce book.  And a few social media links, too:  Facebook: Storey PublishingSpruce Upholstery, #SpruceBook  Twitter: @StoreyPub@SpruceHome#SpruceBook

Blog Tour:

Monday, 11/4 Bromeliad
Tuesday, 11/5 How About Orange
Thursday, 11/7 Inside Storey
Tuesday, 11/12 Making It Lovely
Wednesday, 11/13 Our Style Stories
Now, how about a giveaway?  One lucky US reader will get their own Spruce book.  Just leave a comment on this post to enter.

MCM Bench, Version 2.0

If you’ve followed along for a few years, you may remember the free MCM couch I found.  Before I rescued it, it was in the elements, used as a smoking bench.  And in very rough, stinky shape.  Think hazmat suit to touch the cushions gross.

Free Outdoor Couch End

So I pitched the cushions, upholstered a long, single seat and refinished the wood.

Outdoor Bench After

When we moved it was still in great shape.  Because we have a covered deck area, I put the bench out there.  Despite being covered, the elements took a toll on the poor guy.  Sun beaten and driving rain doesn’t do a body, um couch, good.  Time to refinish it.  Again.  I lightly sanded it all down and gave it another coat of Minwax Dark Walnut.  In lieu of a polyurethane finish, I used Watco’s Teak Oil.  

Watco-Teak-Oil-for-MCM-Sofa

We used it on the wood kitchen counters at the last house and loved it.  Minimal sanding required and it can be applied as needed.  After two coats, the wood has a soft, low sheen.

MCM-Sofa-in-Living-Room-Arm-Detail

When I decided to refinish this sofa, I knew he wouldn’t be going back outside.  No siree.  Our living room furniture needs serious help (as in replacement) and this is one small step in the right direction.

MCM-Sofa-in-Living-Room-Overall

Sleek lines, dark wood, and navy upholstery.  I’m channeling Emily Henderson, folks.

MCM-Sofa-in-Living-Room-to-Dining

I’m undecided how I feel about the upholstered seat versus a removable, flippable cushion long-term.  This was much easier.  If I want to make a cushion, I’d have to add cross supports then plywood for the foam to rest on.  And then buy new foam and sew a cushion.

MCM-Sofa-in-Living-Room-Angle

Maybe I’ll get the urge to try it.  What do you think?  It’s actually really comfortable with a pillow as the back and keeps it looking light.

MCM-Sofa-in-Living-Room-Detail

Unlike out hulking sectional.  Getting a new sofa would make such a big difference in here.

MCM-Sofa-in-Living-Room-Back

Sadly, this room hasn’t gotten much attention in the time we’ve lived here.  The entertainment center is new and we took out the small arch above the railing.  As you can see, that hasn’t been finished.  Drywall dust is a serious mess and I don’t have the patience to deal with it yet.  Once I make one change to a room, I want to rework the rest of the space.  Like maybe painting the railing and new color on the walls.  Eventually we’ll replace the windows (these two front ones don’t match the rest of the house) and we want to build a window seat below with bookshelves on either side.  And that chair needs some lovin’.  Maybe a fun paint color for the frame and a neutral fabric?  Suggestions?

V Stripes

This project started because I had a free sample of Valspar paint, thanks to an in-magazine coupon.  Of course Pantone’s paint colors are beautiful.  So i picked a random favorite, June Bug, and brought it home.  I painted over my red stump.  And made another for a friend.  Then I saw the Dwell Studio Chevron coffee table and knew how I’d finish up this color.  I flipped the coffee table top over and painted it white.  Measuring wasn’t my favorite part, especially because I didn’t want to draw lines all over my table.  Instead, I drew lines on small pieces of tape and worked from there.

Chevron-Table-Detail-Tape

With my three-inch stripes marked off, I filled in with masking tape and rolled on June Bug.

Chevron-Table-Detail-First-Teal-Coat

Three coats later (why I try to buy paint and primer in one) I peeled off the tape to reveal this:

Chevron-Table-Detail

Perfectly crisp lines (thanks Frog Tape!) and a fun pattern.

Chevron-Table-Top-Detail

And I can still flip the top for the plain mint top.  Best of both worlds.

Chevron-Table-Top-in-Family-Room

For now, I’m liking the bold design and deep color.  Something to wake up the family room.

Chevron-Table-Top-in-Family-Room-Toward-Fire

Chevron-Table-Top-in-Family-Room-Detail

What do you think of the large pattern?  Do you start projects because you get something free?  Or just have to paint and repaint for a quick, new look?